So you want to start a business, move to paradise and get paid to change the world?
Don’t worry – this isn’t one of those hyped-up pitches claiming you can make $30k a month in a few short months with little to no work involved.
Starting a website is the first step for most people when getting started online.
Perhaps you’re looking to build your affiliate marketing empire, start a freelancing business or launch your very own private-label brand of e-commerce products.
Whatever the motive, you need a website to bring your creation to life – and this post will walk you through, step-by-step, how to get started from scratch.
Why start a blog or a website?
This goes without saying, a website is the backbone for most businesses all over the world.
We live in a time where our cars, fridges, and TV’s are connected to the internet. The digital revolution is in full swing and a website is a powerful tool that anyone can use to connect with thousands, if not millions of people globally.
The internet is also a tool of influence.
Your core business could have nothing to do with blogging but your website can be used as a space to add testimonials, showcase your services and build your personal brand.
The best part?
Your website can be used to help people in some way and generate passive income at the same time — a win win.
Business models like Affiliate Marketing allow you to monetise your site around a subject of interest. And that’s exactly what I’ll be focusing on in this step-by-step guide.
Here’s what you can expect in the post:
Related Content: How to Become Successful at Making Money Through Your Blog
Seven Steps to an Amazing Blog
Learning how to start a blog isn’t hard.
By the end of this post, you’ll have all the tools and information you need to build a website as beautiful as this one
The setup process itself only takes a few minutes if you rush through it – but realistically speaking, getting yourself set up properly will take a good few hours of your time.
This won’t be the fastest guide to starting a website from scratch, but it’s one of the most detailed ones you’ll find on the internet.
Let’s go!
1: Defining your vision
Before we dive deep into the technical steps to building your website, it’s important to identify what you want out of it.
What purpose is your website going to serve for you or your business?
And if you’re looking to monetise your future traffic, which business model will you be using?
You could become an affiliate through one of many affiliate marketing programs, offer consulting/coaching services or even start an e-commerce business.
Perhaps you’re a budding entrepreneur working on an MVP for your startup and need a website to showcase your idea to investors.
When it comes to the internet, the opportunities are endless. This is a problem because the abundance of choices make it hard to choose.
Why?
Because you feel like you’ll miss out on all the other good stuff by focusing on one thing. But this is precisely what you need to do to succeed.
Forget about FOMO.
The grass always seems greener on the other side until you get there.
The internet makes it especially hard because you hear about all these success stories from people doing all sorts.
That’s why defining your vision is so important. Once you have a vision and you combine it with a deadline, drive, consistency and milestones broken down into actionable daily steps — you’ll be shocked at what you can do.
“One of your great responsibilities in life is to decide for yourself what you really love to do and then throw your whole heart into doing that thing extremely well” — Brian Tracy
“Nothing can add more power to your life than concentrating all of your energies on a limited set of targets” — Nido Qubein
2: Honing in on your niche
Honing in on your is where you decide on your area of focus when it comes to your site. In the context of building a blog that can be monetised through affiliate marketing, you need to find your hungry market and follow the money.
I can’t stress the importance of this point enough.
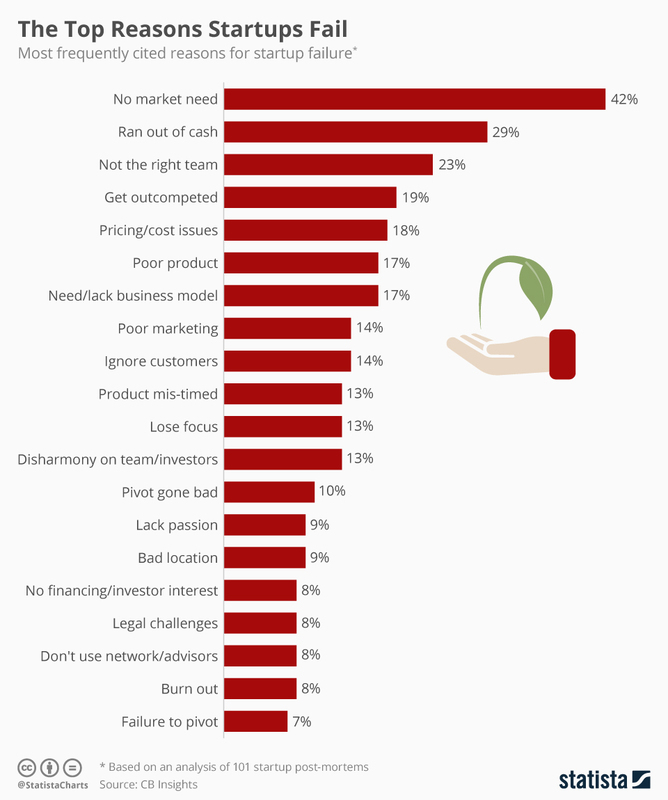
Do you know the number one reason new startups fail?
It’s called the business idea delusion. People assume they must come up with a revolutionary idea that’s never been done before.
But there’s one fatal problem with this form of thinking:
It’s all about you.
Which means you’re building a business around a concept you’ve created without testing if the market actually cares.
This is why a majority of startups that fail, cite no market need as their reason for going under.
Sure, there are always exceptions that innovate and change the status quo — the Facebooks, AirBNB’s and UBER’s of the world.
But the majority of businesses that exist today are built on models that are proven to work. The same goes for success in the affiliate marketing world.
Discovering your market need
The successful businesses of today study the market like a fanatical scientist.
They figure out the most painful problems within a specific niche, industry, vertical. They take the time to understand the problems better than the market does by asking questions and treating their business as a never-ending series of scientific experiments.
Finally, they deliver a superior product to the market and sell it with ease.
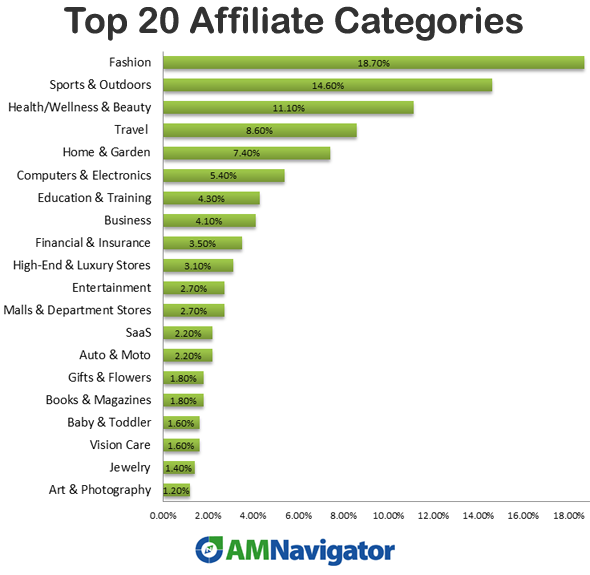
In the case of affiliate marketing, AM Navigator took a sample of over 500 affiliate programs from networks like CJ Affiliate, AWIN and Shareasale to work out top-performing affiliate programs based on earnings per click, conversion rate and payout volume.
They extracted the results and mapped the top affiliate programs into 20 broad categories:
Fashion, Sports & Outdoors and Health & Beauty make up 44.4% of top-performing affiliate programs.
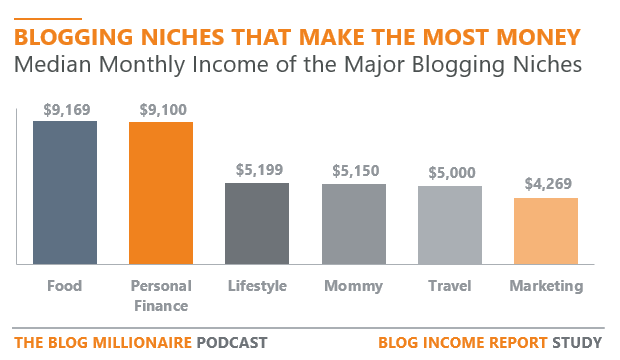
However — It’s worth noting that the above chart doesn’t take other forms of monetisation into account. If we’re looking at making money from blogging as a whole, the results look quite different:
The above chart was pulled from an awesome blog income report study by a guy called Brandon Gaille. The report shows that Food and Personal Finance are miles ahead of everyone else when it comes to median monthly blogger income.
Keyword research with commercial intent
The foundation of figuring out painful problems you can solve is to perform commercial keyword research. This is where you make use of web traffic tools to identify search terms with buyer intent.
You can then create a base of content around problems you know people are willing to pay to solve.
For example:
I use a tool called ahrefs to identify groups of search terms I can target for future content.
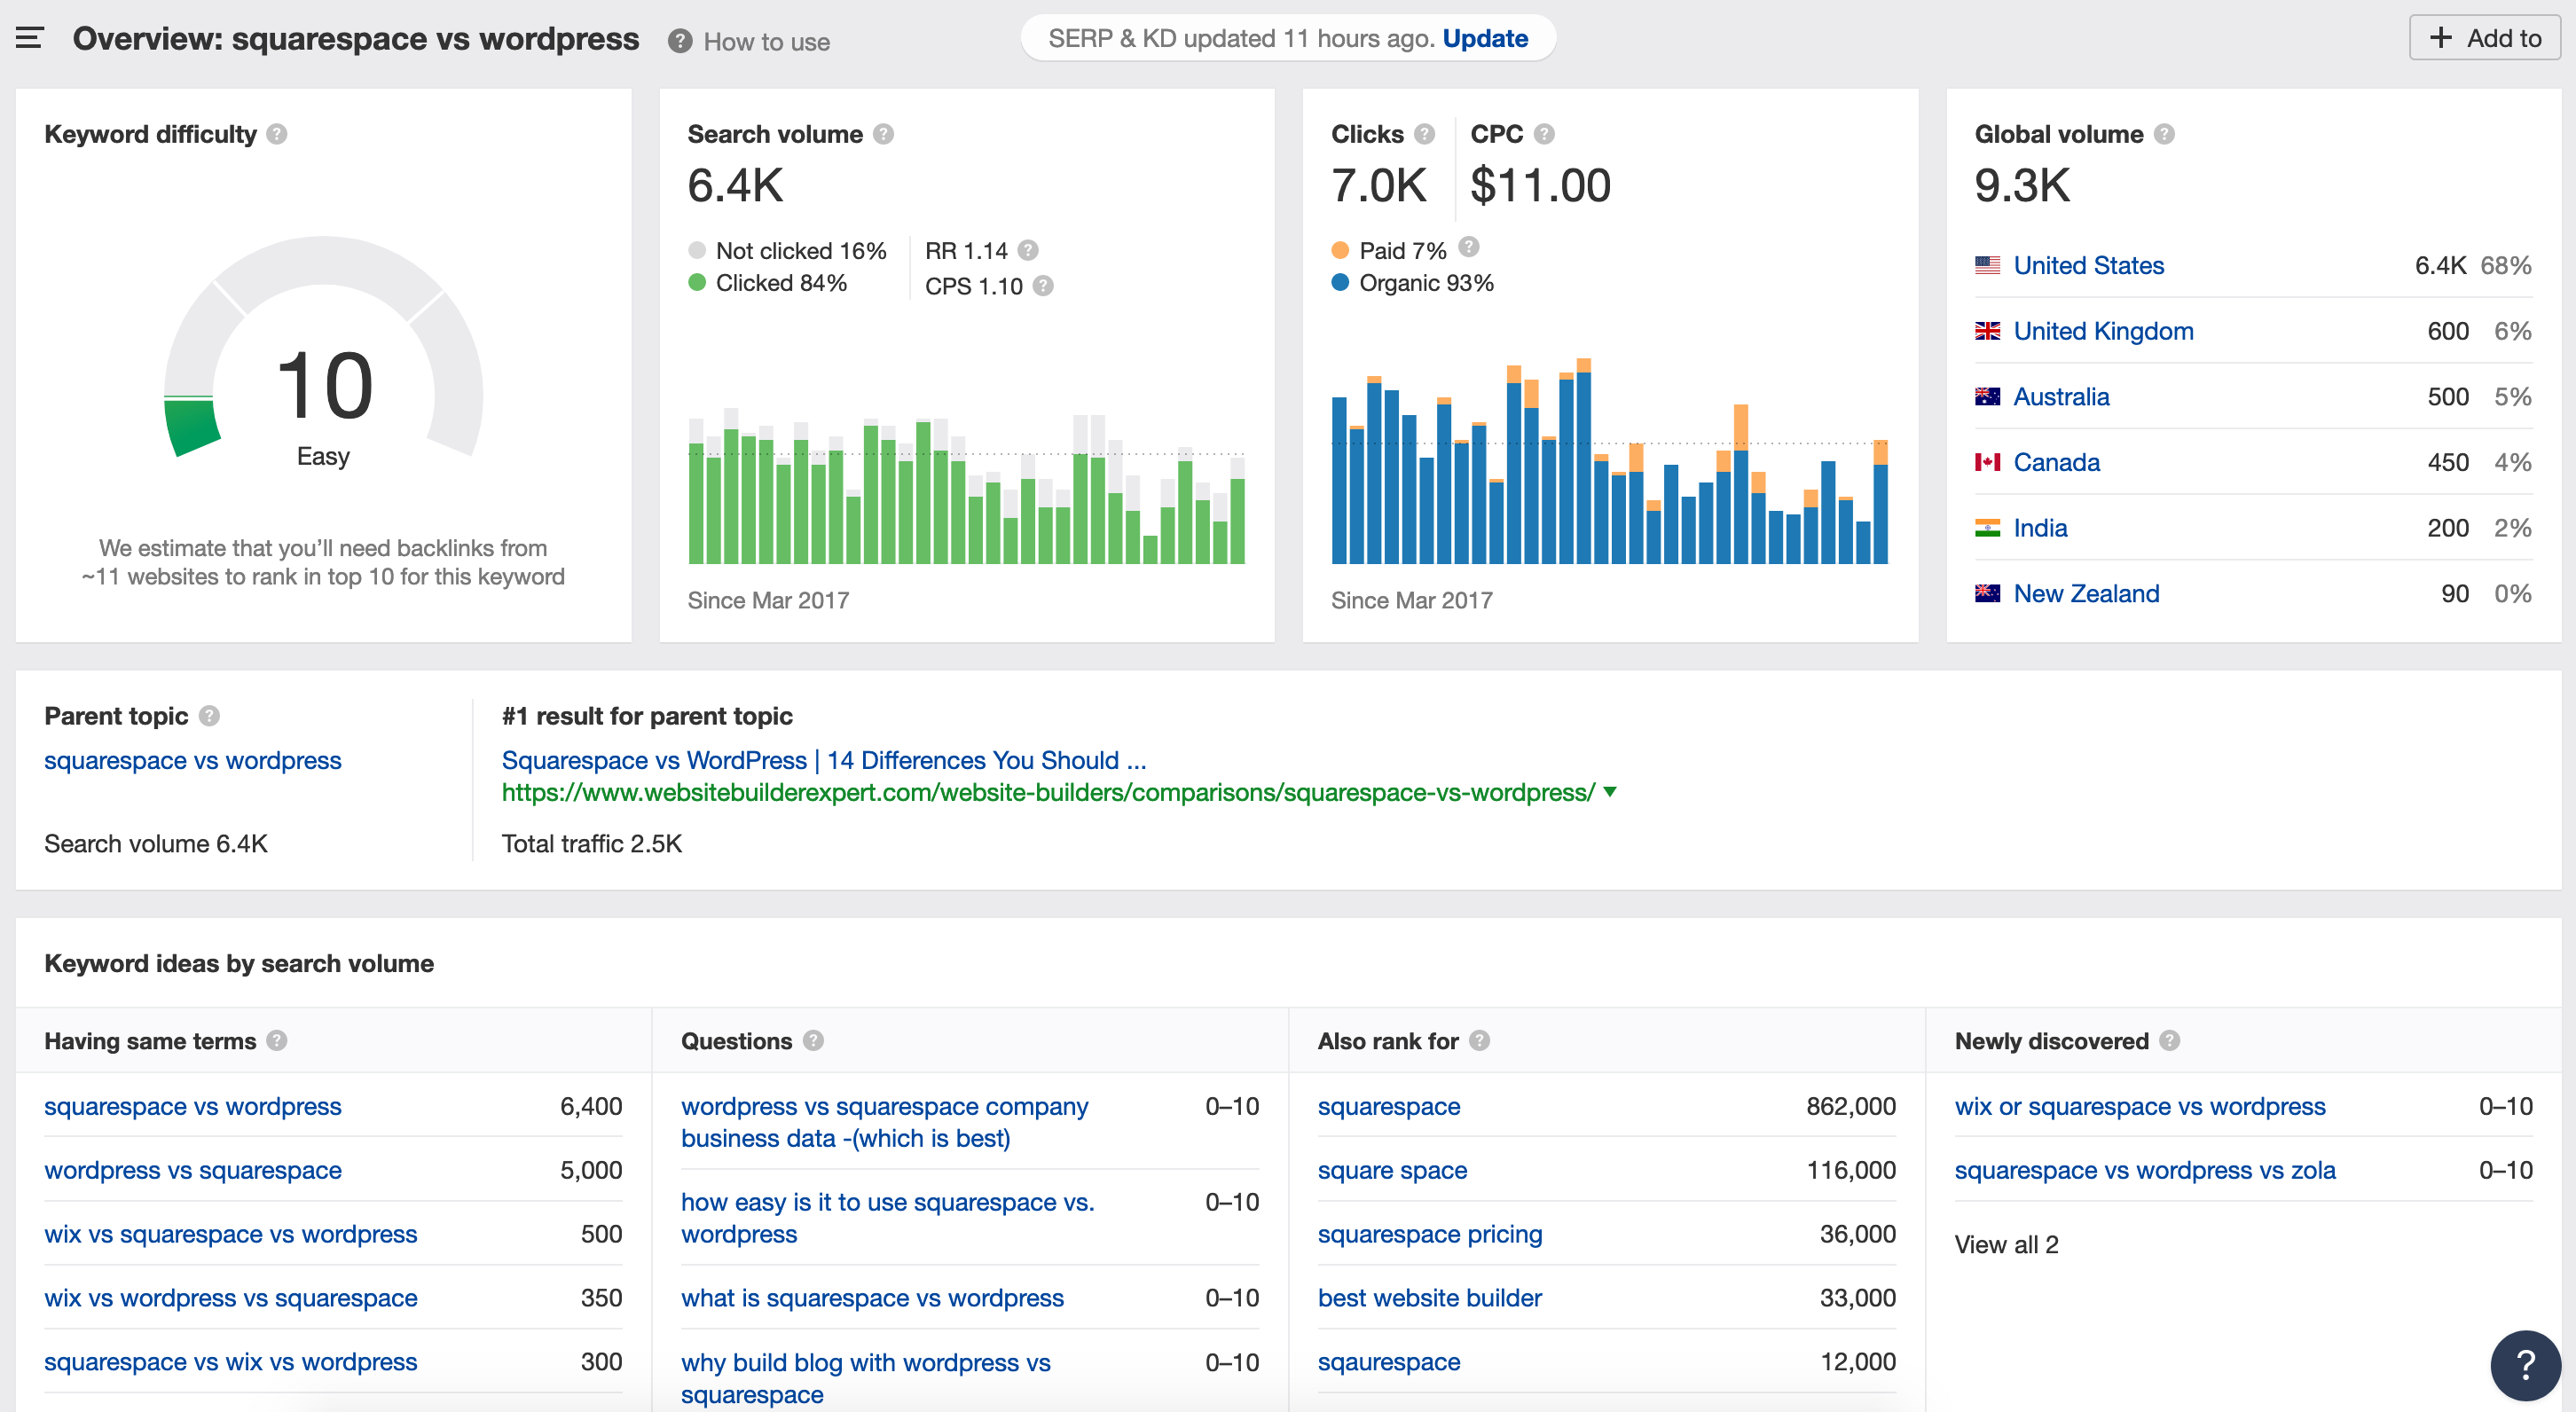
One search term I’m targeting at the moment with a relevant post is “Squarespace vs wordpress”. These are two popular website builders on the market right now.
Here’s the keyword research results page for this term on ahrefs:
Breaking down the key metrics:
- Search volume — shows how many people are searching the exact given term on Google, at 6.4k US searches per month, this would be classified as medium volume.
- Clicks — overall number of clicks on search engine results page for given keyword and percentage of clicks on paid ads vs organic listings. 7K clicks for this keyword and 93% on organic results are great metrics in relation to the search volume.
- Keyword difficulty — estimates how many links from other sites you will need to rank for any given keyword. A KD of 10 indicates this term has low competition.
- CPC — stands for Cost Per Click and measures the average figure advertisers pay for a click on their result for a given search term. $11 in the above example confirms this is a term with high buyer intent.
When you’re starting out with your site, you’ll want to focus on ranking for keywords with medium to low competition. These keywords are easier to compete for with a new site and help you build enough authority to start targeting high competition keywords.
3: Decide on your blogging platform
What is a blogging platform?
It’s the content management system of your website. It’s like the operating system that your website runs on. Think Microsoft Windows or Mac OSX for personal computers, except for your site!
In a nutshell — a content management system (or CMS, for short) helps you build a website without the need to code it from scratch yourself. It makes it easy for us mere mortals to build gorgeous webpages without the need to hire an expensive software developer.
In terms of the way your site is set up, there are two main configurations available — “hosted” and “self-hosted”.
“Hosted” blogs
Hosted websites are owned and operated by the parent site they are hosted on. Some examples of these platforms are Blogger, Tumblr and WordPress.com (not to be confused with WordPress.org)
Typically you can detect a hosted website through the domain name. These sites usually include the host platform in the domain name.
For example:
- bengu.blogspot.com
- cookingfun.tumblr.com
- monstertruckwheels.wordpress.com
Starting a website on these platforms is simple and straight-forward but the drawbacks make this option a non-starter for most people.
Here’s why:
You also don’t have much choice when it comes to design. Most hosted platforms lock down their custom design features so you’ll be stuck with the basics.
“Self-hosted” blogs
A “self-hosted” blog is something that you host yourself through a domain name you’ve purchased.
It’s the way to go for serious bloggers and aspiring business owners alike.
These blogs offer all the flexibility and customization you need to create a stunning website, monetise your traffic and build an awesome brand.
With “self-hosted” blogs, you have a number of options available to you…
Self-hosted website platforms
Three self-hosted website platforms make up the majority on the internet…
WordPress, Drupal and Joomla!
WordPress now powers over 26% of all websites on the internet with Drupal and Joomla powering around 5%.
A recent study found that for websites in the top 1 million of the world, WordPress powers five times more business websites, compared to news sites.
Some big brand WordPress sites include:
Why is WordPress so popular?
WordPress is winning in the content management space because they cleverly combine power with simplicity.
It’s not only flexible, free, easy to use, modern, and fully customizable but also reliable and secure with huge support from a global community.
WordPress has massive functionality and support with over 29,000 plugins and counting. These plugins help you tweak and add new features to your site without (usually) having to mess around with any code.
4: Pick your domain name
Your domain name is an essential part of your brand. It’s important to come up with something that you’ll use for the long-term as you can’t change your domain name once you buy it.
Furthermore, you’ll be working on growing your search engine presence to rank your articles on Google (unless you’re focusing on a different traffic source like Pinterest).
Once you start working on your SEO, all the trust, authority and ranking power will be directly tied to your domain name, so you won’t want to change it.
It is possible to redirect your domain to another site, but it’s better if you can avoid doing this in the first place.
This means you must put some serious thought into the name of your website.
Some tips for picking a great name:
- Avoid something too niche-specific (like dogtreats.com) because you may need to pivot on your niche. Keep it broad. Get specific in your content.
- Your name should be easy to remember and easy to type (try and avoid using numbers and symbols).
- Try not to use country-specific TLD’s (Top Level Domains) like .co.uk or .us — these can affect your global search ranking ability.
Custom TLD’s
A “TLD” stands for “Top Level Domain” – it refers to the extension of a domain name such as “co.uk” “.com” or “.org”.
New top-level domains released a few years ago enable better domain and brand descriptions. Some real-life examples of descriptive domains extensions include:
These custom TLD’s are typically cheaper than traditional “.com” domains and can be a great way to highlight what your site is all about.
With that said, please proceed with caution because having a custom TLD can limit your ability to pivot in the same way that having a super-specific domain name would.
A safe bet?
You can’t go wrong with a .com domain.
Blog name generators
If you’re struggling for good names, blog name generators can help you come up with something fun, quirky and interesting.
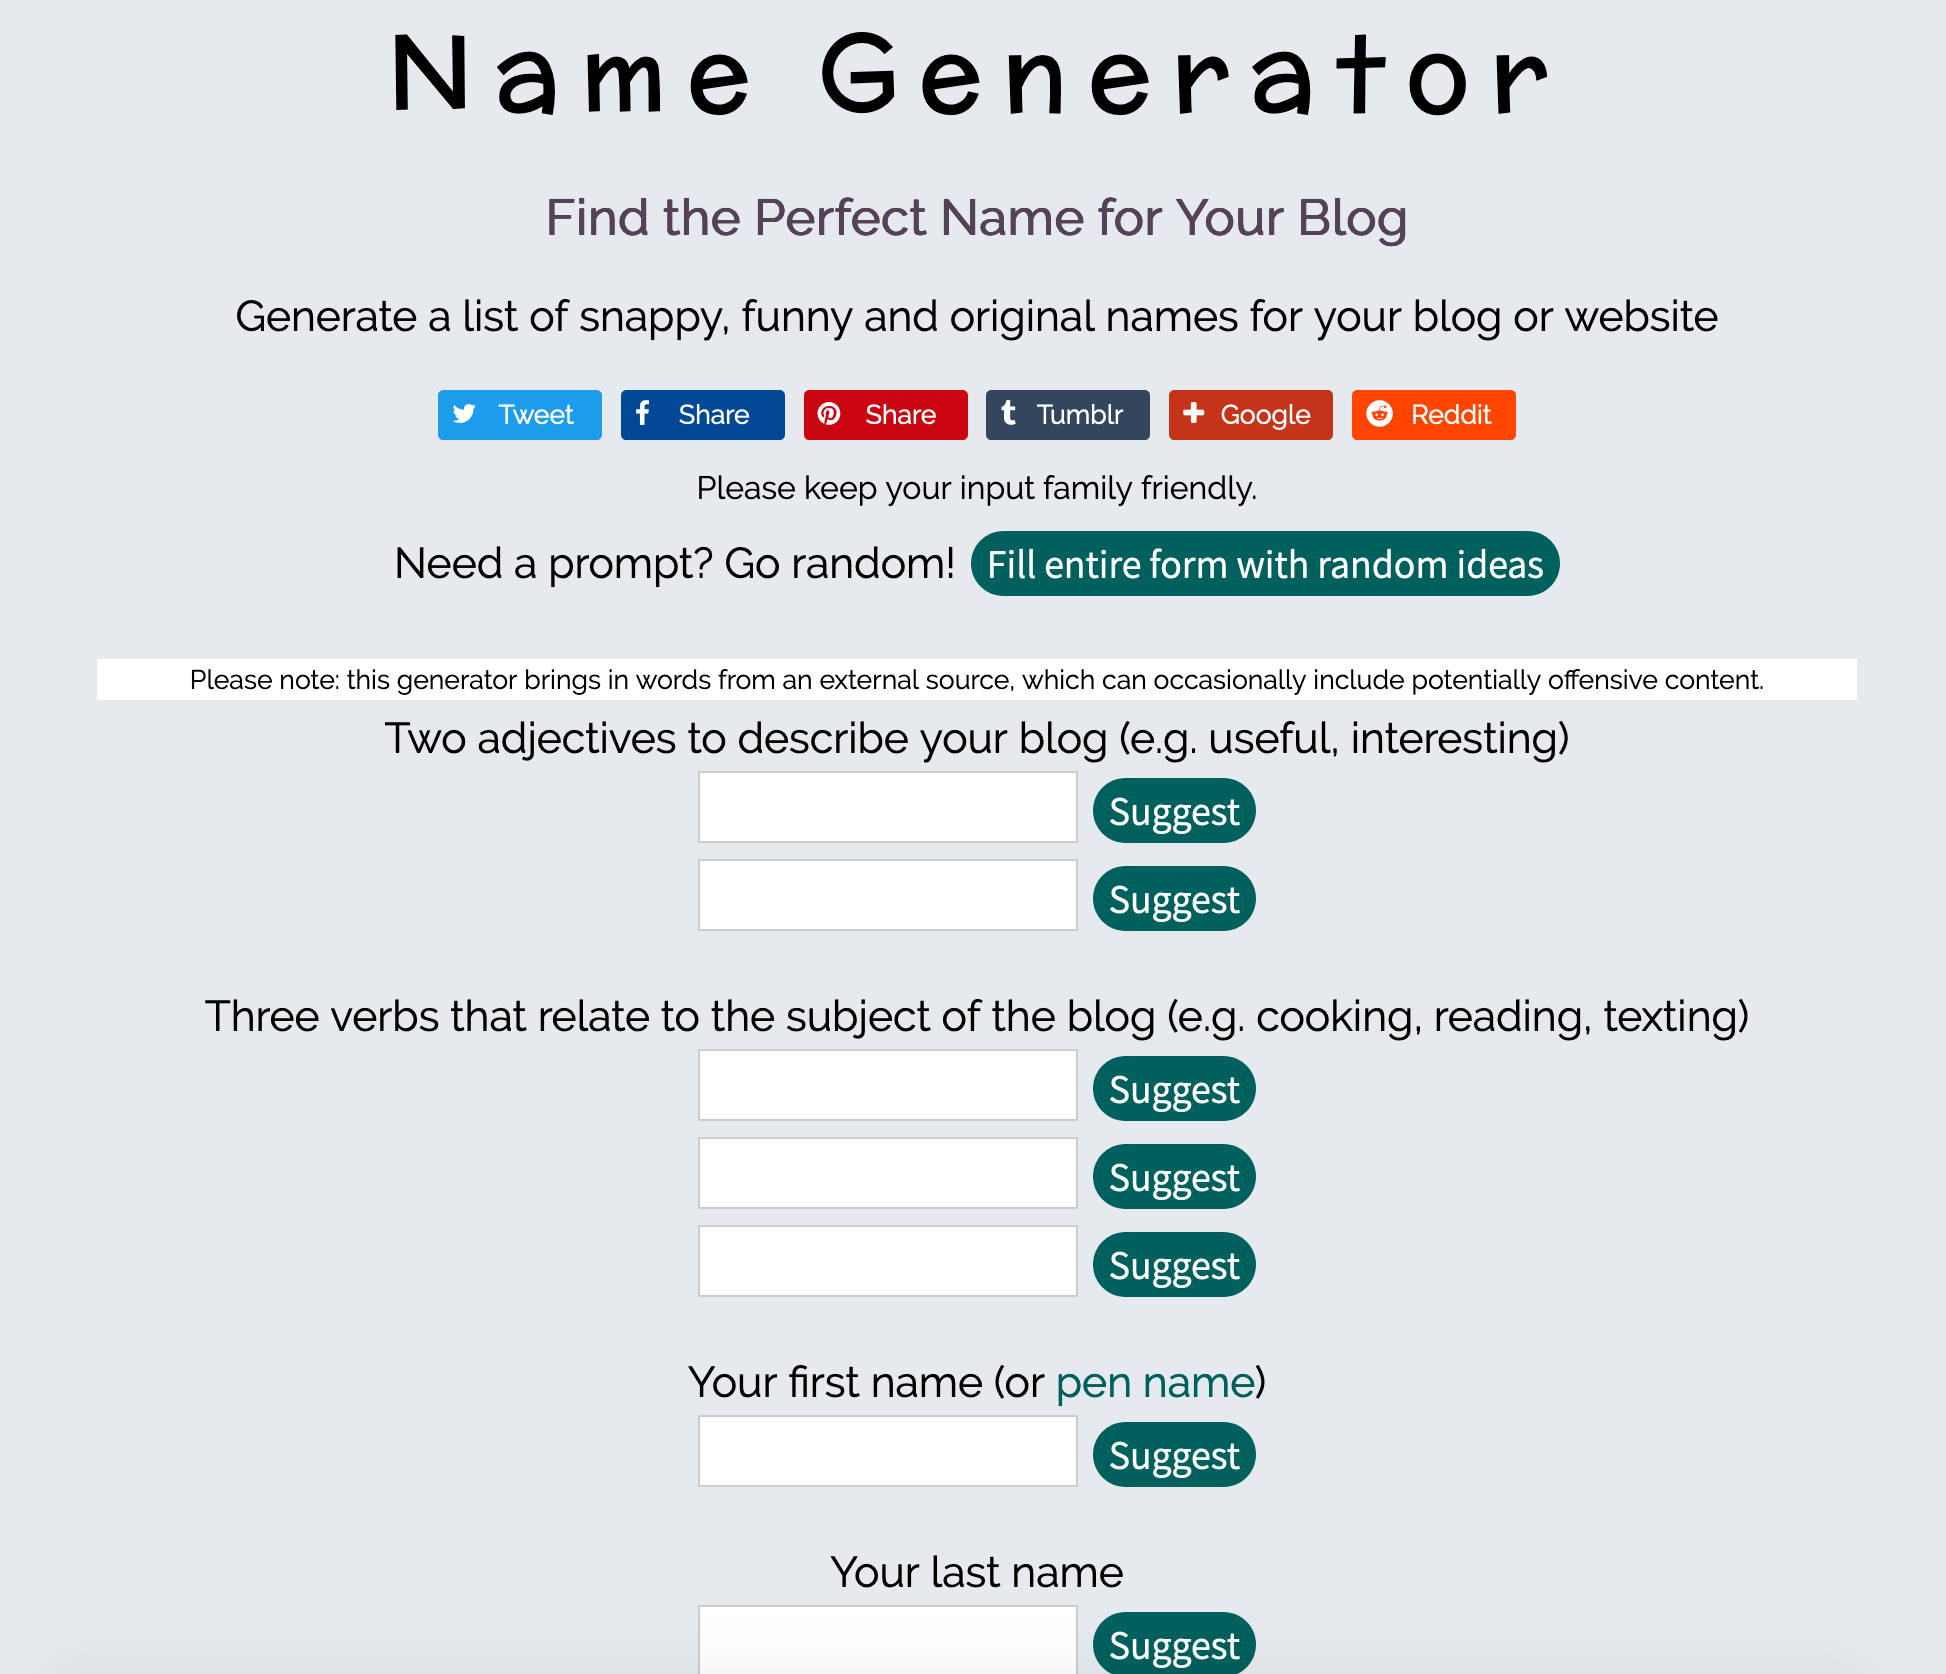
Name-generator.org is a free service that can help you find an amazing domain name.
You simply browse to the site and fill in some adjectives and verbs that relate to your chosen niche:
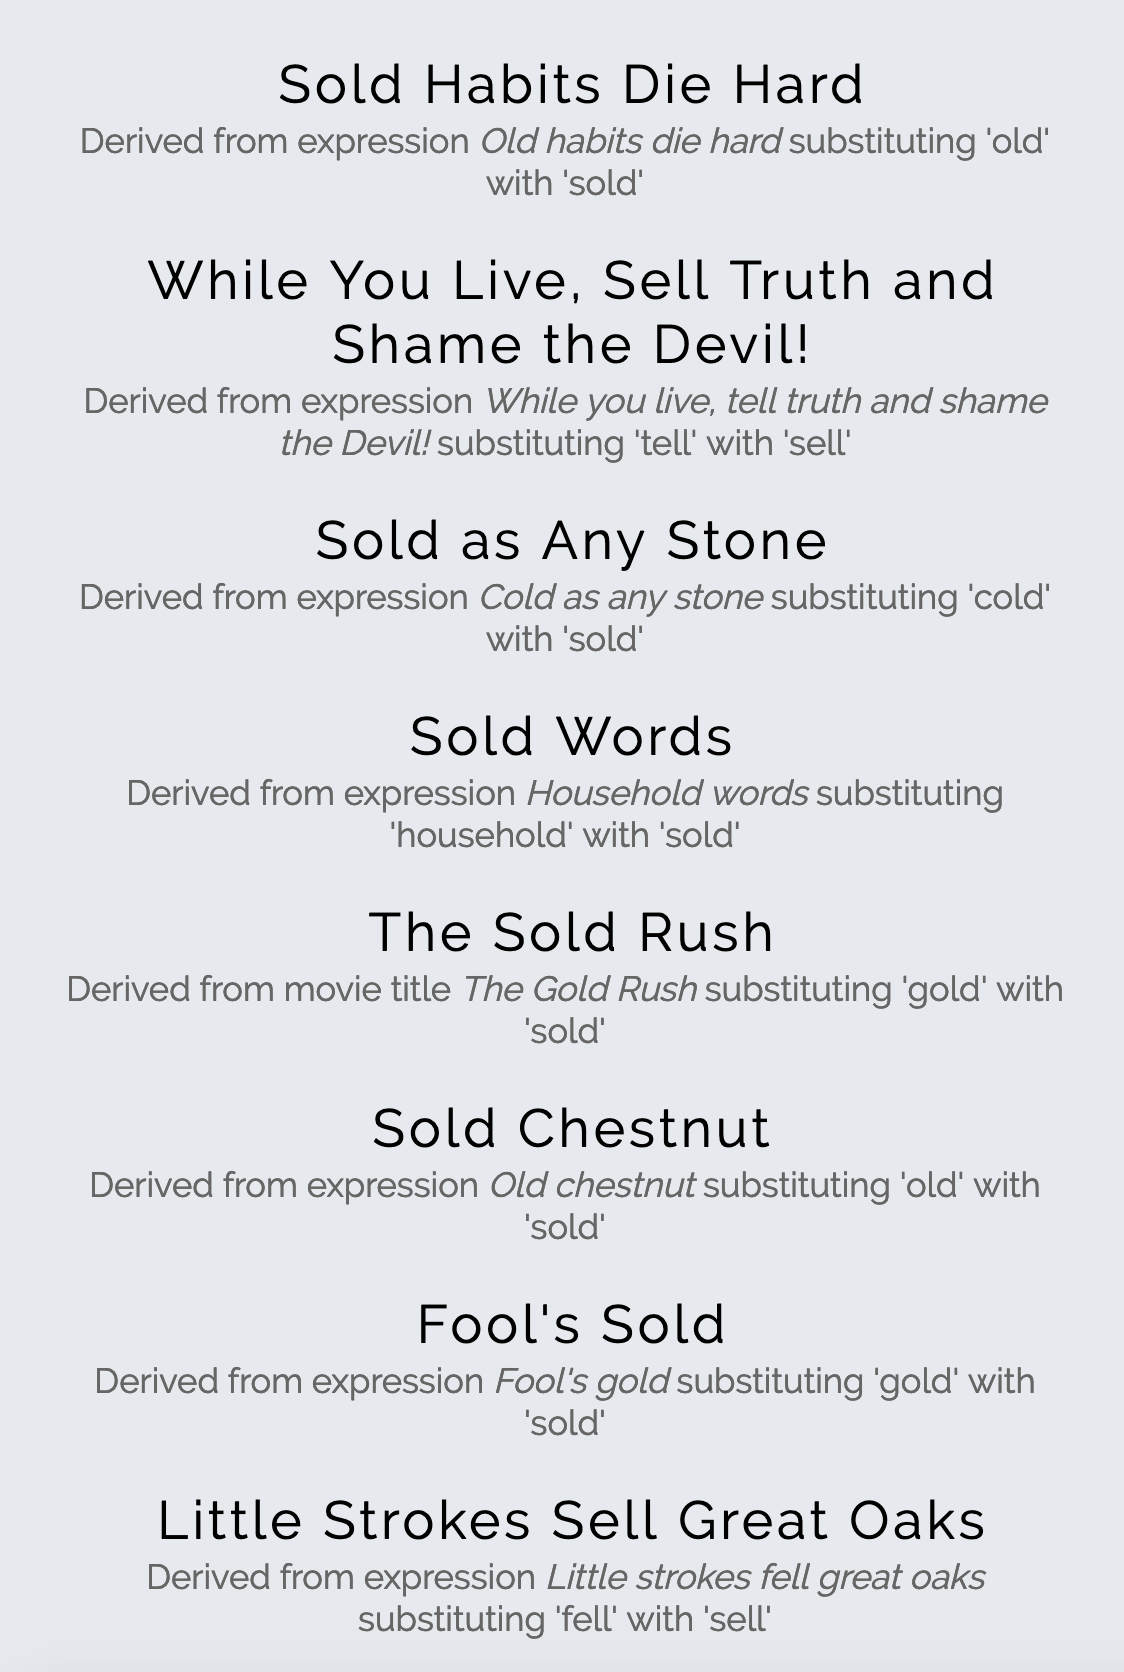
Then it spits out some creative blog name ideas you can use. I filled in some marketing and sales descriptive words and was pleasantly surprised with some real gems:
“Sold habits die hard” and “little strokes sell great oaks” — brilliant!
Name generators can help you come up with truly creative names for your website. Once you’ve found a suitable domain name, you’ll need to check if it’s available for purchase.
You can do this by heading over to Bluehost and clicking the “Domains” button at the top. You can then input your domain to check if it’s available.
Domain name pricing
Domain name pricing works on a 12-month renewal basis, usually costing between $5-$20 every year, depending on popularity and TLD.
Premium domains (highly sought after names) can fetch much more money — five, six and even seven figures in some cases. These domains have no superior qualities in terms of ranking advantages, however, they are usually catchy and exclusive.
When you’re starting out, there’s absolutely no need to go for a premium domain name, a standard domain will do just fine.
Bluehost is a popular choice for buying a standard domain because you can get a free domain name for the first year with any hosting plan.
5: Choosing your hosting solution + registering your domain name
Once you’ve figured out your domain name, you’ll need to purchase hosting for your website.
Think of web hosting as the piece of land you rent on the world wide web. When you purchase hosting, you pay for storage on a server that’s linked to the internet. These servers are usually contained in huge datacentres (giant rooms full of computers) and subject to a variety of protocols to keep your site safe and secure.
In a nutshell:
It is the service that allows your website to be viewed on the internet.
Powerful hosting can speed up your site, minimise downtime, backup your precious data and keep you safe from cyber attacks.
Web hosting pricing ranges from $5 up to over $100 a month for one website. The low-cost hosting is classified as Shared Hosting and higher-priced options usually provide a Managed hosting service.
Shared hosting VS Managed WordPress hosting
When it comes to hosting, you have plenty of options out there so let’s quickly breakdown the key differences so you can decide what suits you best.
Shared hosting is a type of hosting plan where your site shares resources with other websites on the same servers.
It has a number of pros and cons:
Managed WordPress hosting provides more performance, value-added services and security enhancements, at a price. You can expect features like automatic updates, backups and custom dashboards to help you easily manage your site.
It also has a number of pros and cons:
So which one should you choose?
The choices have been made far less complicated thanks to options like Bluehost and Siteground — they offer entry-level managed hosting at a price that competes with budget shared hosting.
The catch?
You sacrifice some premium features like custom dashboards and blazing-fast performance. But if you’re just starting out, this is one the most balanced options from a cost/feature/performance perspective.
I recommend Bluehost because they’ve been around since 2003 and are one of the few affordable hosts that offer staging sites, automatic WordPress core updates and a free domain name.
Also, you can get your domain name for free for the first year.
Setting up your hosting account (step-by-step)
Once you’ve decided on your domain name and your host, it’s time to get it all up and running!
This guide will focus on how to get started with Bluehost — it won’t take longer than a few minutes to buy your domain name and install WordPress on your new site.
Let’s begin:
Step 1: Go to Bluehost.com
Click on the “Get Started” button on the homepage:
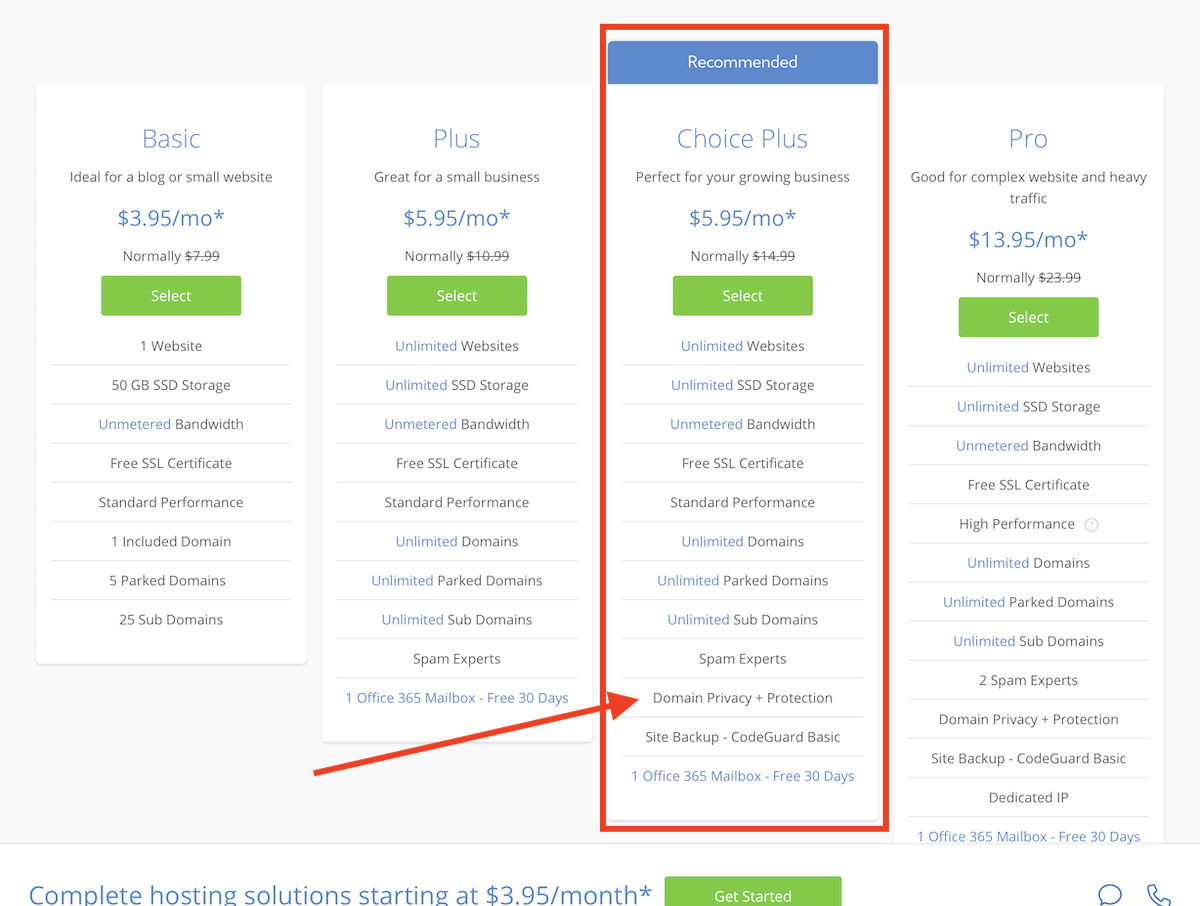
Step 2: Pick your plan
Pick your plan based on your requirements, most plans with Bluehost are pretty similar. I’d go for the Choice Plus plan because it includes Domain Privacy — which means your personal information will be kept private on the WHOIS database:
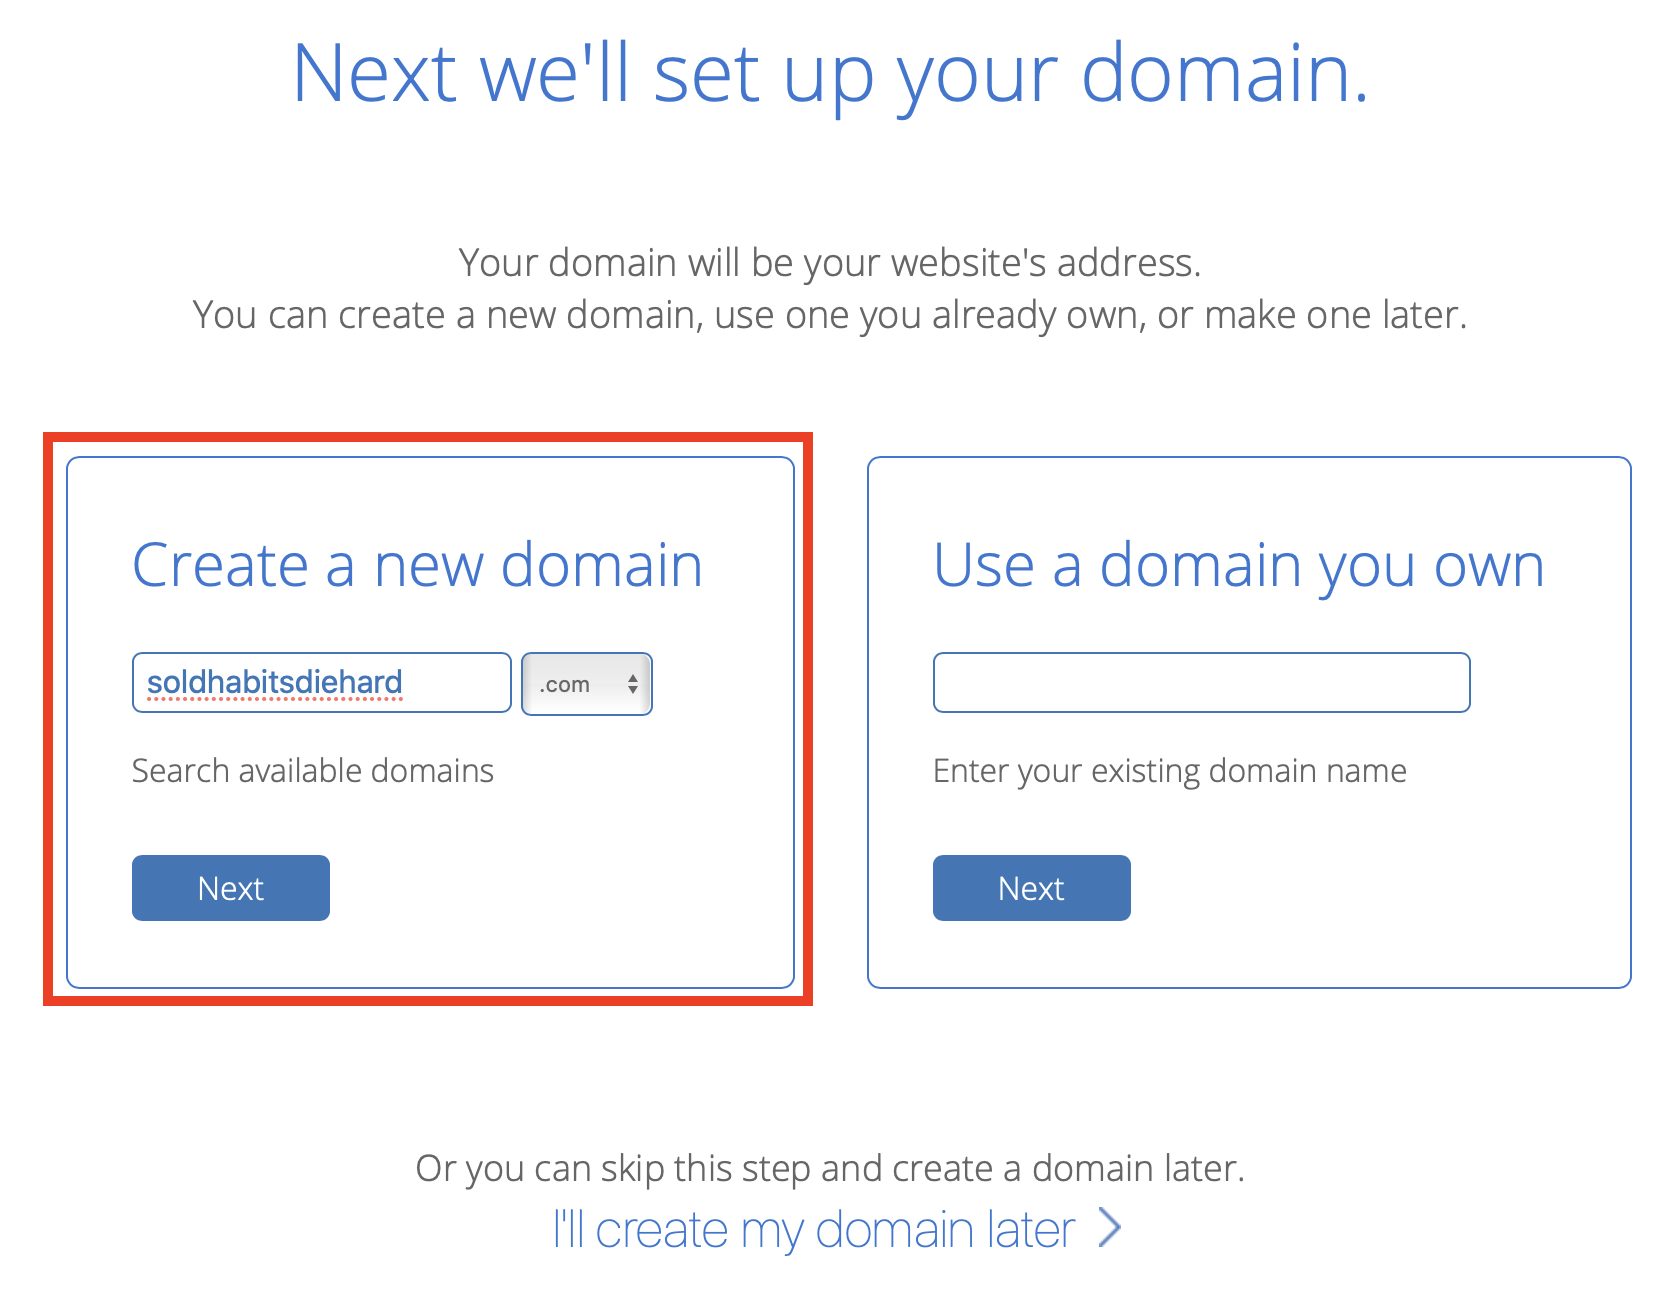
Step 3: Specify and purchase your domain name
Once you’ve selected the plan that suits you best, you’ll need to specify the domain address and TLD you’d like to purchase:
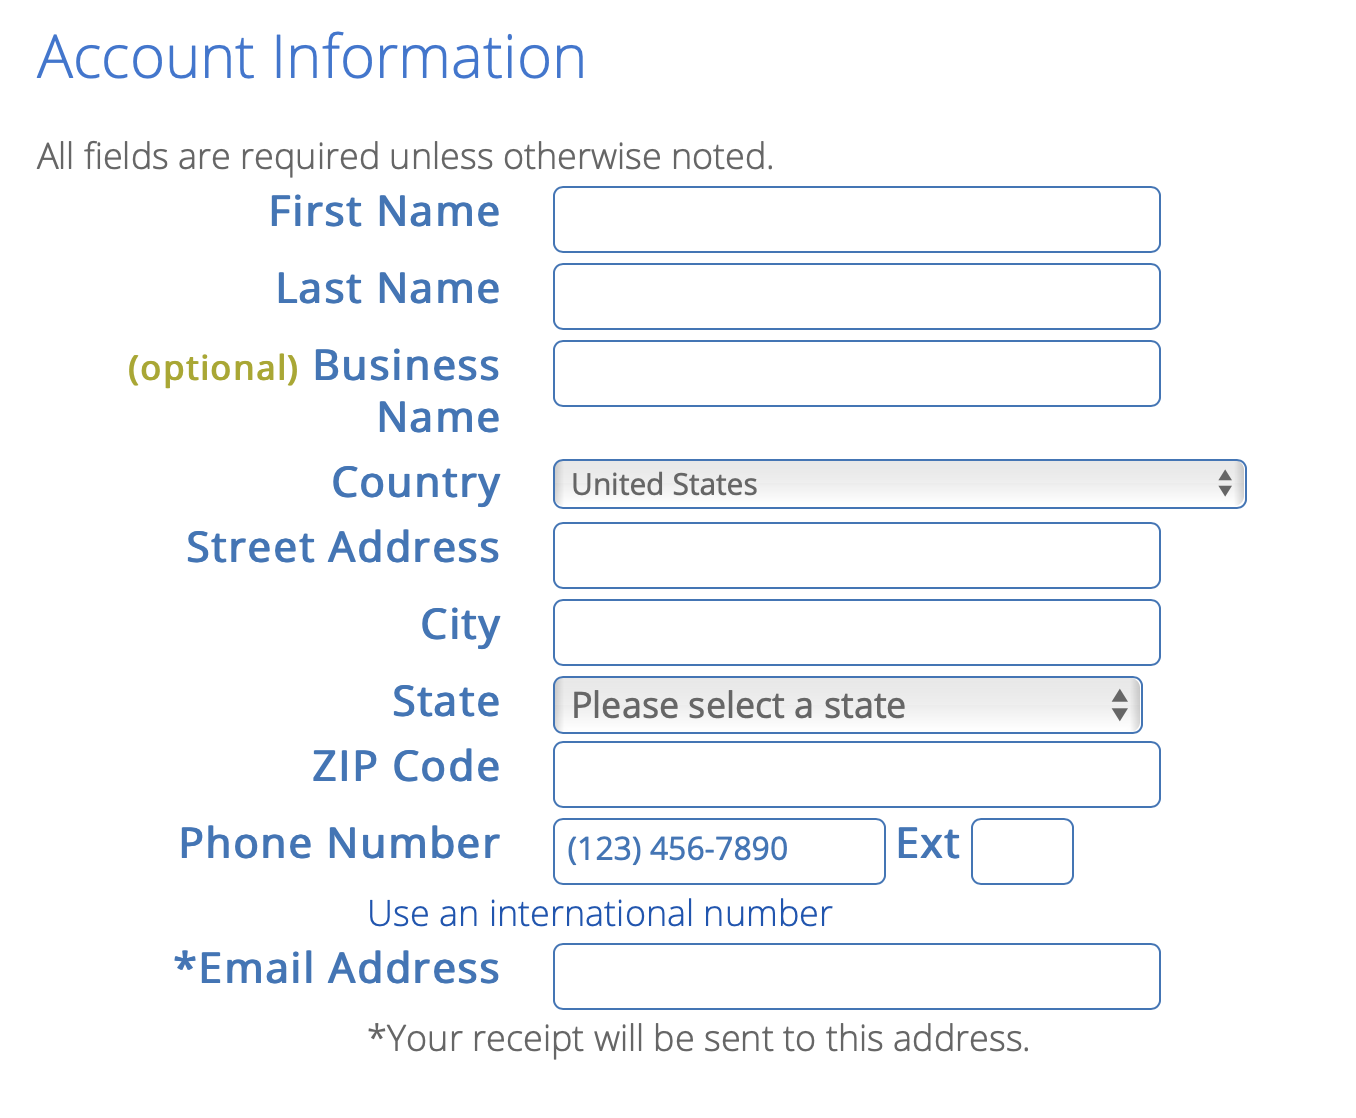
At this point, you should have already settled for a name and checked the availability through Bluehost’s domain search feature. The next page will confirm whether the domain is available and ask you to fill out some personal information:
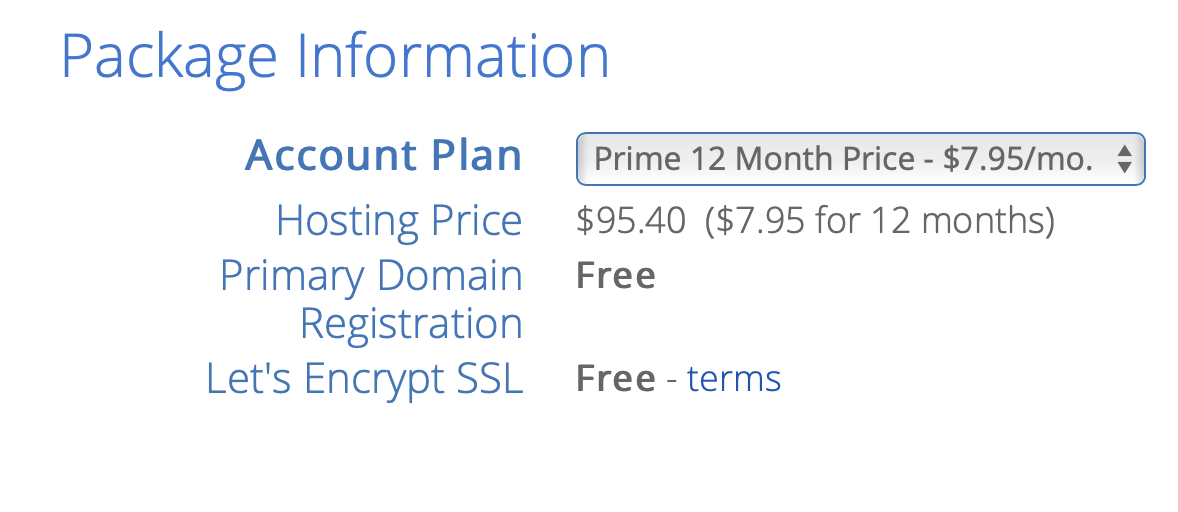
Once you’ve filled out the info on the above page, you’ll see the “Package Information” section as you scroll down:
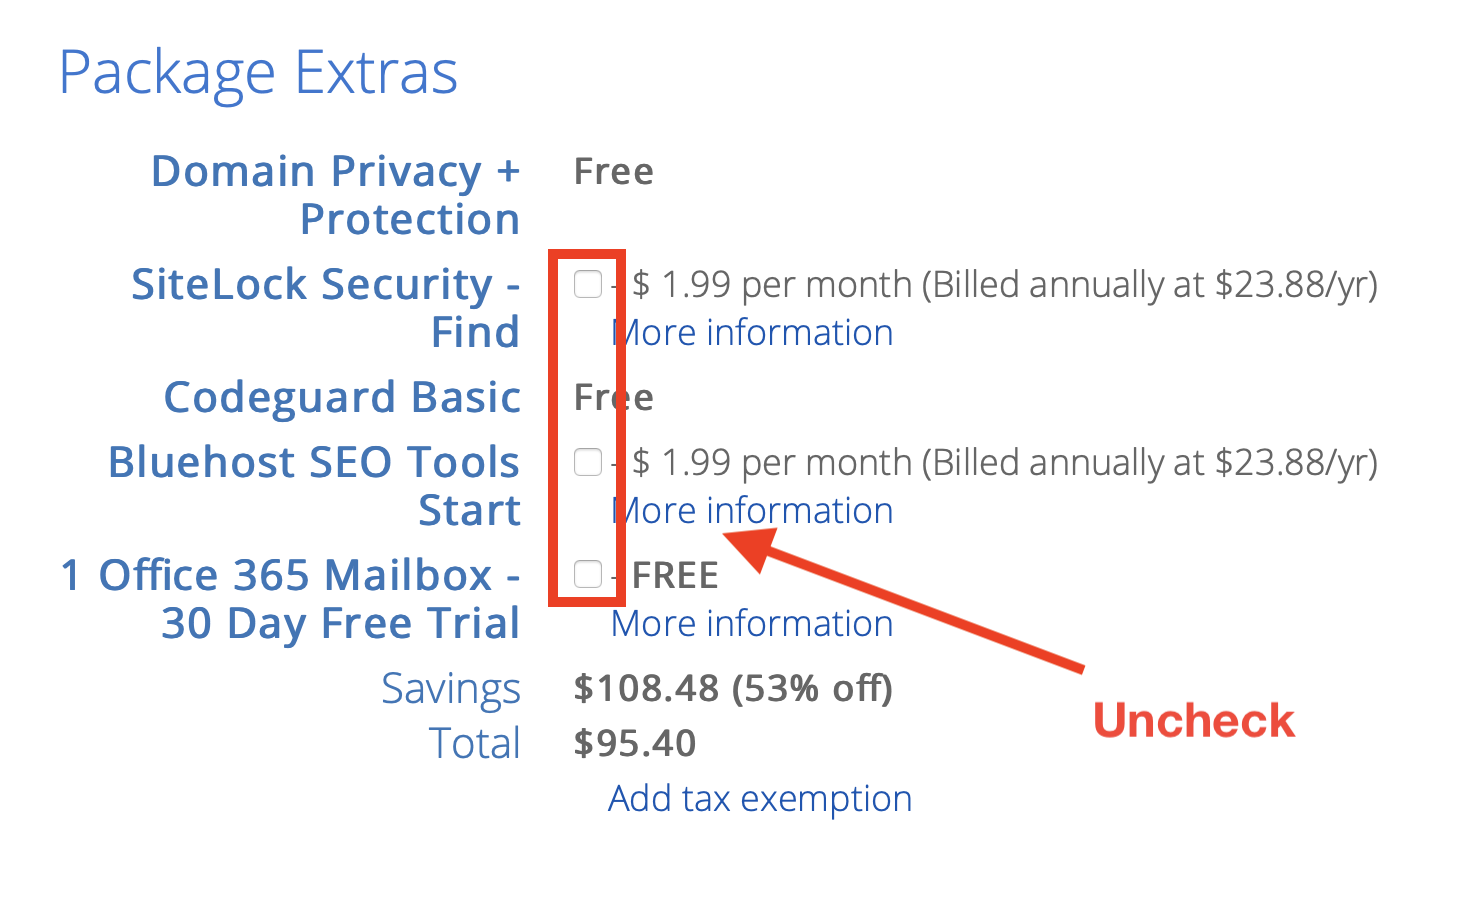
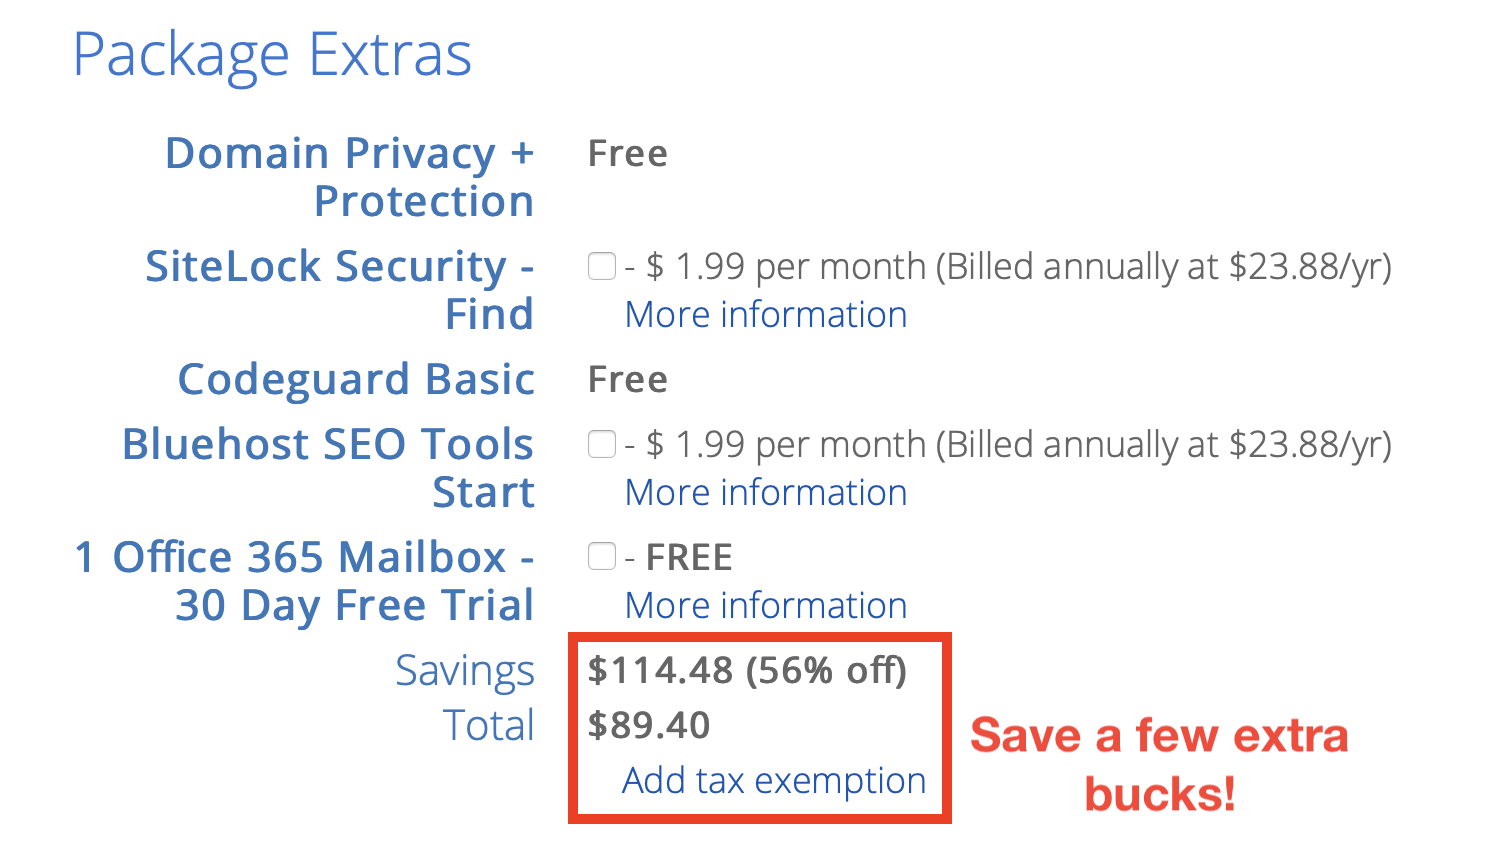
Select your preferred account plan from the dashboard then scroll down to the “Package Extras” section — you can untick the list of upsell options as they’re unnecessary:
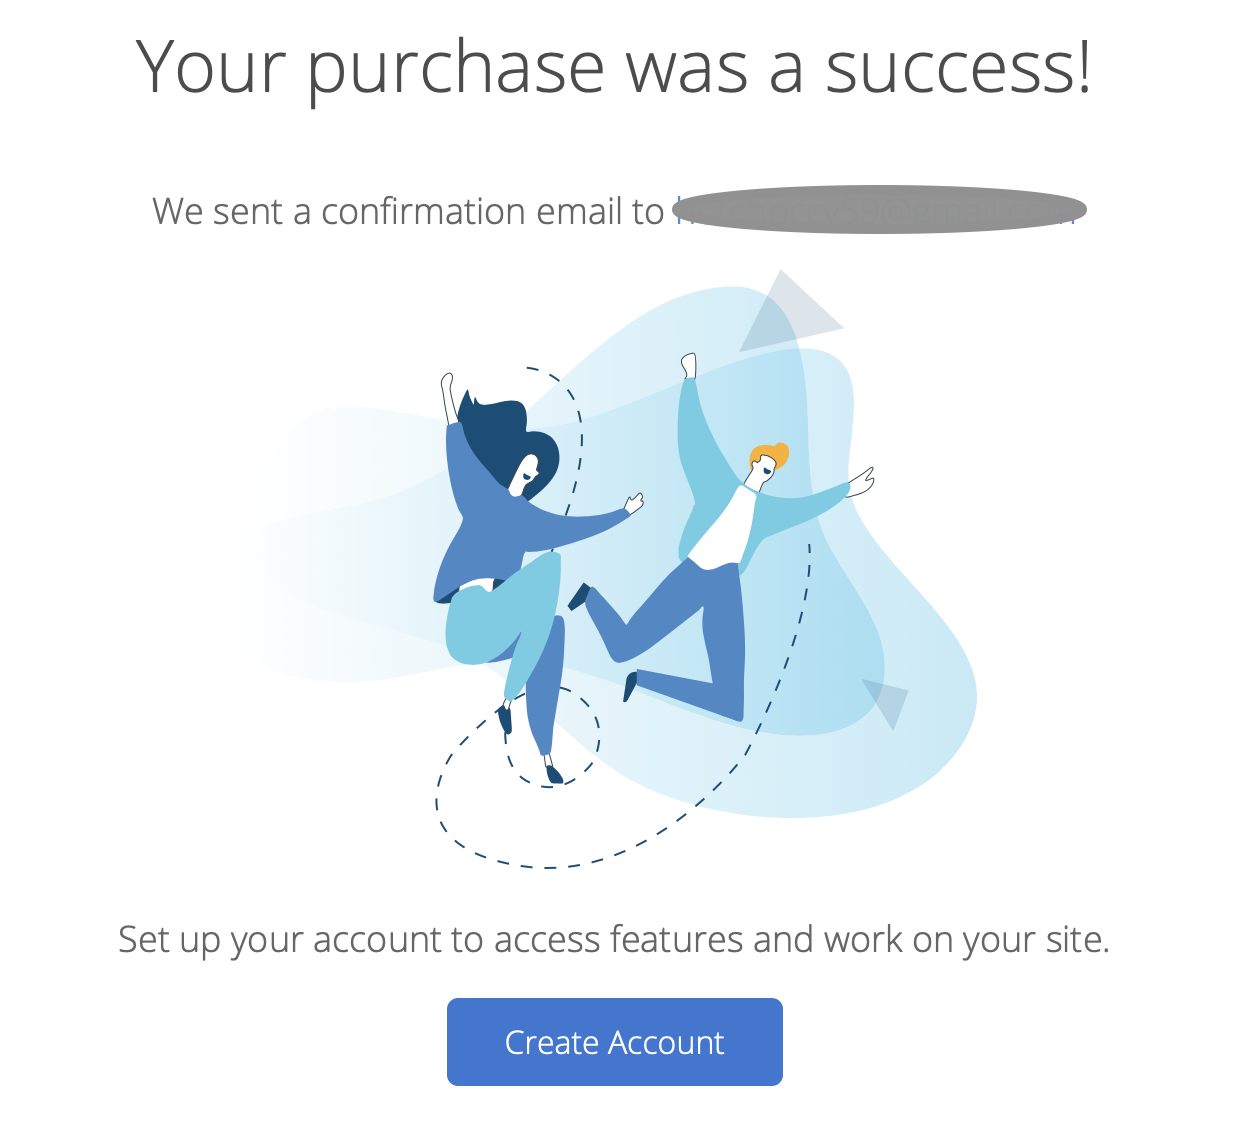
Then fill out your card details (or pay through Paypal) to finish. Once done you should see the following page:
Step 4: Install WordPress and your first theme
Once you see the success page (shown above), click on “Create Account”. You will be asked to create a password.
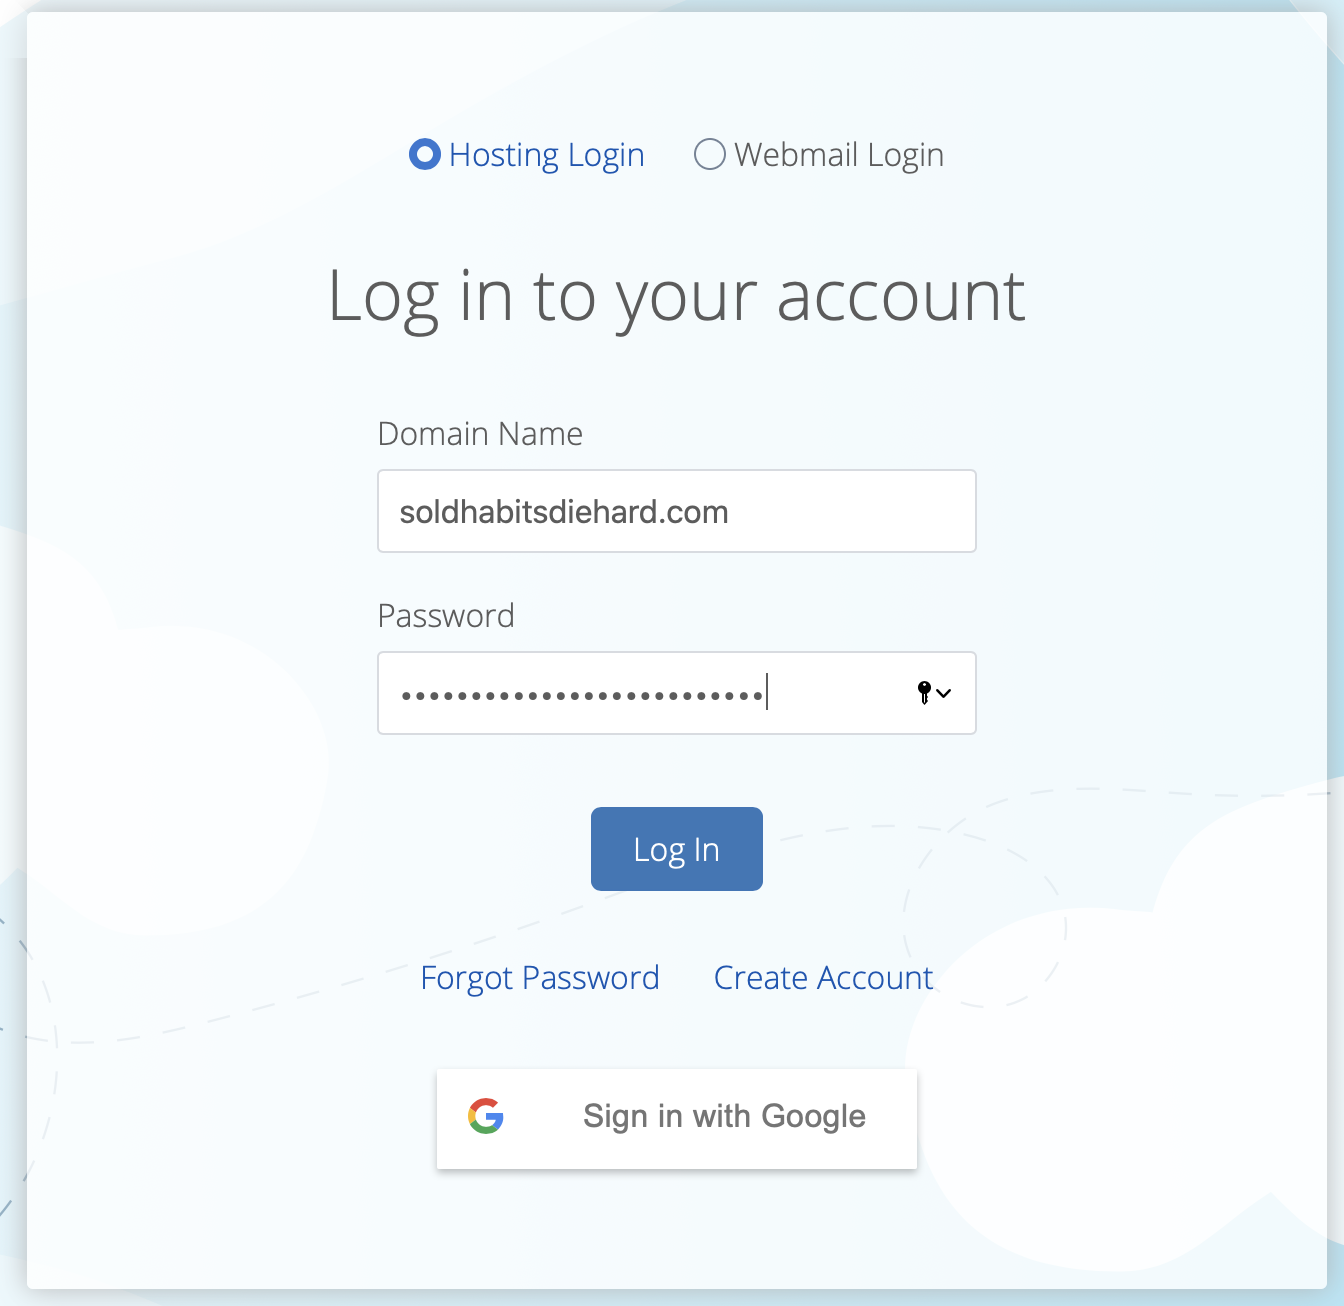
After creating your password, you should be presented with a login page:
Fill in the details then click “Login”.
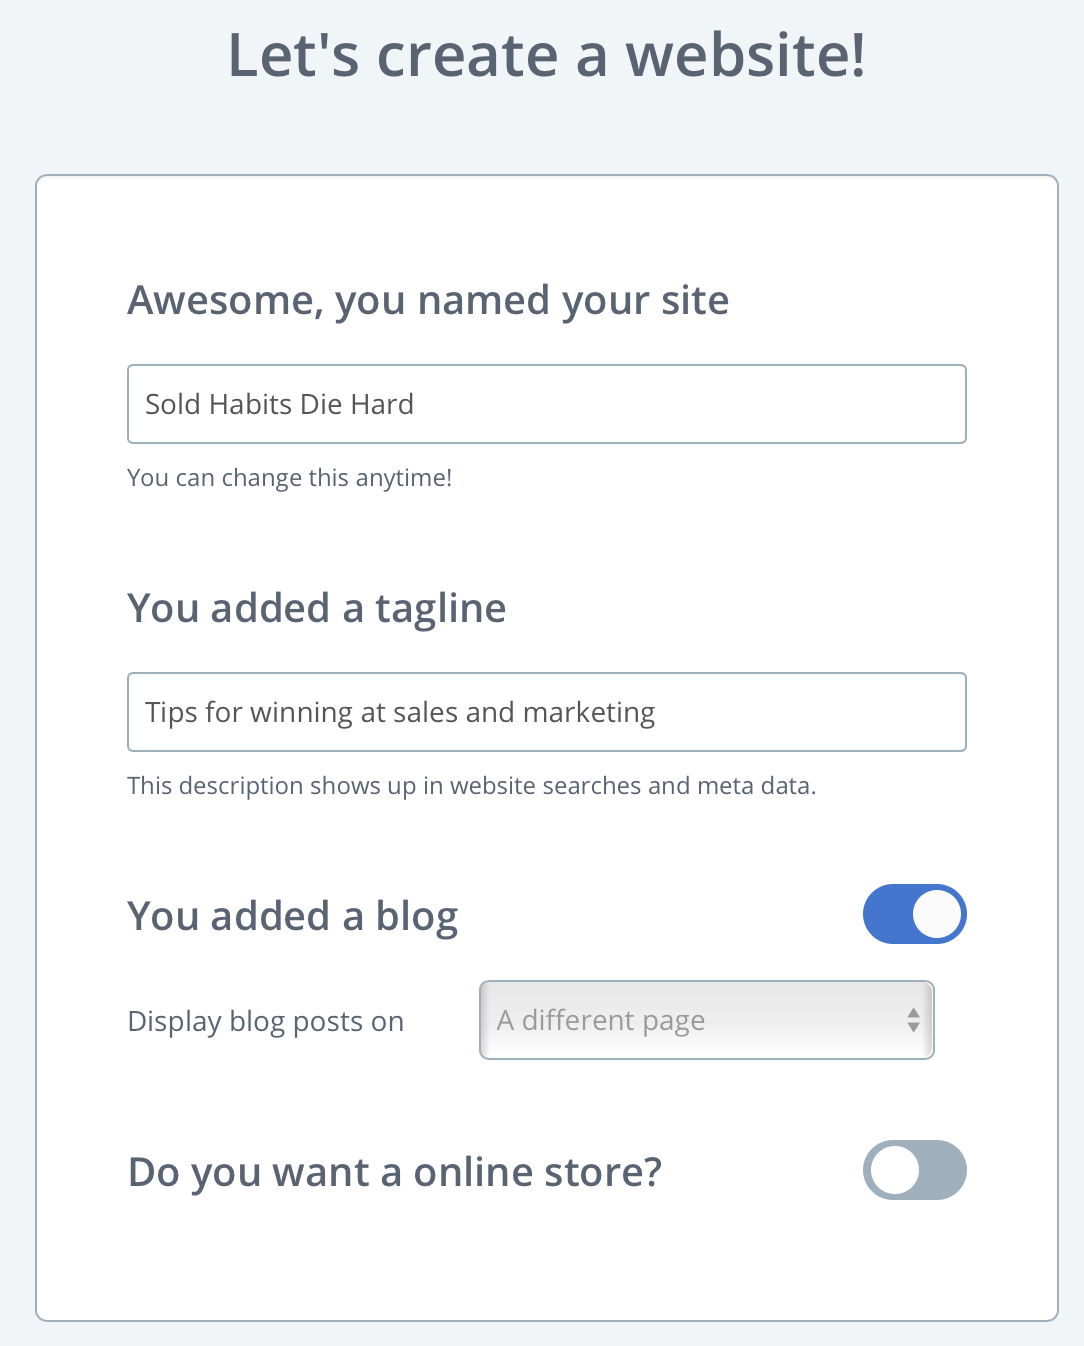
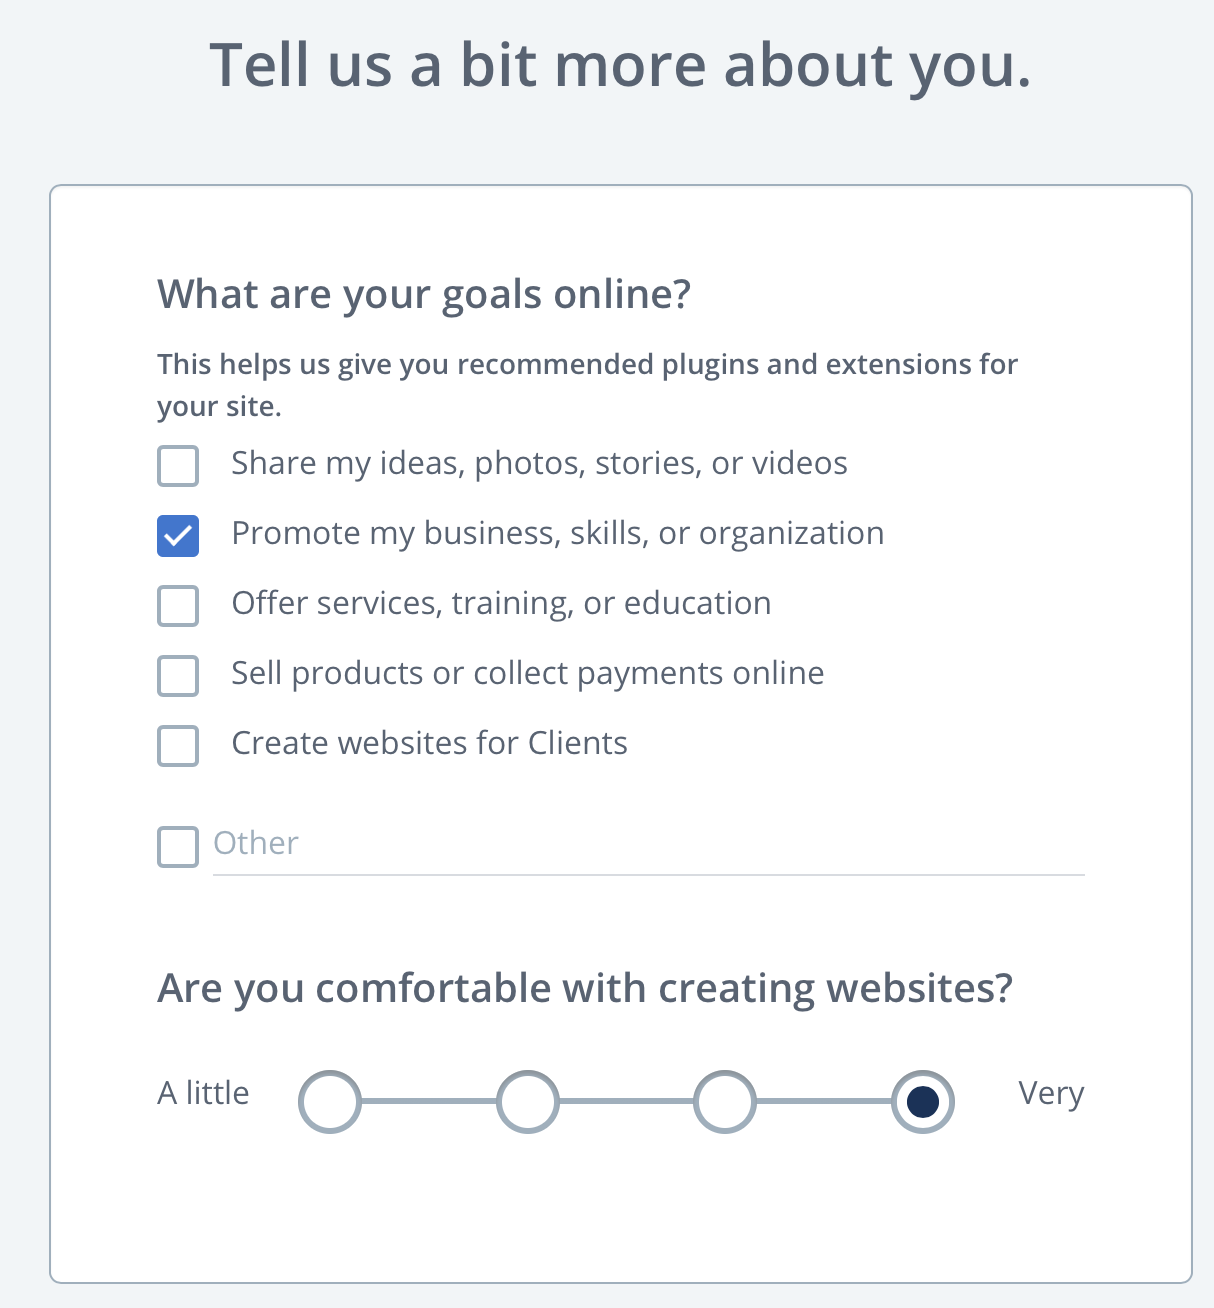
You’ll then be asked to fill in some basic information about your site:
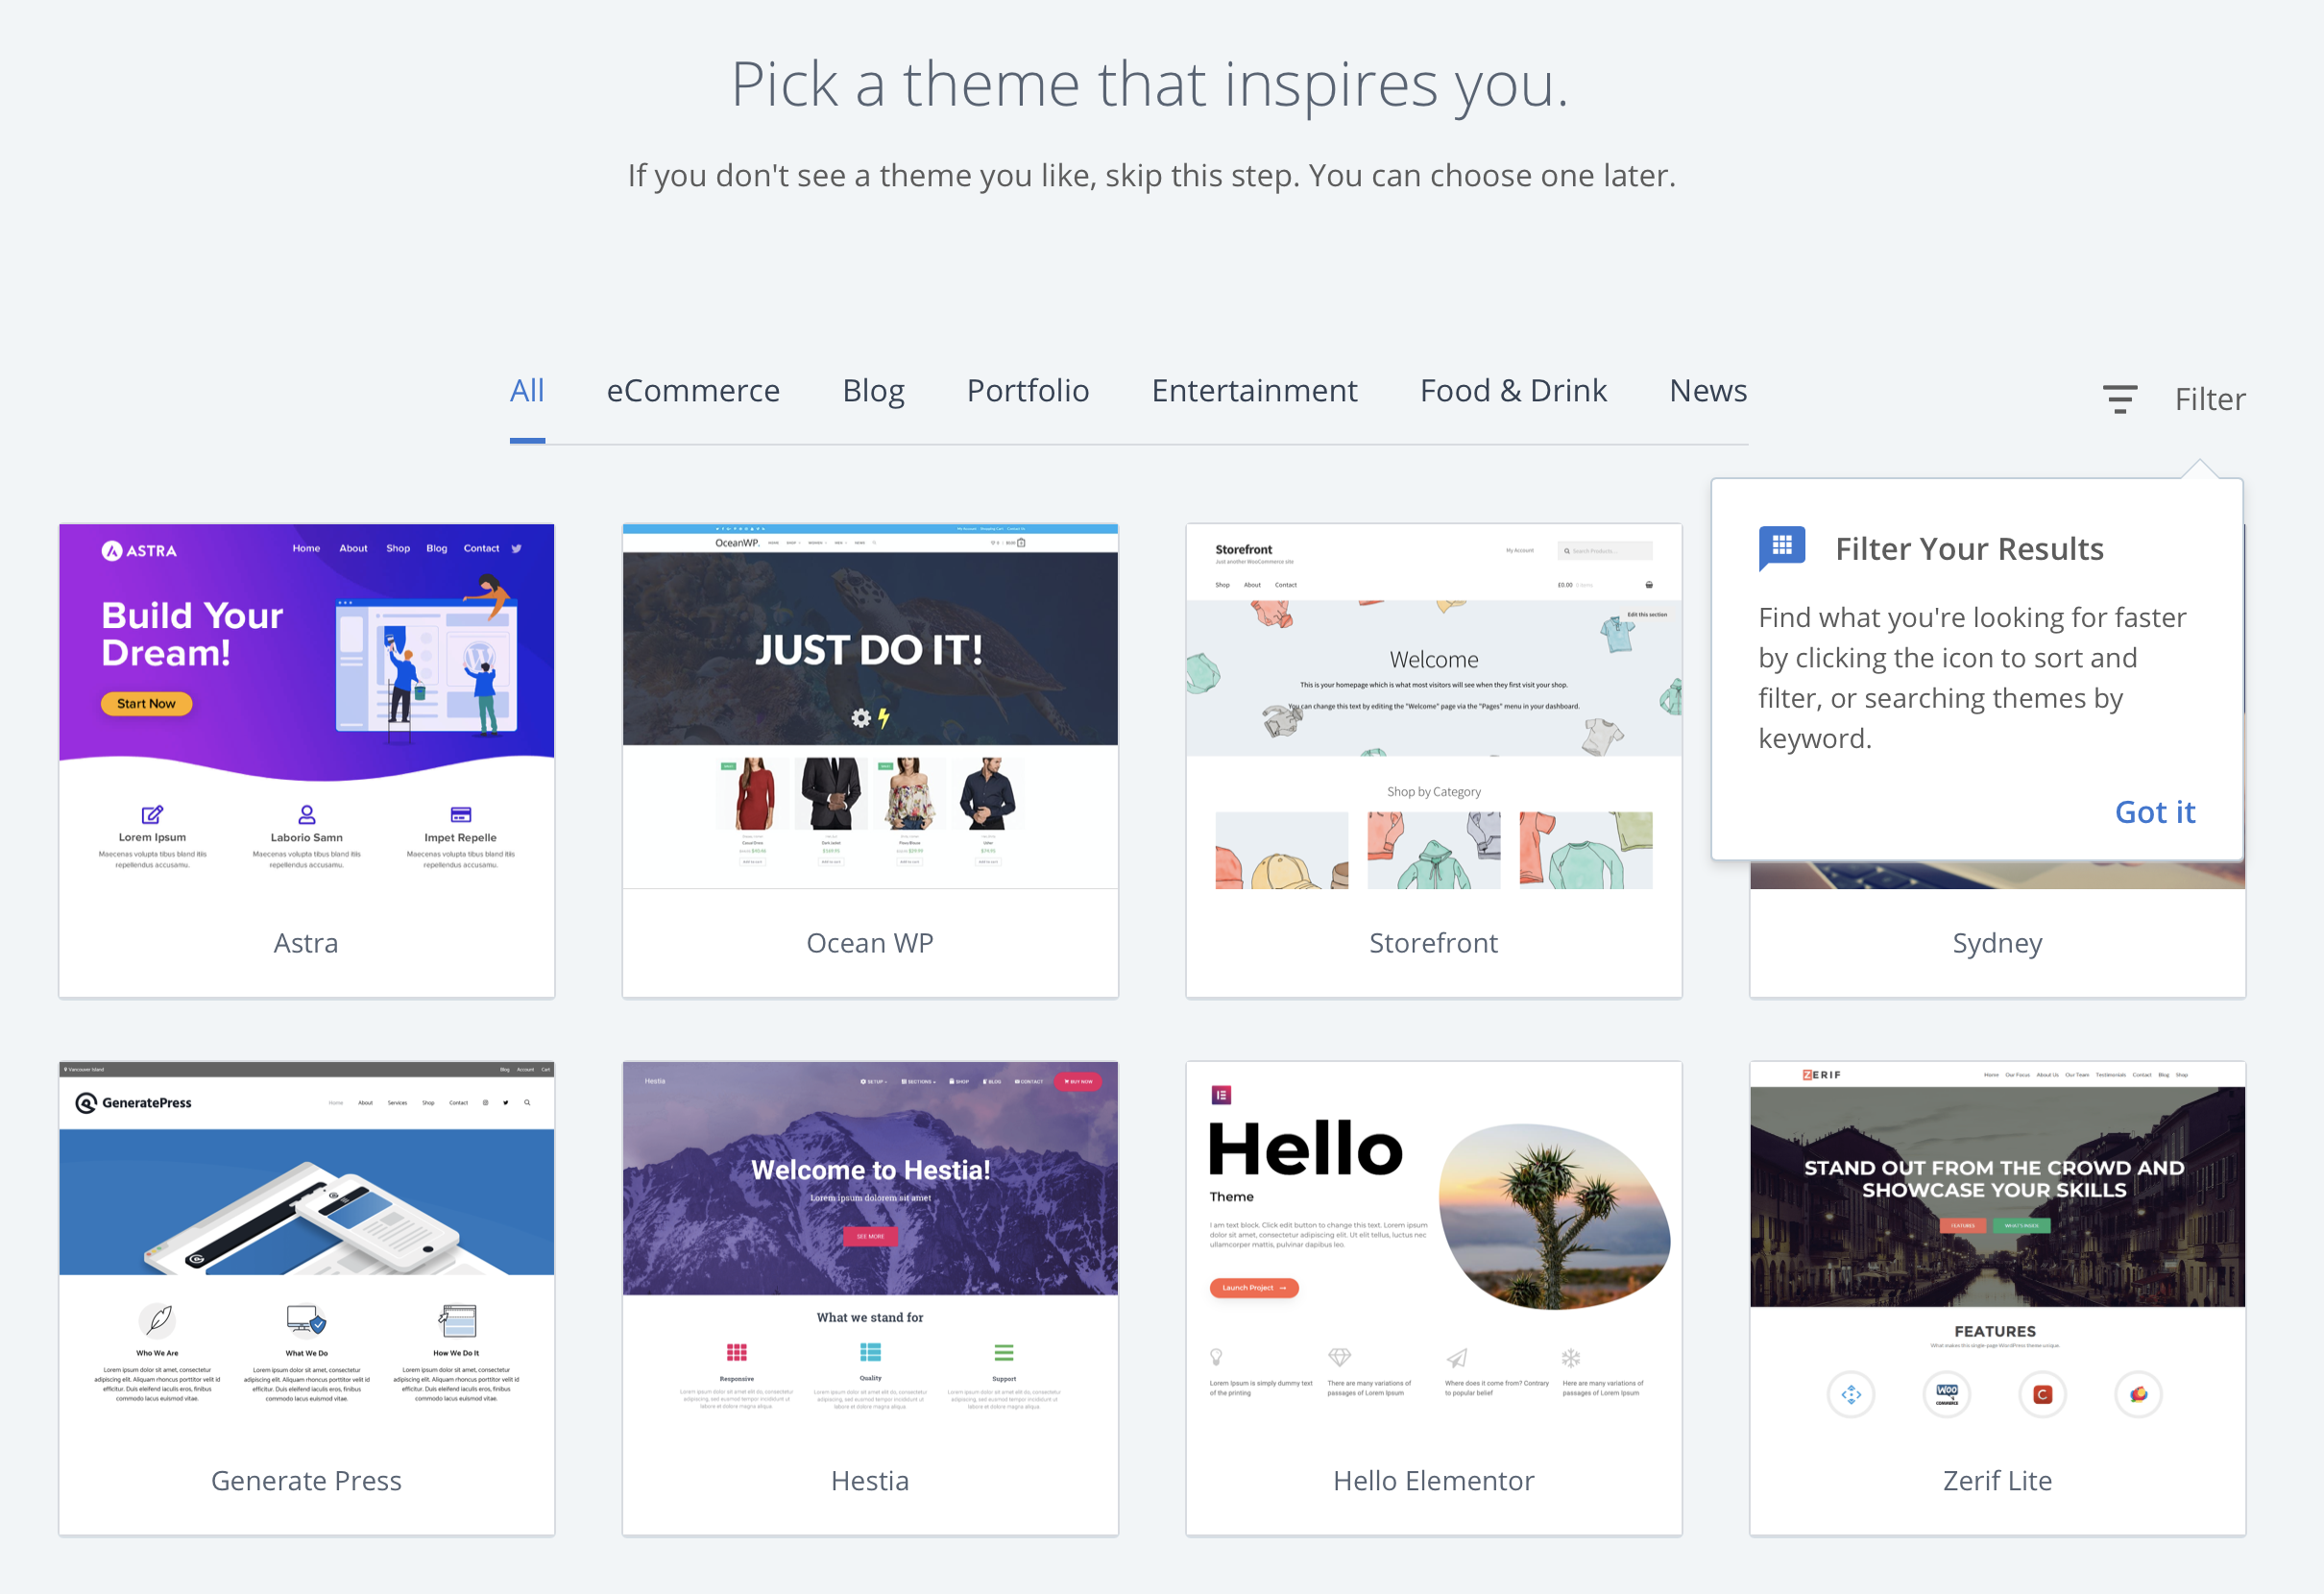
After this, you get to choose a theme for your website. I was quite impressed with the free theme designs shown by Bluehost on this page:
Depending on the theme you select, you may be asked to import a template. A template is an “off-the-shelf” website design you can import directly into your site, so you can simply fill in the blanks, not mess with any funny code and have a functioning website that looks decent.
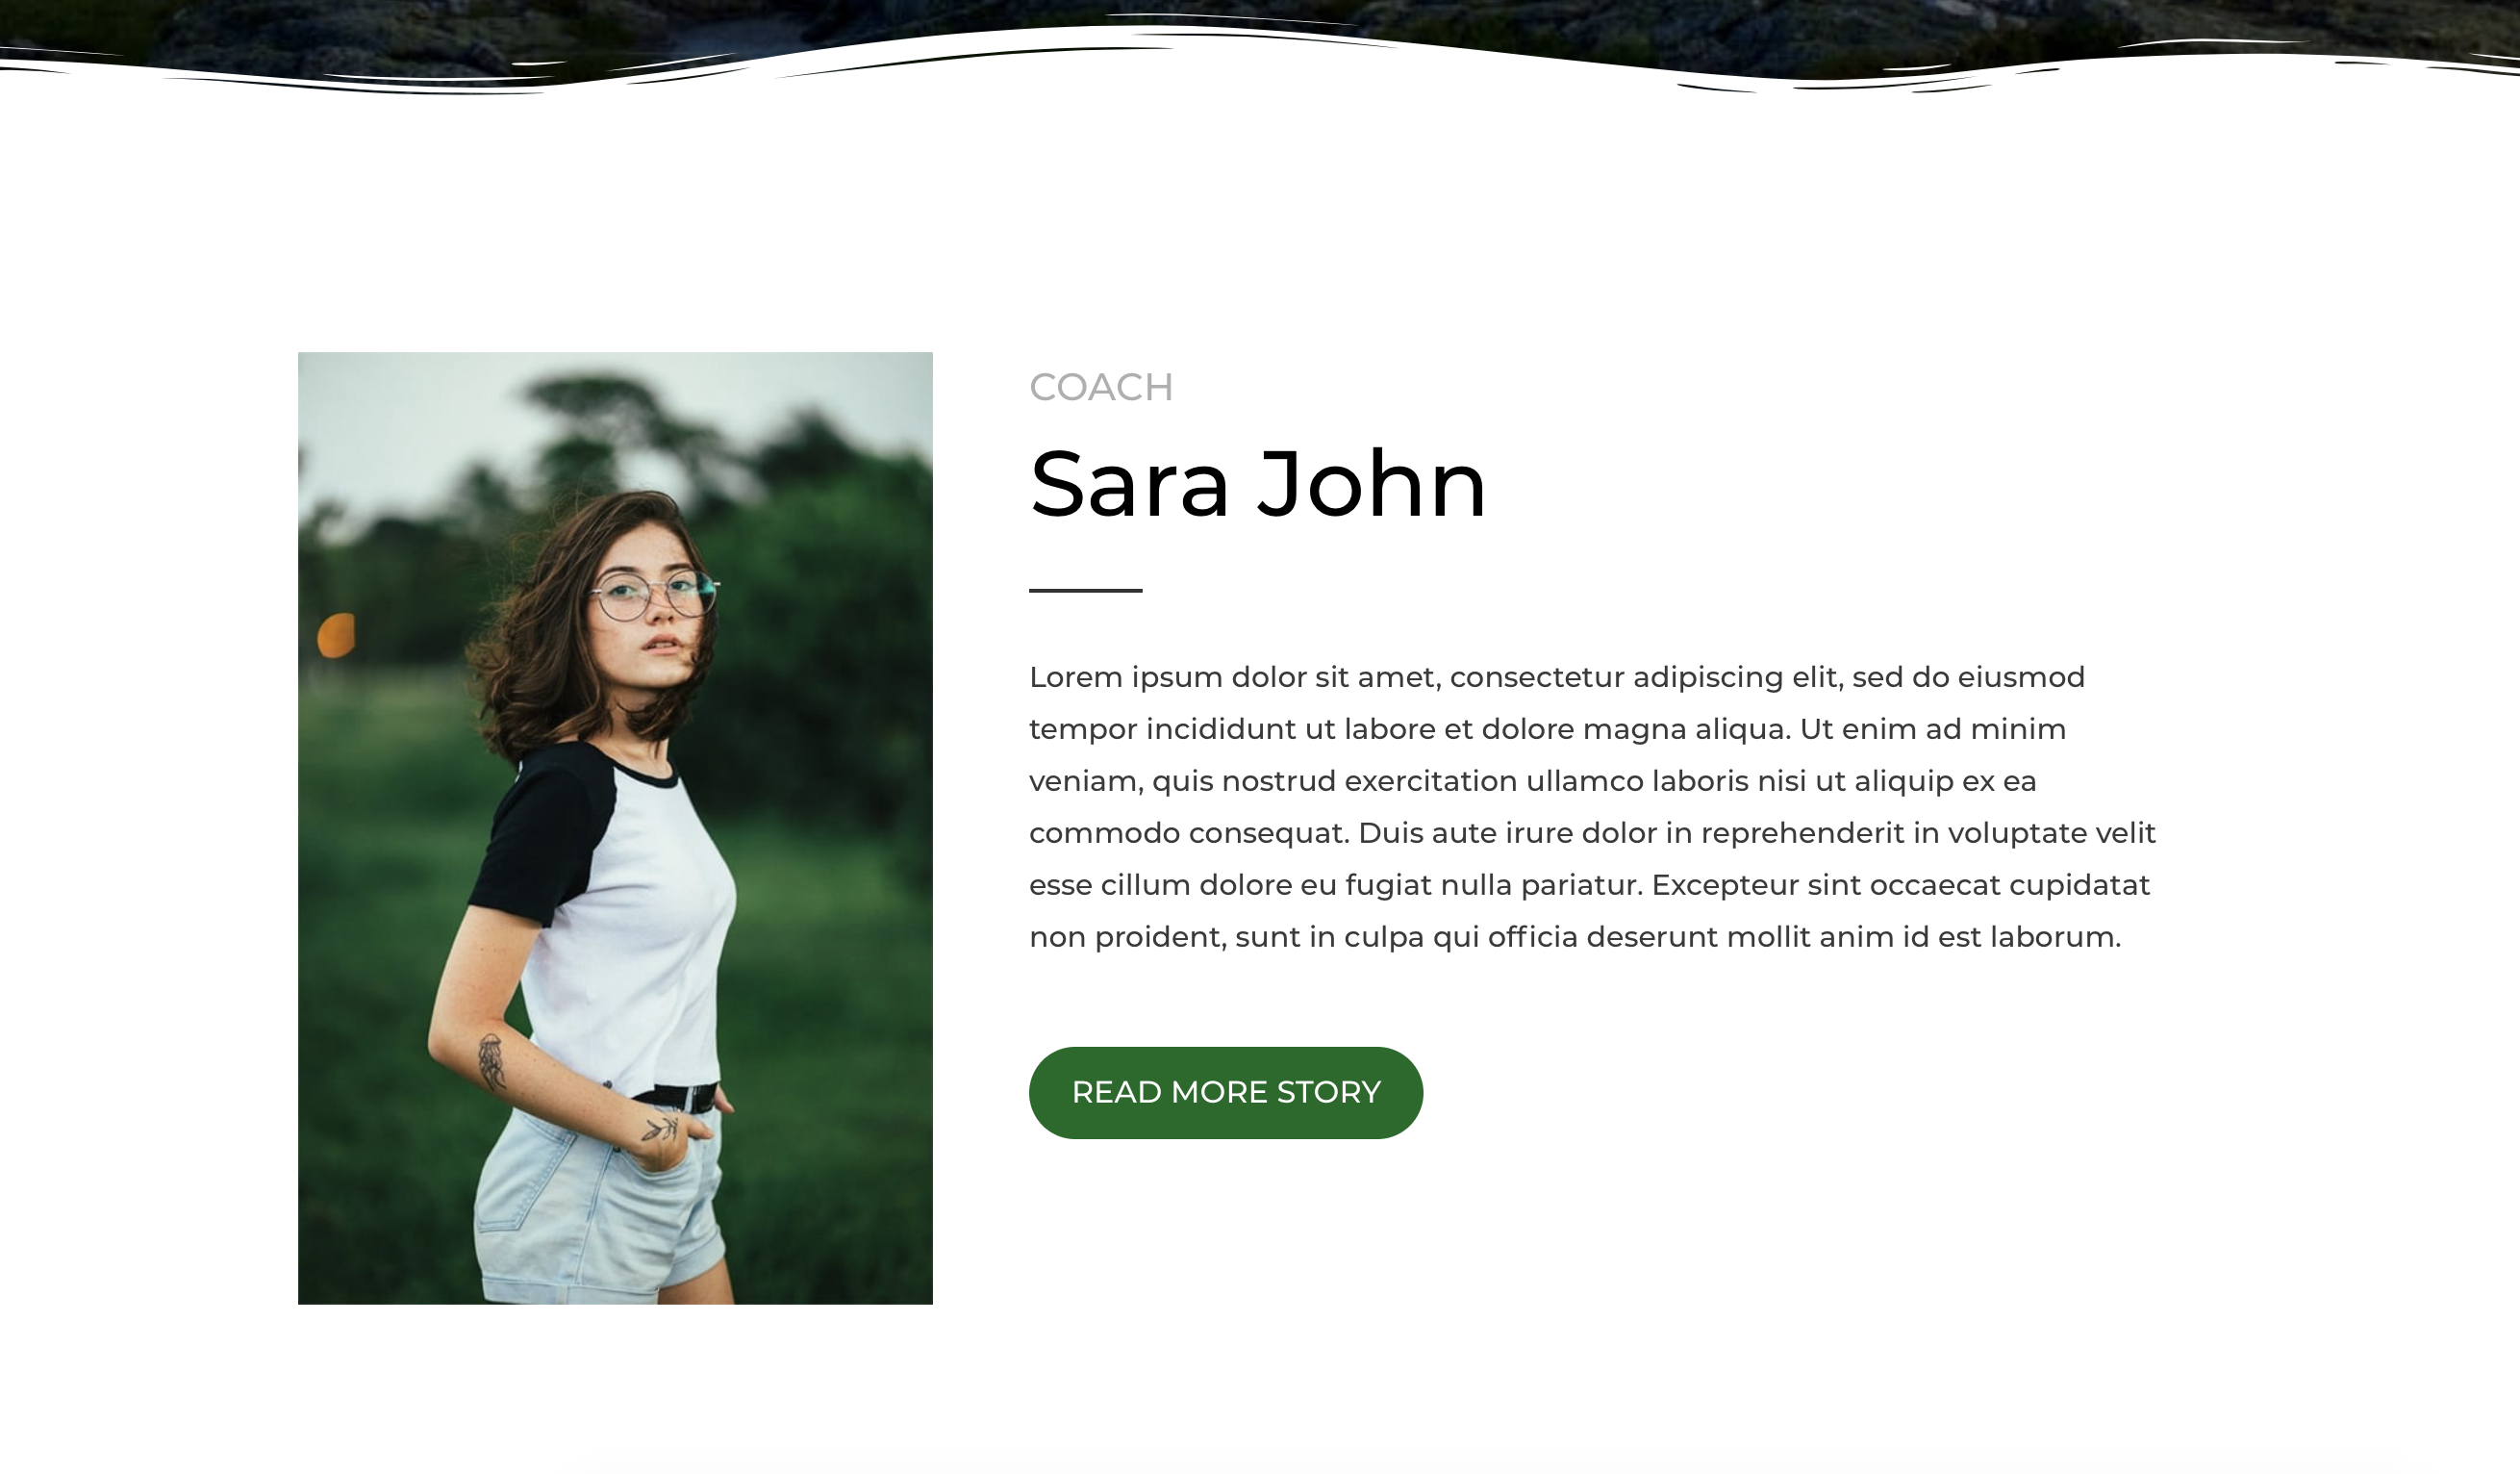
I picked one of the templates from the Astra theme and my test site now looks like this:
Pretty sweet, right?
You can call me Sara ;)
Free themes are great when you’re starting out, but you’ll want to invest in a premium theme if you’re serious about your project.
Many free themes look the part but fall short when it comes customising your site, adding pop-up forms, widgets and even some plugins.
A premium theme will usually cost no more than $150 as a one-off payment. And if you choose right, the advantages are worth the price.
The best premium themes are:
- Mobile responsive with a multitude of layout options
- Offer in-depth tutorials on how to tweak and customise the theme
- Include unlimited updates, support and ability to use the theme on multiple websites
Take your time when picking your theme because this isn’t something you’ll want to change often.
If you’re looking for theme recommendations, Studiopress offers some of the best on the market, at a reasonable price.
Here’s an example of the Authority Pro theme:
Studiopress themes also come bundled with the Genesis Framework.
This framework is the foundation for all Studiopress themes and is known for being SEO friendly and simple to use.
Step 5: Install your plugins
Plugins are where WordPress really starts to shine.
They allow you to add features and functionality to your website without having to code the changes yourself. A godsend for those of us that don’t speak code!
With WordPress plugins, you can do all sorts — from adding stylish contact forms to speeding up page load times and integrating email marketing software.
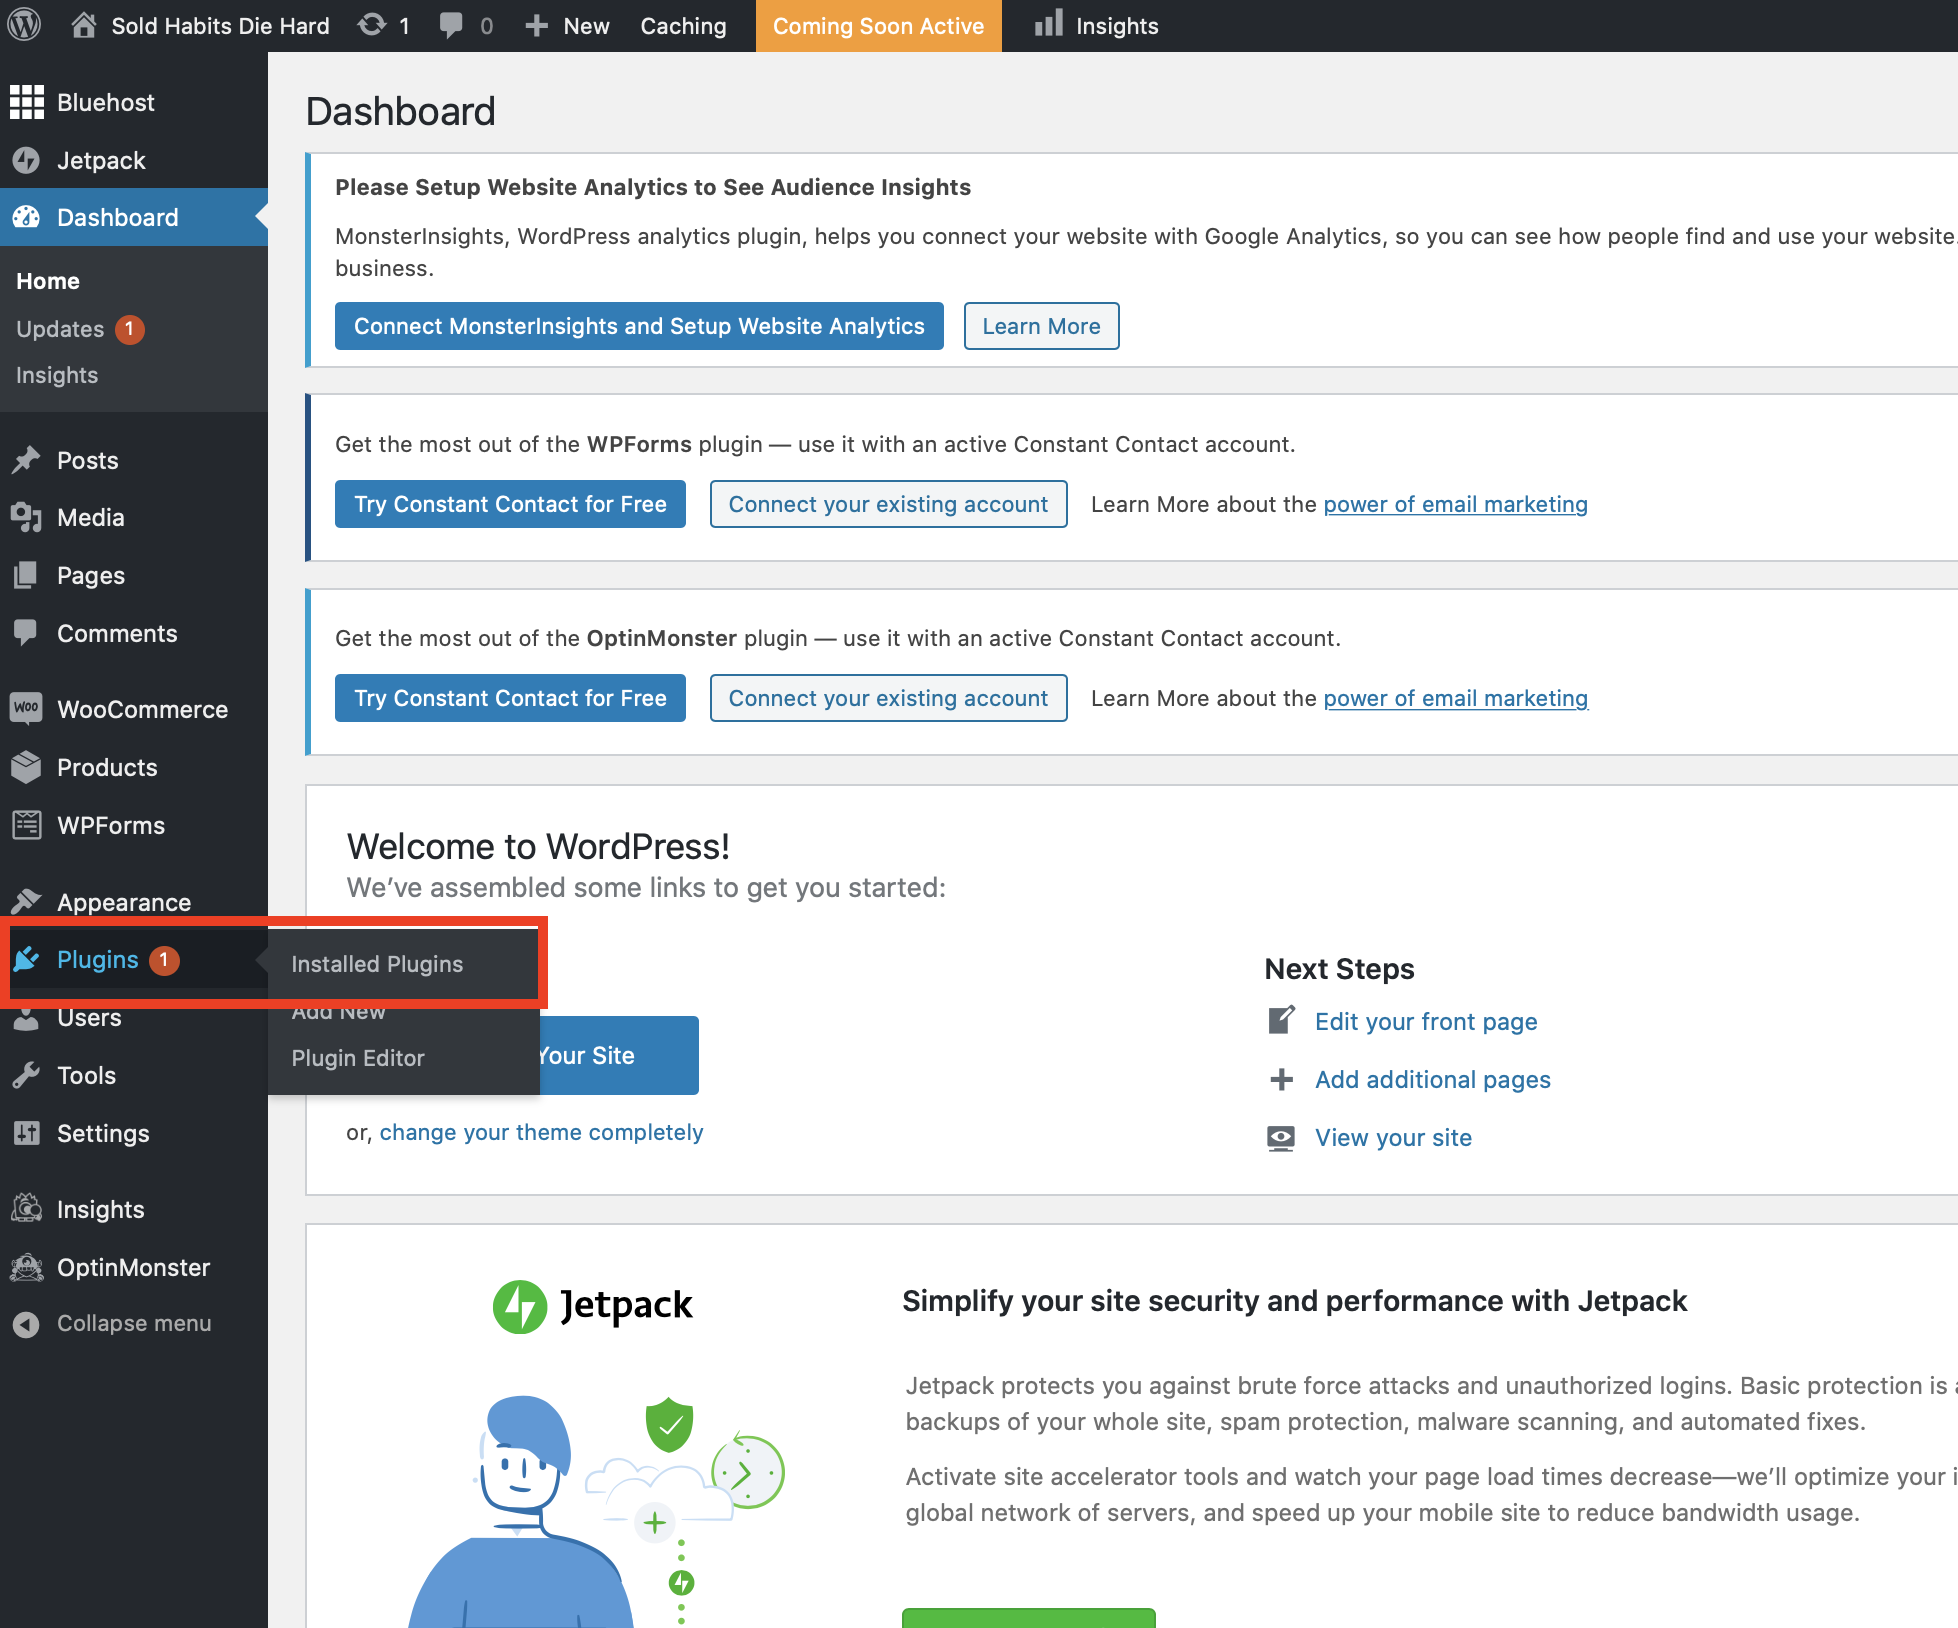
If you click on the “WordPress” button in your Bluehost portal, then hover over “Plugins” then click “Installed plugins” from your WordPress site dashboard:
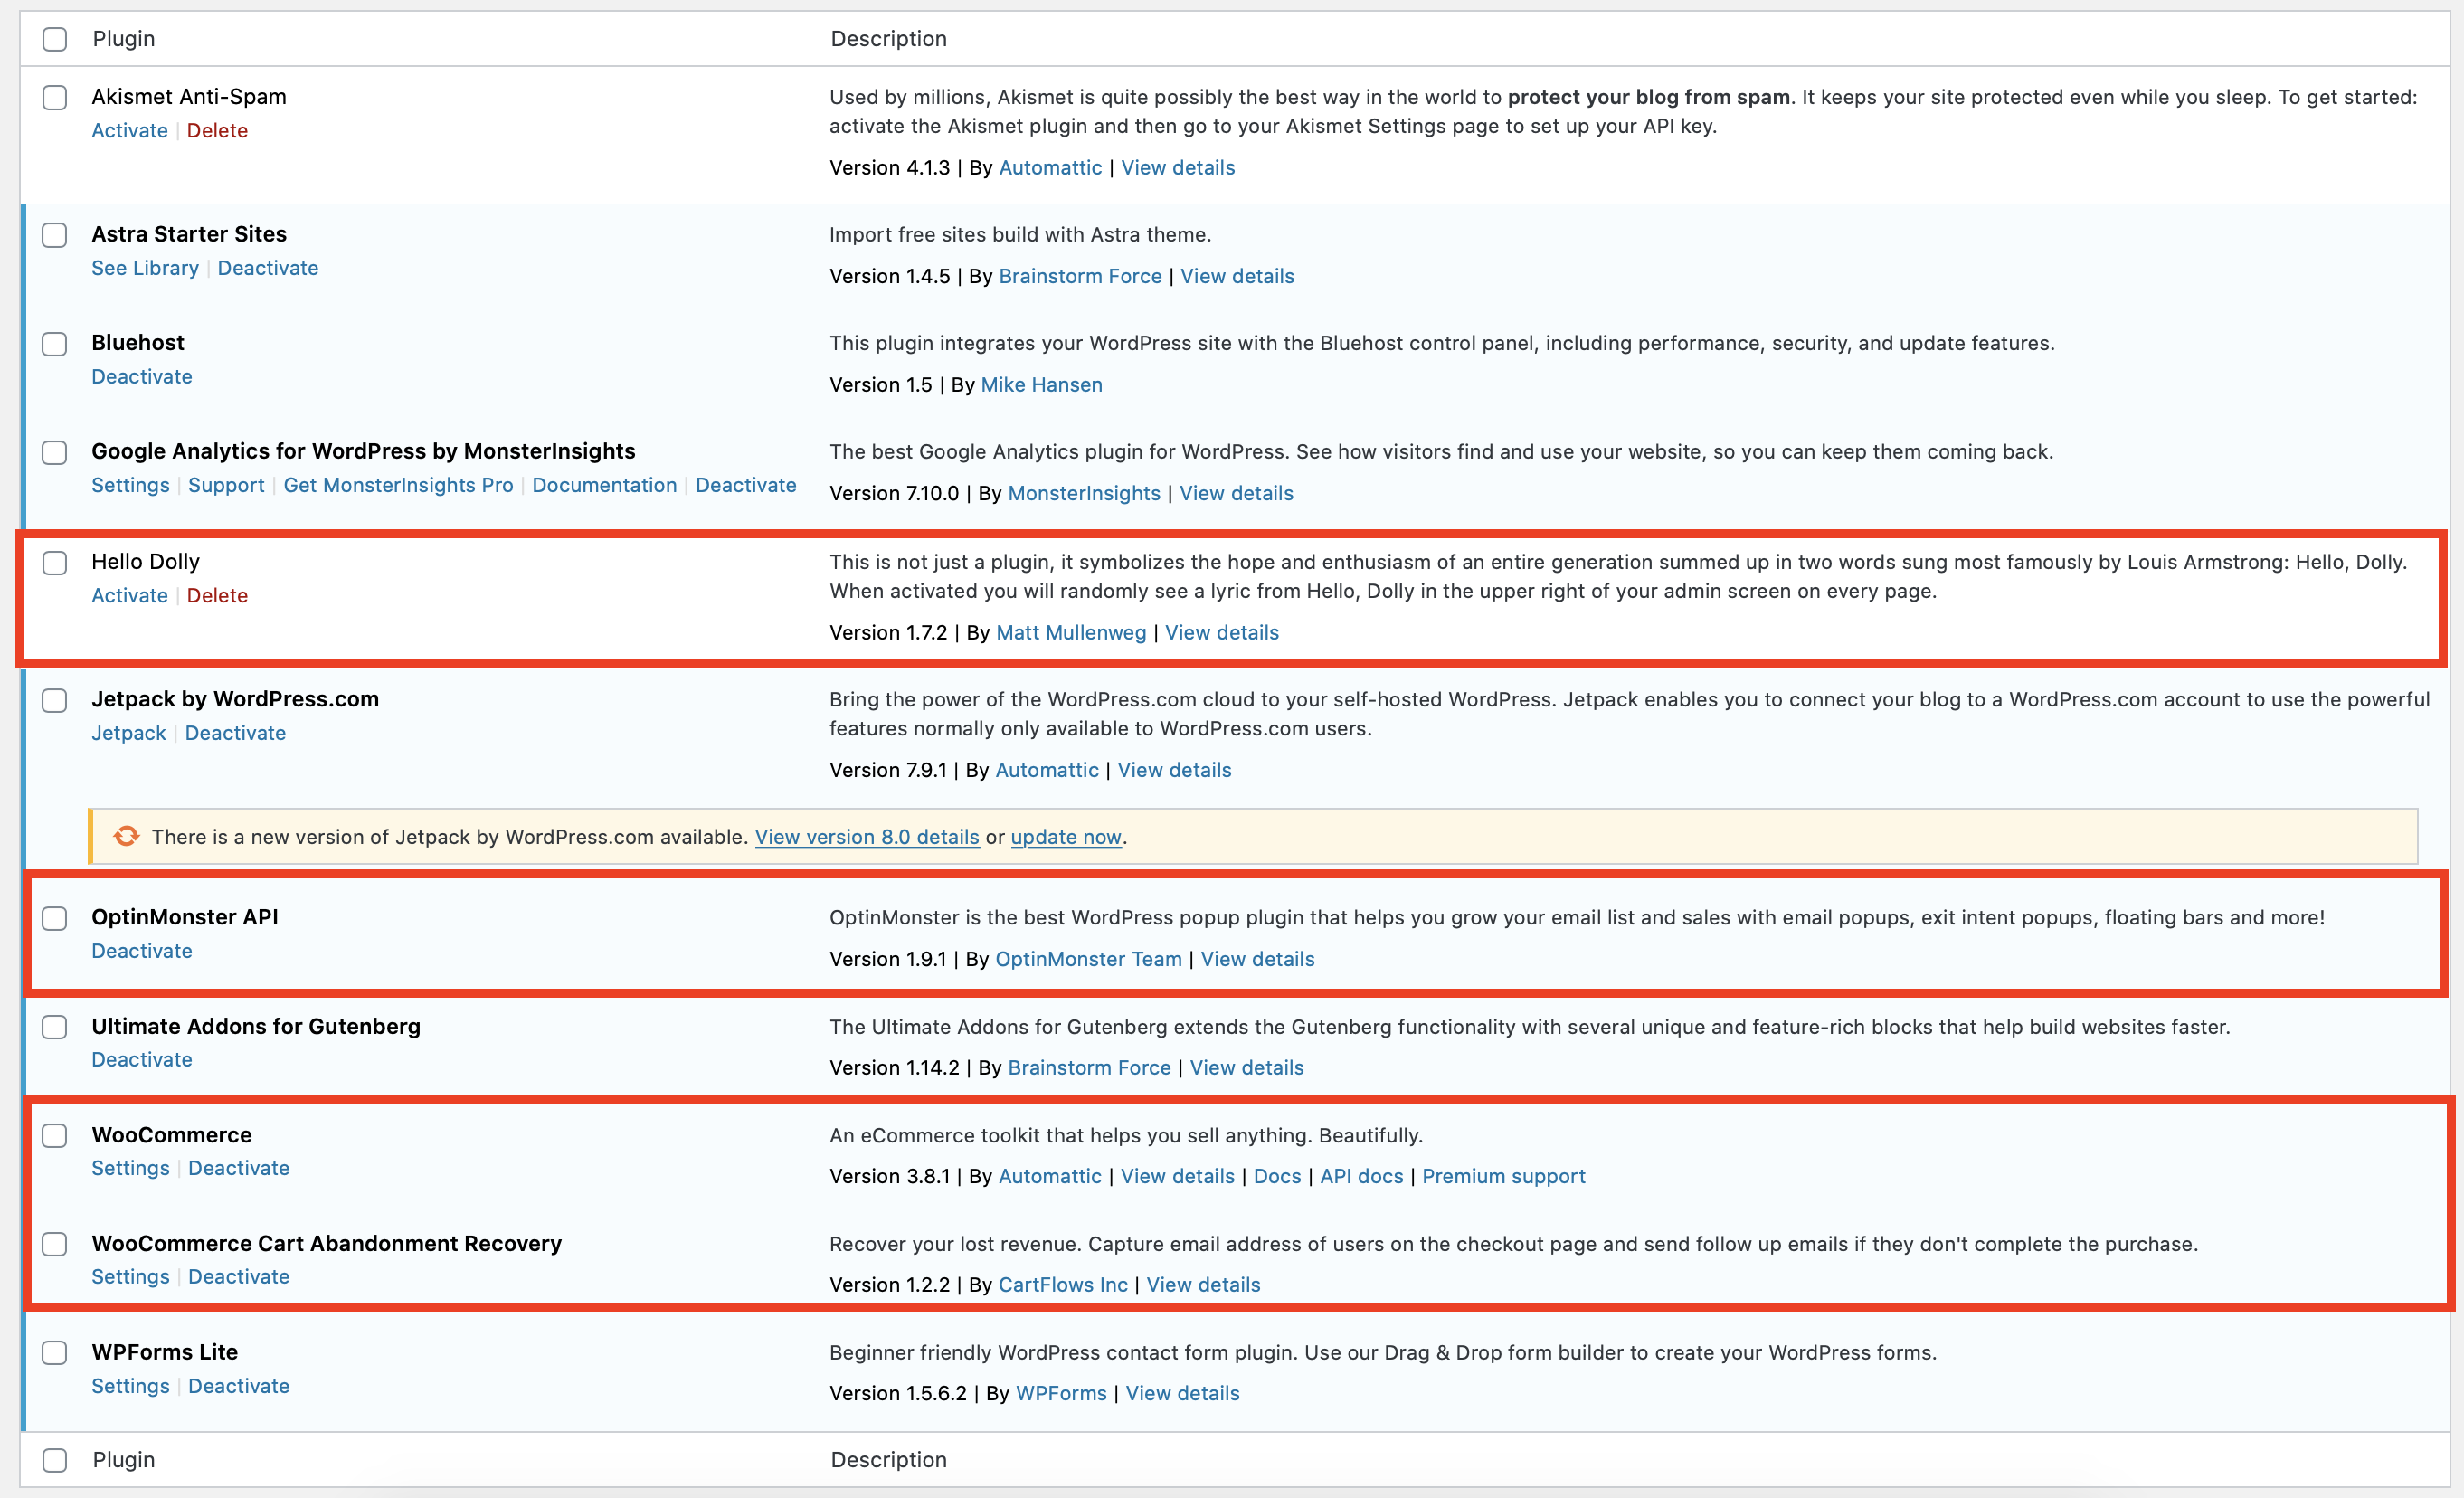
Once you’re in the Plugins section, you’ll see that Bluehost has installed quite a few plugins for you by default:
You can go ahead and delete the plugins highlighted in red. OptinMonster is a pay monthly software to help you generate more leads. Woocommerce is an e-commerce plugin that helps you sell goods directly from your site.
Feel free to keep any plugins you think you’ll use (including the ones highlighted), just know that too many plugins can slow your site down.
Here are some recommended plugins to get you started:
- Autoptimize (free) — makes the most of your site speed by optimising Javascript, HTML, images and more to improve page speed.
- Classic Editor (free) — Brings back the classic page and post editor for WordPress (resembles Microsoft Word). WordPress released Gutenberg in November 2018 and many people prefer the classic editor instead. You can test both to see which one you prefer (I’m still using classic!).
- Pretty Links (free) — Helps you turn ugly long URLs into short and sweet ones. This is mainly used for affiliate links as they’re often super long. Pretty Links also track link clicks.
- Yoast SEO (free) — One of the most widely used SEO plugins for WordPress. Helps you structure your site in the most efficient way and optimise your pages for better Google rankings.
- Use Any Font (paid) — Allows you to upload and use any font on your website. Some themes come with a limited set of fonts — Use Any Font solves this issue. Costs $10 for a single site licence.
Step 6: Sort your SEO and site permalink structure
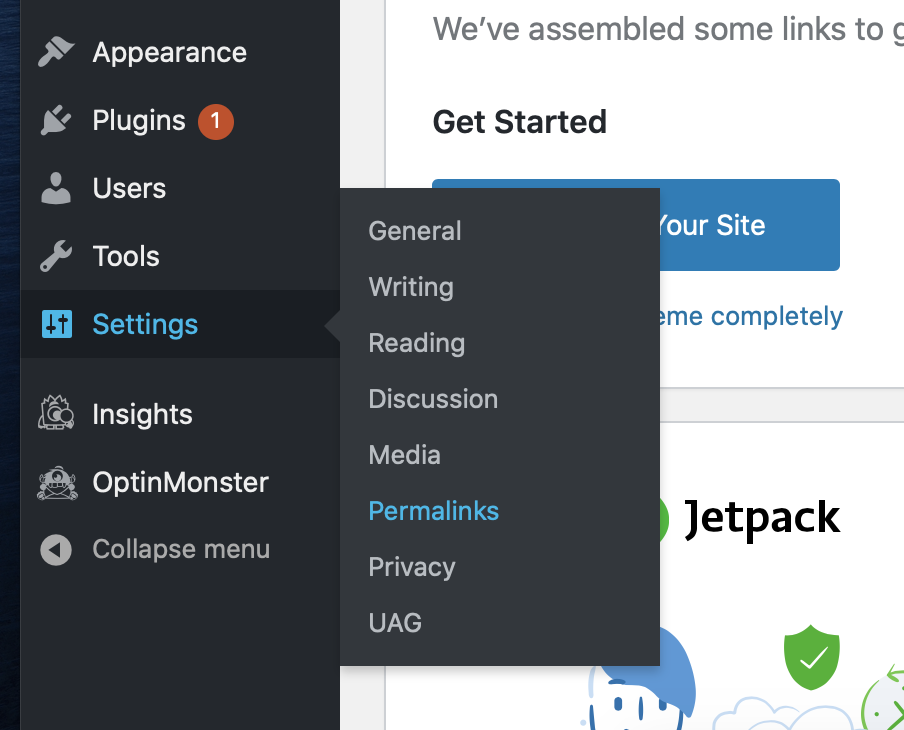
From your WordPress dashboard, hover over the “Settings” button and click on “Permalinks”:
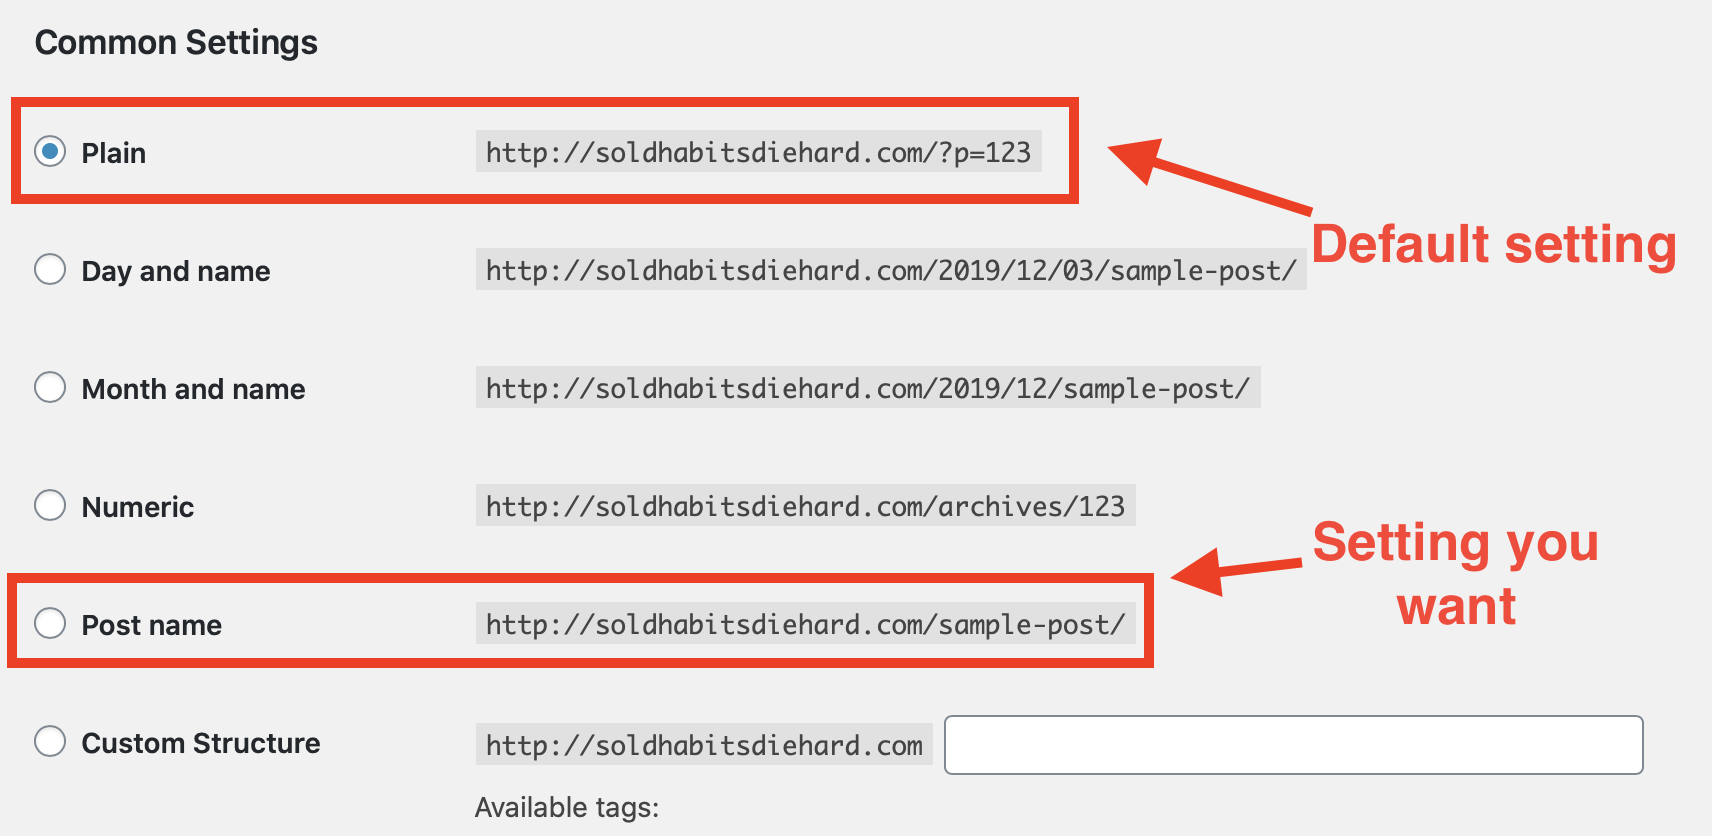
Once there, you’ll see “Common Settings” for your permalink structure.
Your site permalink structure is a fancy term for describing how your URLs look on your blog. This is important because the default structure for your posts look like this:
If you sent someone a link to one of your posts with the default setting, they’d have no idea what your post was about. This is also horrible from an SEO perspective as search engines use the keywords in your URL as a ranking factor.
Finally, you want to make sure you sign up for Google Analytics and Google Search Console — free tools that track website visits, conversions and more. Here’s a great guide on getting started with Google analytics. And an equally great one for Google Search Console from Hubspot.
If you’ve followed the above steps, congratulations, you’re now the proud owner of your new piece of online real estate!
You’ve researched your niche, defined your vision, picked your domain name, your hosting, installed WordPress, and chosen your themes and your plugins. Phew!
You’re kicking some serious action-taking ass right now. I’m sending you virtual pats on the back through the screen!
Step 7: Start creating content
You’ve built your foundations, now it’s time to start adding content.
Learning how to create epic content isn’t something that can be taught in a blog post — but let’s cover some principles that help you on your way.
If you want your content to reach the first page of Google, it needs to be as good or better than what you find on the first page for your target keywords. Creating content needs to come from a place of adding value and not just educating but entertaining your readers…
Still working on that last one!
Content that does well is typically long-form, detailed, and contains pictures, infographics, videos….etc. You don’t need to include all of these in your posts, but you want to break up your content with appealing visual aids.
Once you start writing and publishing great content, you need to start promoting it. It can be through digital signages, ads, and more. If you just build it, they won’t come automatically.
In fact, you should spend just 20% of your time creating content and 80% promoting it. Promoting your content in the right way will help you land links from powerful websites. These links will help you rank in the search engines.
Bringing it all together
So there you have it!
A step-by-step walkthrough on creating your first website and piecing everything together. If you’ve taken action and launched your first website – big high-five!
I know how daunting things can be when you’re first starting out, I’ve been there. And it sucks. There’s a lot to learn and overwhelm feels like your new best friend you never wanted.
But stick with this.
This could be the start of a life-changing journey if you choose to take this seriously.
If you’re interested in further resources, I recommend the Six Figure Mentors — a course that helps new entrepreneurs start a profitable online business.
SFM helped me learn game-changing concepts on affiliate marketing and I even got coaching and met many like-minded people through their awesome community. This was at a time when I was ready to give up after struggling for over a year in affiliate marketing.
So if you’re looking for a blueprint you can follow, it’s worth checking them out.

I’m a London-born lover of technology, obsessed with online business, passive income and the digital economy. I love learning, researching and curating the most valuable resources to save you time, money and help you discover the truth on what it actually takes to achieve your goals.







Thanks so much for sharring great information.
Hii there, Great tips for blog. Thanks for sharing this informative information with us. Keep posting. If you are planning to go on a trip with your family or friends. Then, we are the best accommodation provider in Espiritu Santo Island, Vanuatu.
Hey Ahmad.
Another blockbuster of a guide to starting a blog.
I don’t just love the careful resource but the design as well.
Truth is, what makes me glue to a site is the design as well. Just wondering if you’re a site builder like Elementor for some parts with nice backgrounds.
Altogether, great read it is.