Toying with the idea of picking Unbounce as your landing page builder?
If you’ve been doing business online for a while you know landing pages are a vital cog in your digital marketing machine.
Whether you make money through affiliate marketing, white label products, or drop shipping, solid landing pages are part of your game plan.
To do landing pages right, you need a good landing page builder.
Unbounce is touted as the landing page builder for serious marketers. Check best-landing page-builders lists out there and you’ll usually find Unbounce in the top three.
But is it really all that or just a tool that’s more than hype than handy?
In this (BS-free) Unbounce review, I will examine the key features of the platform. When we are done, you’ll be able to make an informed decision on whether Unbounce is suitable for you or not.
But before we get into the nitty-gritty let’s answer a few basic questions:
Unbounce – The User Interface
Let’s explore the user interface.
If you’re like most online marketers — you want a simple and nimble but powerful tool that allows you to create high-converting pages.
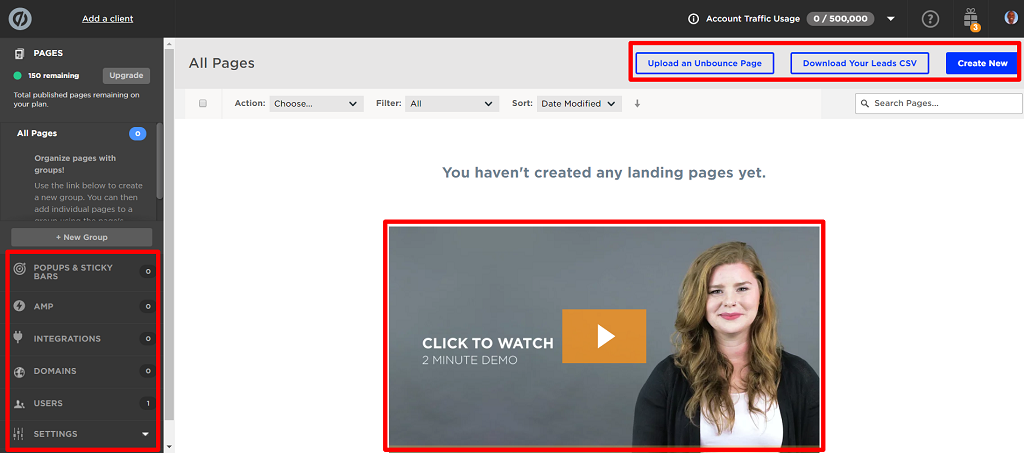
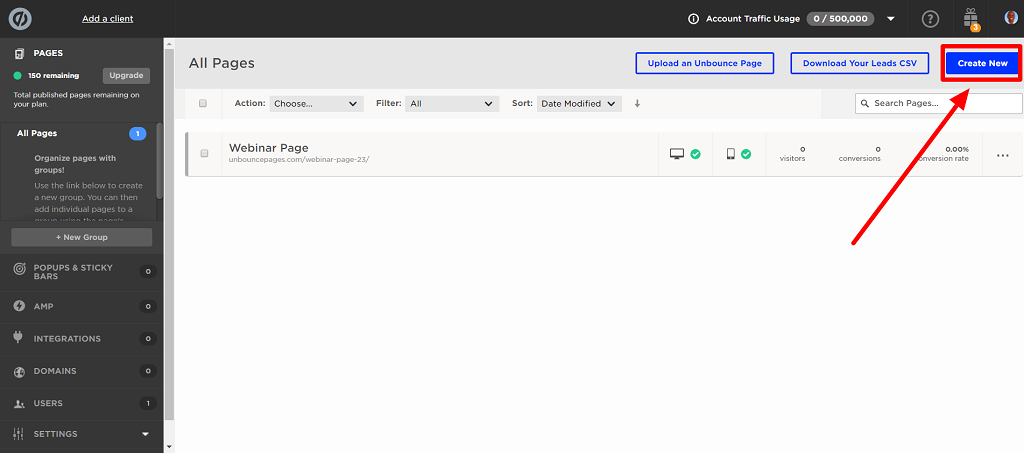
Unbounce doesn’t disappoint. When you log in to your account, they greet you with a clear, clutter-free dashboard that gives you options to create a new page, load an existing one or download your leads.
To begin with, on the left are options to work on your popups, sticky bars, Google Accelerated Mobile Pages (AMP) and other features of the tool.
Check it out:
Also, you can watch a short video that shows you how to create your first page. Most important, this is a great way to help beginners get started fast.
What strikes you immediately is the simplicity and clarity — the backbones of a friendly user-friendly interface. It’s easy for you to find your way around. Besides that, there’s nothing special about the dashboard. It’s pretty standard — in a good way.
One small thing worth mentioning is:
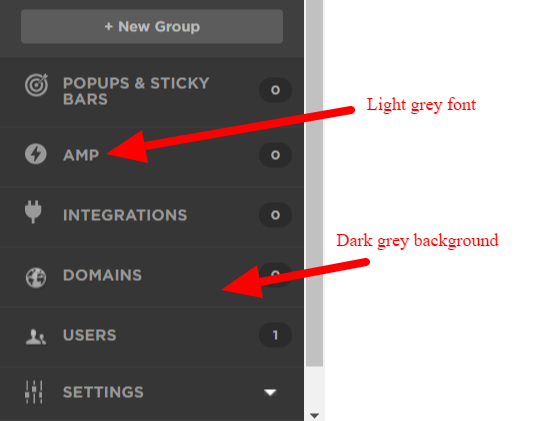
The grey font used on a black background on the left side menu — it blends in a little too well.
Those with poor eyesight may have to squint their eyes to read. A more obvious colour contrast would make reading faster and more pleasurable.
Unbounce – The Landing page editor
Unbounce pride themselves in helping users create landing pages that convert better than anyone else’s on the market.
In the first place, to create a landing page, hit ‘create new’ on the top right corner of the dashboard.
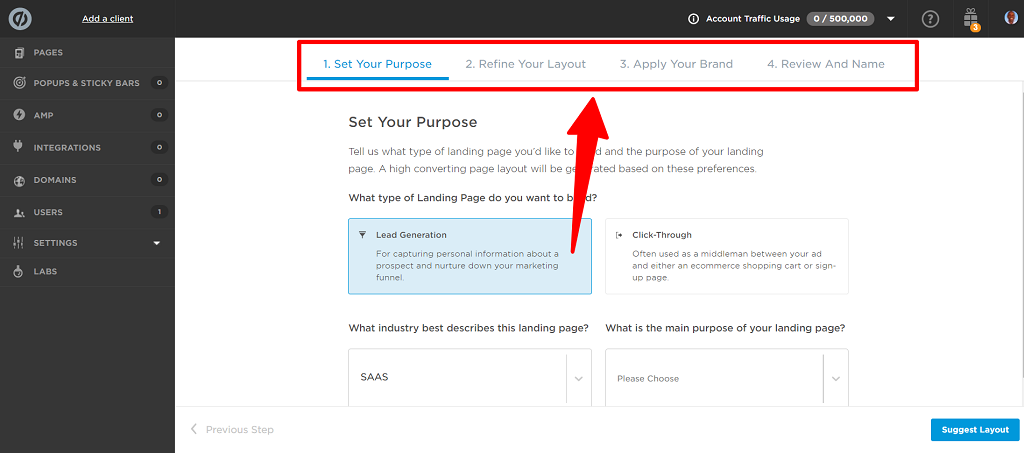
Next, click on the blue get started icon. In addition, follow four simple steps:
- Set the purpose of the page (Lead Generation or Click-Through).
- Refine your layout (Pick suggested layout or choose your own).
- Apply your brand (Apply your brand’s fonts and colours).
- Review your layout (Name your page or campaign).
Here’s what I’m talking about:
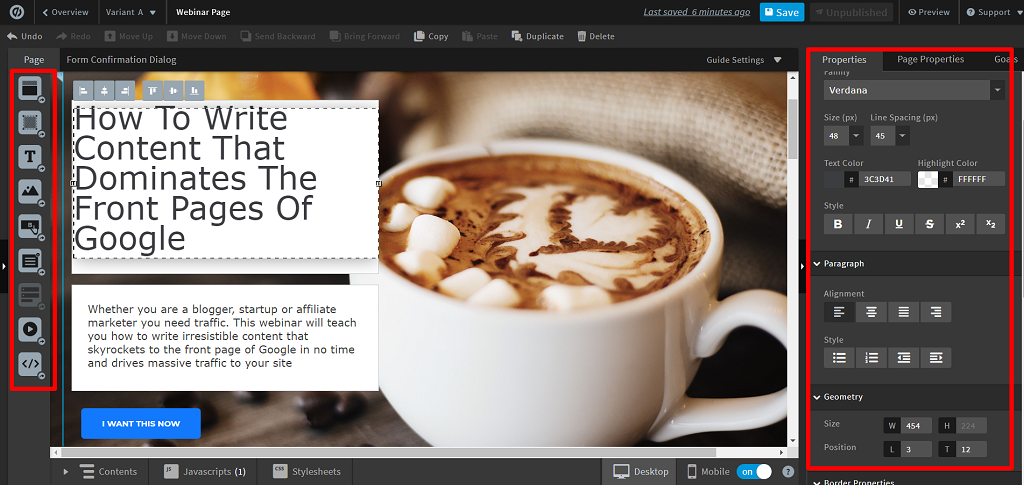
Finally, hit ‘fine-tune this page’ and move to the heart of the editor where most of the action happens. Here you can work on the finer details of your page like fonts, buttons, images, and forms.
I used the easy-to-use drag and drop feature to create a webinar invitation page in minutes.
Here it is in all its glory before publication:
Not too bad if I say so myself. :)
The editor allows you to drag and drop:
- Sections
- Boxes
- Text
- Images
- Buttons
- Forms
- Embed videos
Similarly, on the right menu, you can work on borders, font size, backgrounds, colours, goals, and more.
Using images in Unbounce editor
Without a doubt, conversion-optimised landing pages have lovely images.
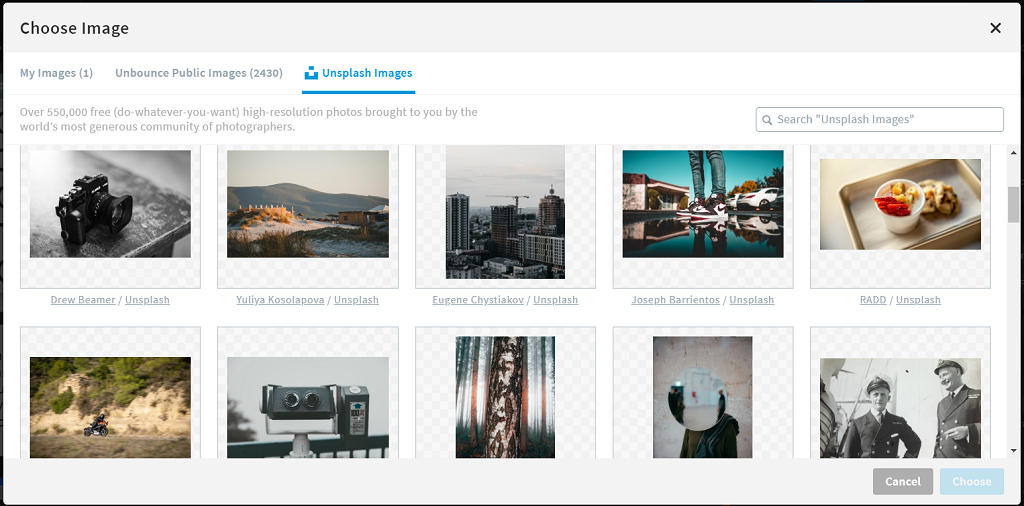
Certainly, these visuals support the text message, touch people’s emotions, and lead to higher conversions. The Unbounce editor does much of the heavy lifting by placing 500,000+ high-resolution photos at your fingertips so you can spice up your page with ease.
With such a wide selection of images from Unsplash, you will find ones that suit your industry or campaign.
And it doesn’t end there.
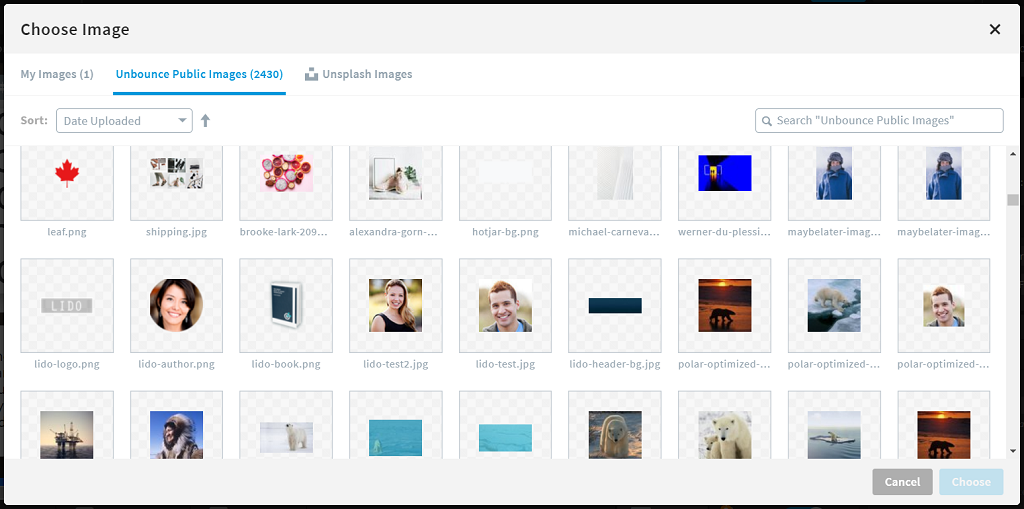
Unbounce also offers their own image library for your convenience:
These image resources save precious hours you’d otherwise spend scouring the nooks and crannies of the internet for the right image to use.
By placing a vast library of photos on hand, Unbounce saves you from this inconvenience.
Using the Auto Image Optimiser
Yes — images complement the text on a webpage and improve user engagement, but they’re also notorious for slowing down pages.
Of course, if your page loads slowly — users abandon it. Ouch. Not what you want!
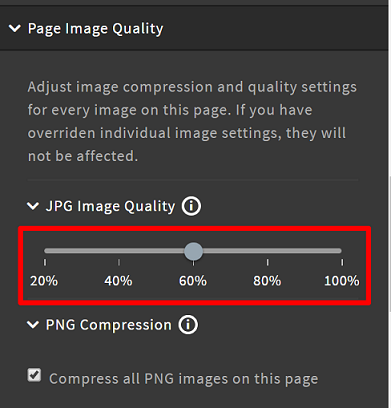
That’s where Unbounce’s auto image optimiser comes in to save the day. Images are automatically optimised to balance quality and file size and make your pages load faster.
This is all done from inside the editor. Or, if you want more control you can do it manually:
Go to page properties > page image quality> image type (jpg or png) > adjust slider
Bingo! You now have smaller fast-loading images.
Next, let’s look at mobile landing pages.
Unbounce Mobile Landing Pages
While the editor includes a mobile pages feature, it has a blemish.
The conversion of designs from desktop to mobile needs improvement. Mobile versions of pages come out wrong sometimes. So you must spend time sprucing up the mobile version, which can sometimes feel like you’re designing two separate pages.
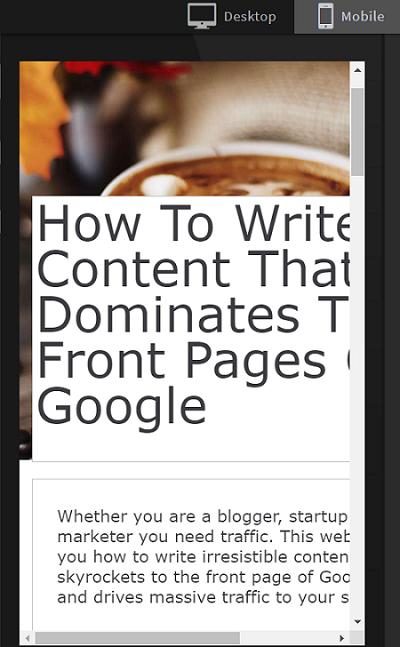
For example here is the mobile version of the page I showed you earlier:
As you can see, words are cut off on the right. I had to spend time reworking the page so the words would fit.
Admittedly, we all know mobile pages are finicky but I feel Unbounce could do a better job to ensure they match the desktop version as closely as possible.
Having said that, they must be applauded for building responsive pages.
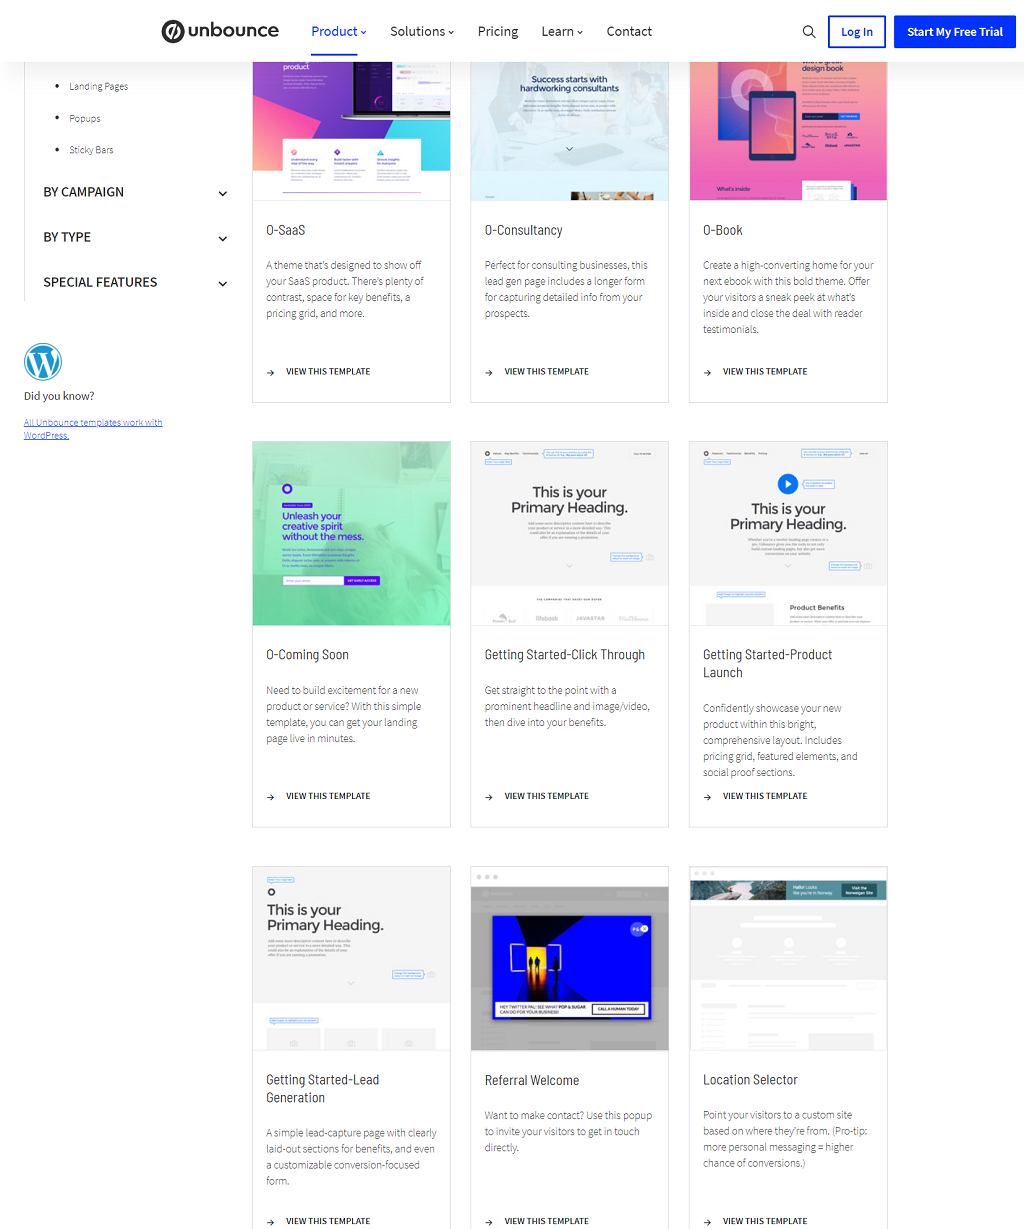
To cap it all, the editor has a massive 100+ tried-and-tested high-converting landing page templates for you to choose from.
Undeniably, this is more than enough for most people.
But, as a way of comparison, Leadpages has 150+ templates so Unbounce has got some catching up to do. And, of course, as any proper modern landing page builder should, you can build a custom page from scratch.
Overall, using the editor is an instinctive experience.
Even a total newbie can master the basics in a few hours and have a respectable page up and running in a short space of time.
Unbounce popups and sticky bars
Popups — love them or hate them, they work like gangbusters.
As a result, they hound you wherever you go online.
Unbounce popups/sticky bars allow you to present highly targeted offers to your visitors based on various parameters like:
- Traffic sources e.g. Facebook, Google Ads, email.
- Their location e.g. city, region, and/or country.
- Specific actions they take e.g. when a visitor arrives on a page or when they exit the page.
The result? Better conversions.
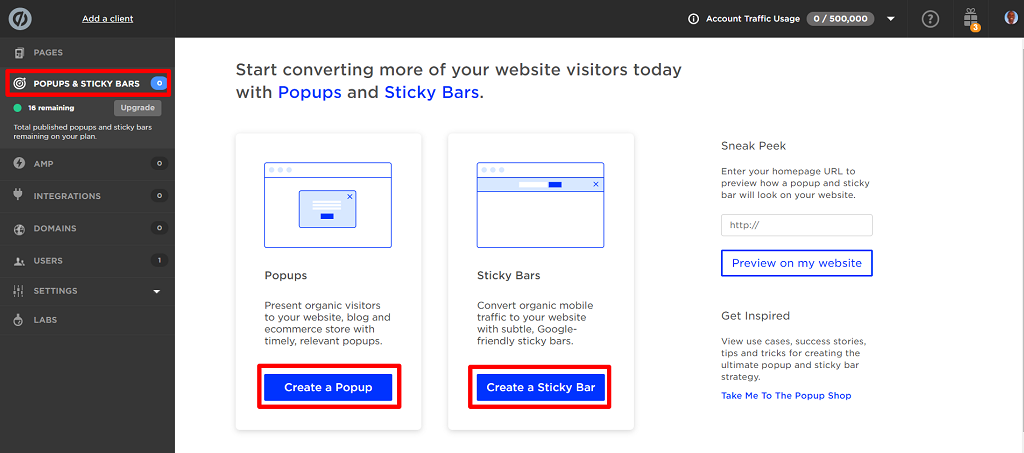
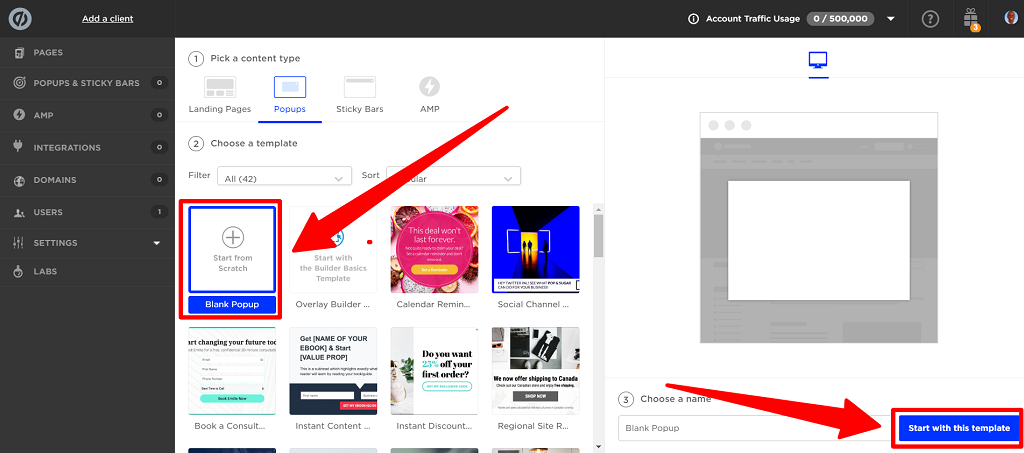
To get started, click ‘popups and sticky bars’ on the left menu. You will then see this page:
Hit either ‘create a popup’ or ‘create a sticky bar’.
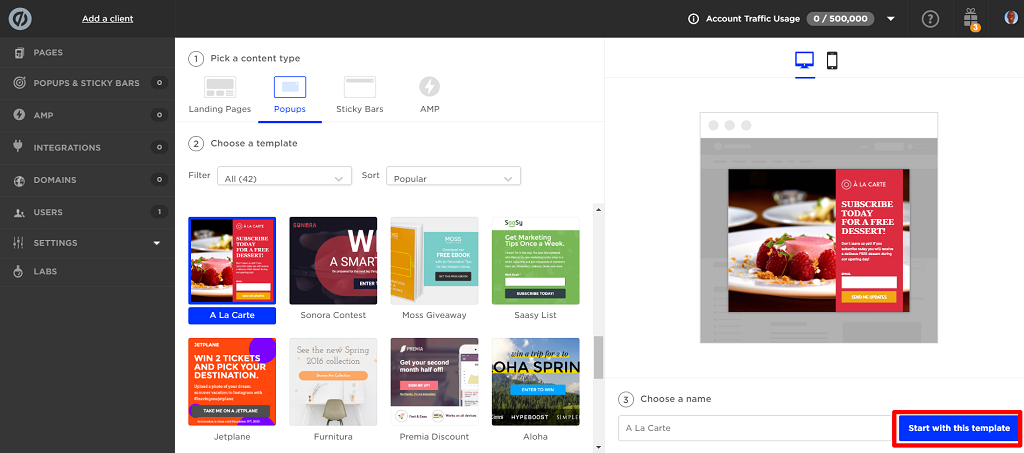
Then choose a template from the available 50+ options and click ‘start with this template’
You can filter results by popularity or the purpose of the popup which covers the following common scenarios:
- Build list
- Contest
- Cross-sell
- Discount
- Cart abandonment
- Content giveaway
- Event registration
- Free Quote
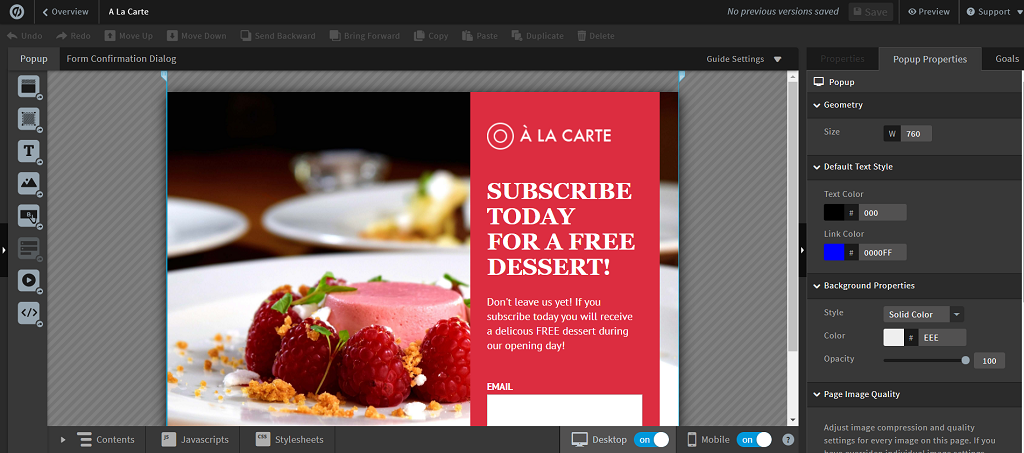
You’ll then arrive at the main popups and sticky bar editor.
Here you can craft and polish your page until it sparkles, then publish your masterpiece!
What about creating a popup from scratch? How much of a challenge is it?
Let’s find out:
Custom Popups and Sticky bars
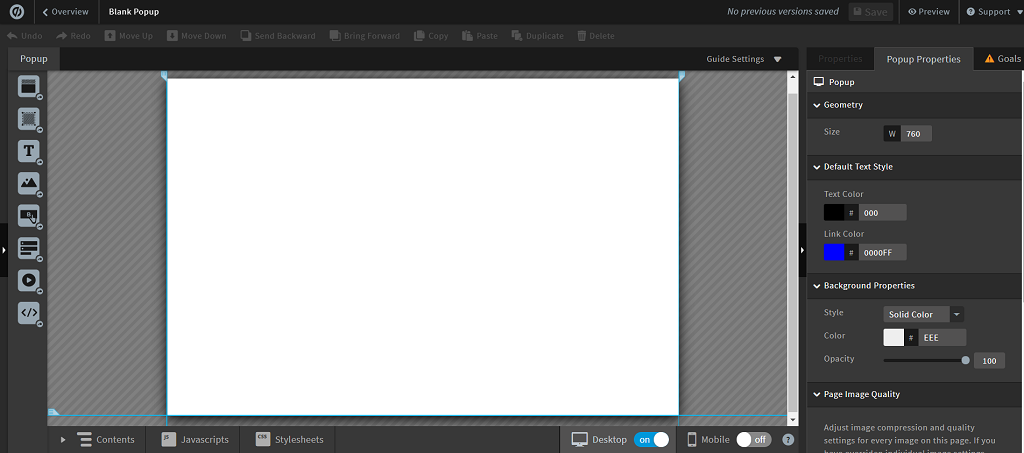
First of all, on the templates page, select ‘start from scratch’ > ‘start with this template’
Second, you’ll see a blank canvas awaiting you. Don’t let it scare you. Take it as an opportunity to unleash your creative genius:
Drag and drop images. Tweak and tint colours. Space and spin fonts.
Get inspiration from other templates if you’re struggling to get started. In the end, you’ll outdo yourself, like I did!
Moving various elements is a snap. You can customise any template down to the smallest detail by drag-dropping elements on to your canvas.
Popups and sticky bars help you personalise your offers and target visitors with precision. They’re versatile, easy to create and simple to connect to your site. You can use them for lead gen, coupon codes, limited-time deals, product announcements — or for bonus offers.
To publish your popups/sticky bars on your site, you must link your Unbounce account to your website first.
How to Connect an Unbounce Page to Your WordPress Site
Hooking up your Unbounce account to your WordPress site is easy.
Here’s how to do it in 3 simple steps.
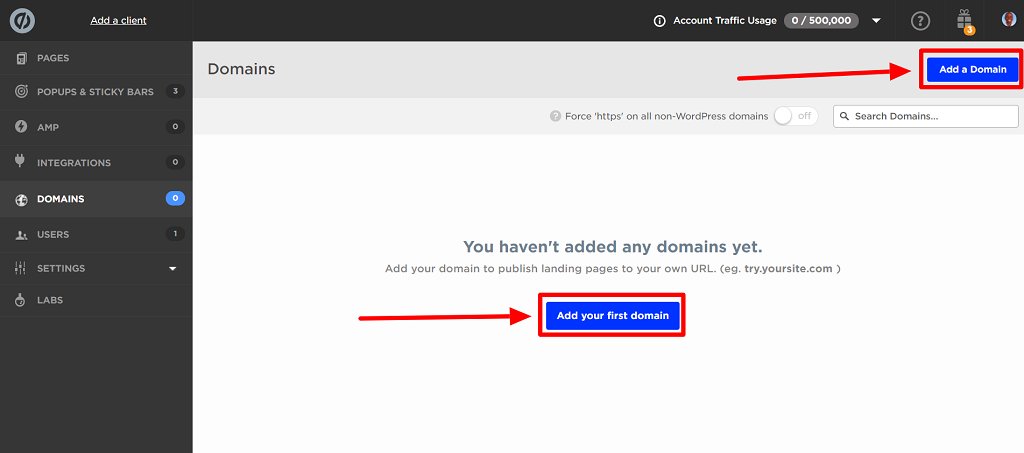
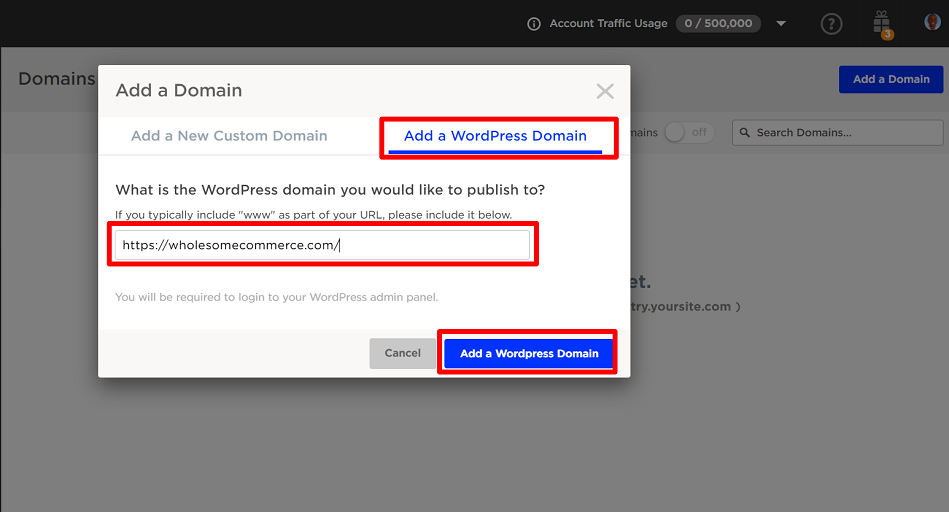
Step 1: Click domains on the left-hand side of the dashboard and then hit ‘add a domain’ or ‘add your first domain’ button.
A new screen will appear.
Step 2: Select ‘add a WordPress domain’ on top, now paste your site URL in the space provided and then hit ‘add a WordPress domain’.
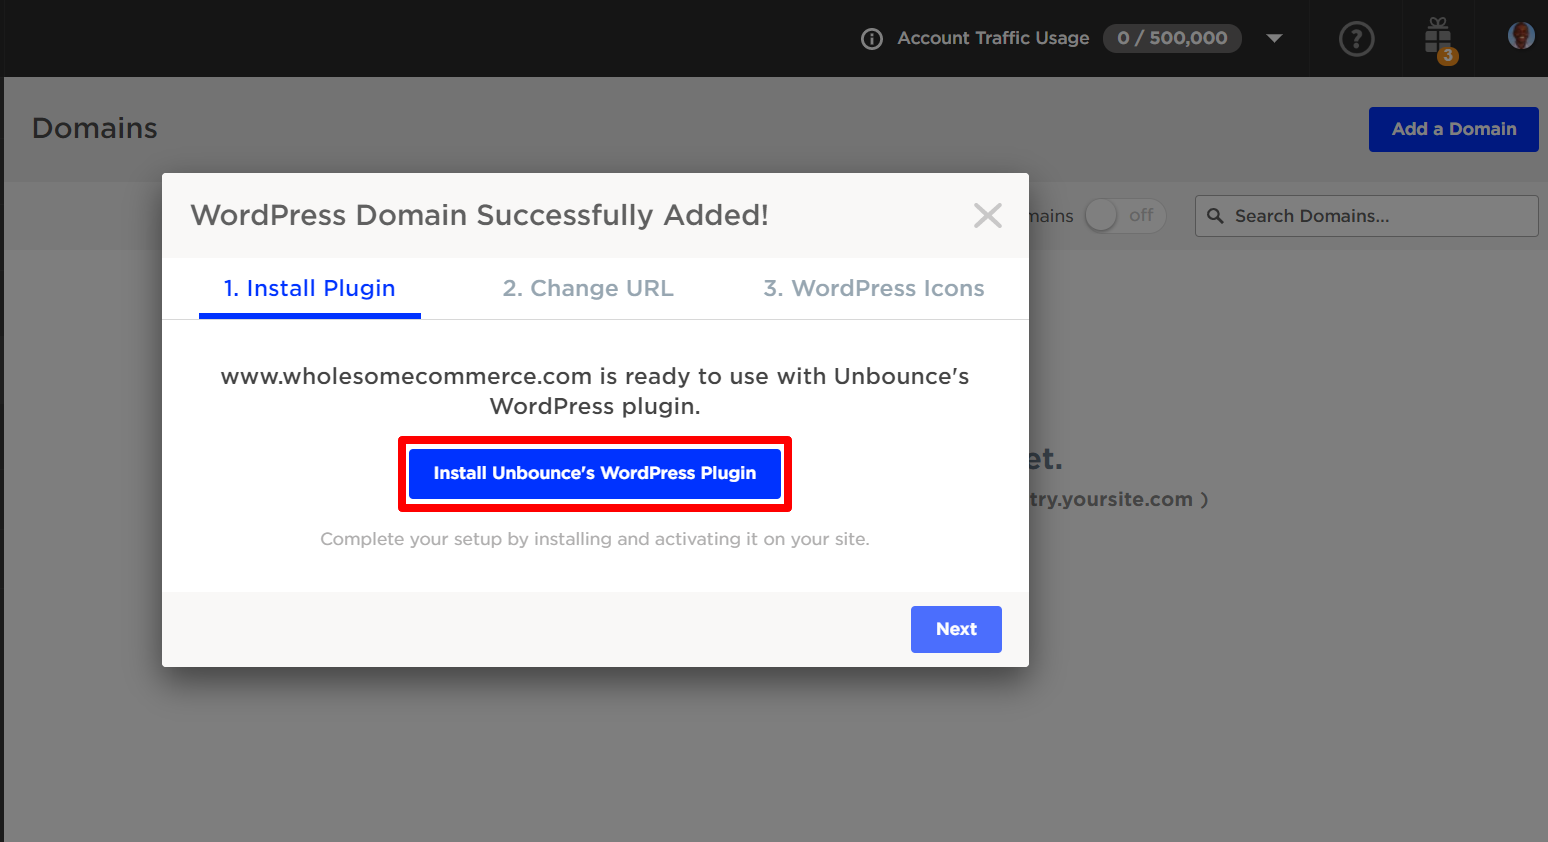
Step 3: Click on ‘install Unbounce’s WordPress plugin’
You are done on this end. Now, head over to your site to finish your set up.
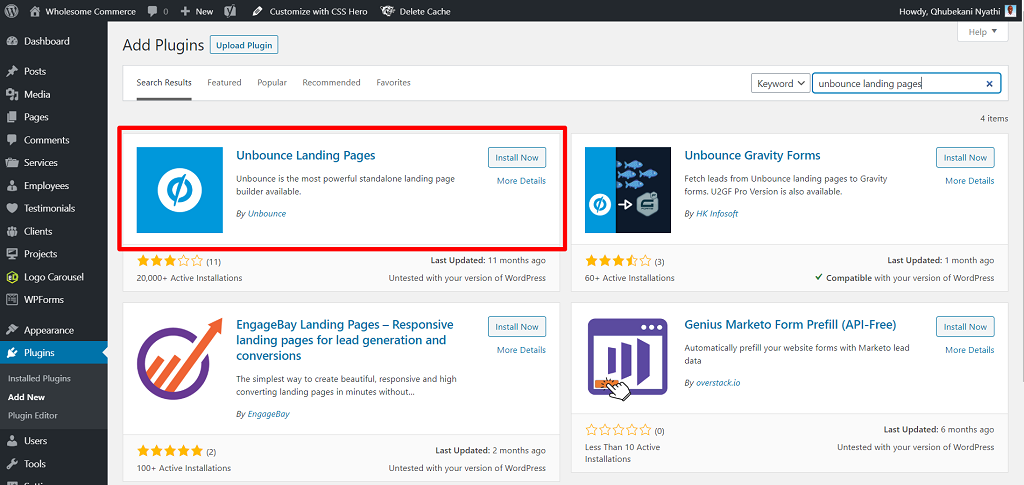
Step 4: Search for the ‘Unbounce Landing Pages’ in the plugins directory and install (and activate) it.
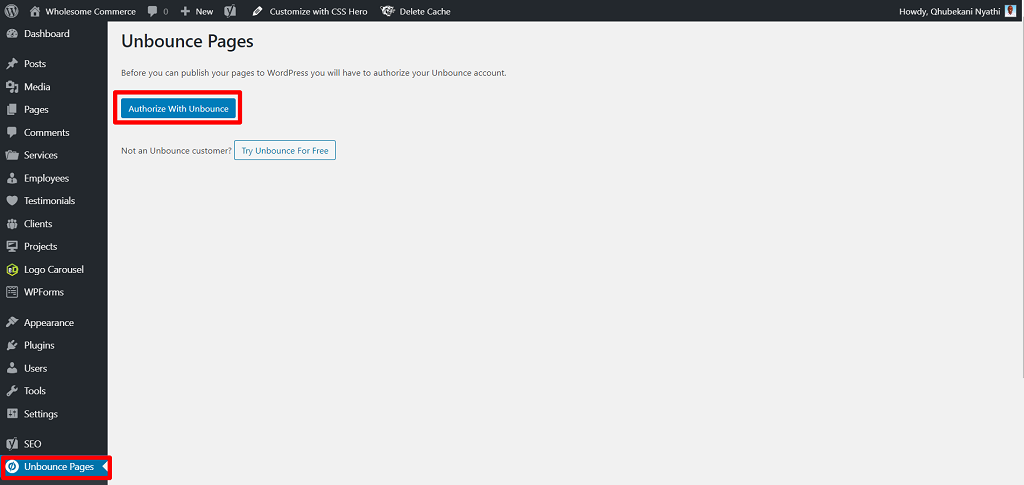
Step 5: Authorise the Unbounce plugin by selecting the ‘Unbounce Pages Plugin’ from the left sidebar WordPress menu, then click the authorise button.
That’s it. Congratulations! Your site is now ready to publish Unbounce landing pages to help you grow your business.
Unbounce split testing
A good landing page builder allows you to maximise conversions and get better insights on your customers through A/B testing.
Perhaps you’re wondering what the heck A/B testing is.
Allow me to explain:
A/B testing or split testing is comparing two versions of a web page with one varying element to see which one performs best. It helps you measure and iterate your pages for the best possible results.
Unbounce has robust A/B testing features.
How To Run An A/B Test On Unbounce
Here is a simple 4-step guide on how to run a split test on your landing pages, popups or sticky bars, through Unbounce.
Step 1: Create a duplicate page(s)
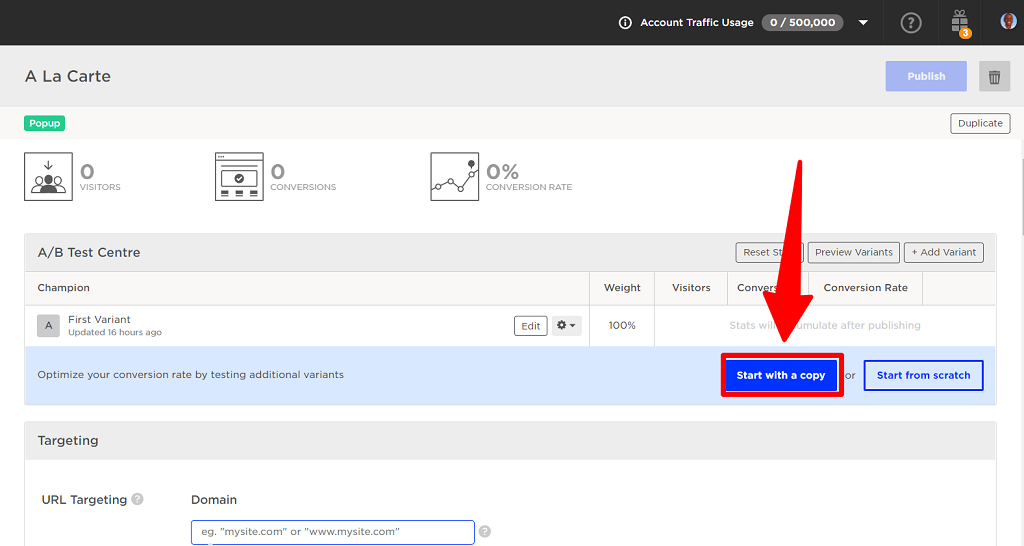
Because split testing is about comparing the performance of two or more pages, you need duplicates of the page you want to test. To do that, open the page you want to test and click on the blue ‘start with a copy’ icon.
You now have two versions or variants of the page A and B.
Easy, right? :)
Step 2: Decide what to test
So, what exactly do you want to test? Here are some key elements worth testing:
- Headline
- Hero Image
- Body Text
- Form
- Bullets (features and benefits)
- Call To Action (CTA)
Once you’ve decided, move on to the next step.
Step 3: Edit the Challenger page B
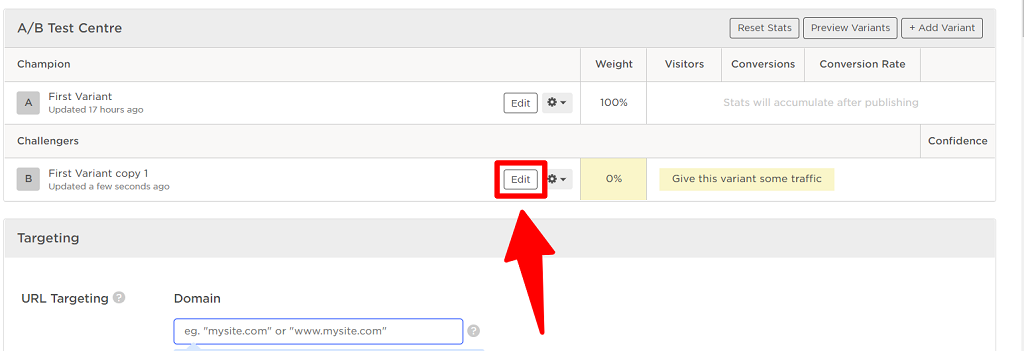
Now that you know what to test, it’s time to edit the Challenger page (B). You do that by hitting ‘edit’ so you tweak the element you want to test.
Change the part you want to test. You can:
- Change your headline e.g. make it shorter or longer.
- Shorten your lead generation form.
- Increase the size of the CTA (call to action).
- Use bullets instead of a paragraph in the body.
- Change the hero image.
The possibilities are endless.
Remember to only change one thing at a time. Making a host of changes will confuse you and you won’t know what change increased/decreased your conversion rate.
Step 4: Assign traffic and run test
Finally, assign traffic between the competing pages. This feature determines how much of the traffic you send will go to each page variant.
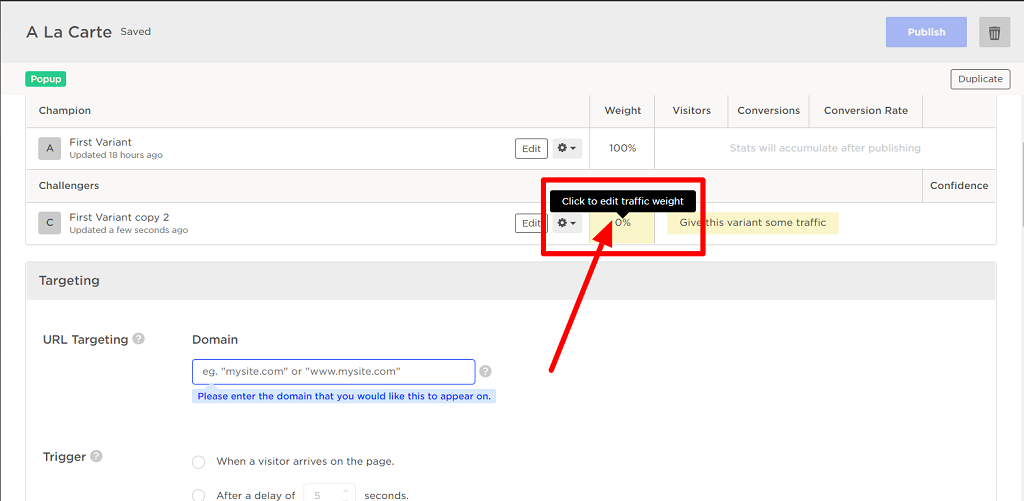
To do this, click on the 0% beside your page B (in the weight column), input the percentage weight you want to assign that variant, then press enter to confirm the changes. This determines how much of the traffic you send will go to each page.
For two pages you can do a 50/50 split. Thereafter, publish the page and run your test. Watch the numbers as they come in. Choose the winner. Rinse and repeat.
As you can see, running a split test on Unbounce is silly simple. Thankfully, all plans come with unlimited split-tests. How generous! This puts them ahead of other landing page builders that limit the number of tests you can do.
Unbounce Integrations
Like all smart landing page builders, Unbounce offers integrations so you can link to other software in your marketing stack.
After all, who relies on a single marketing tool these days?!
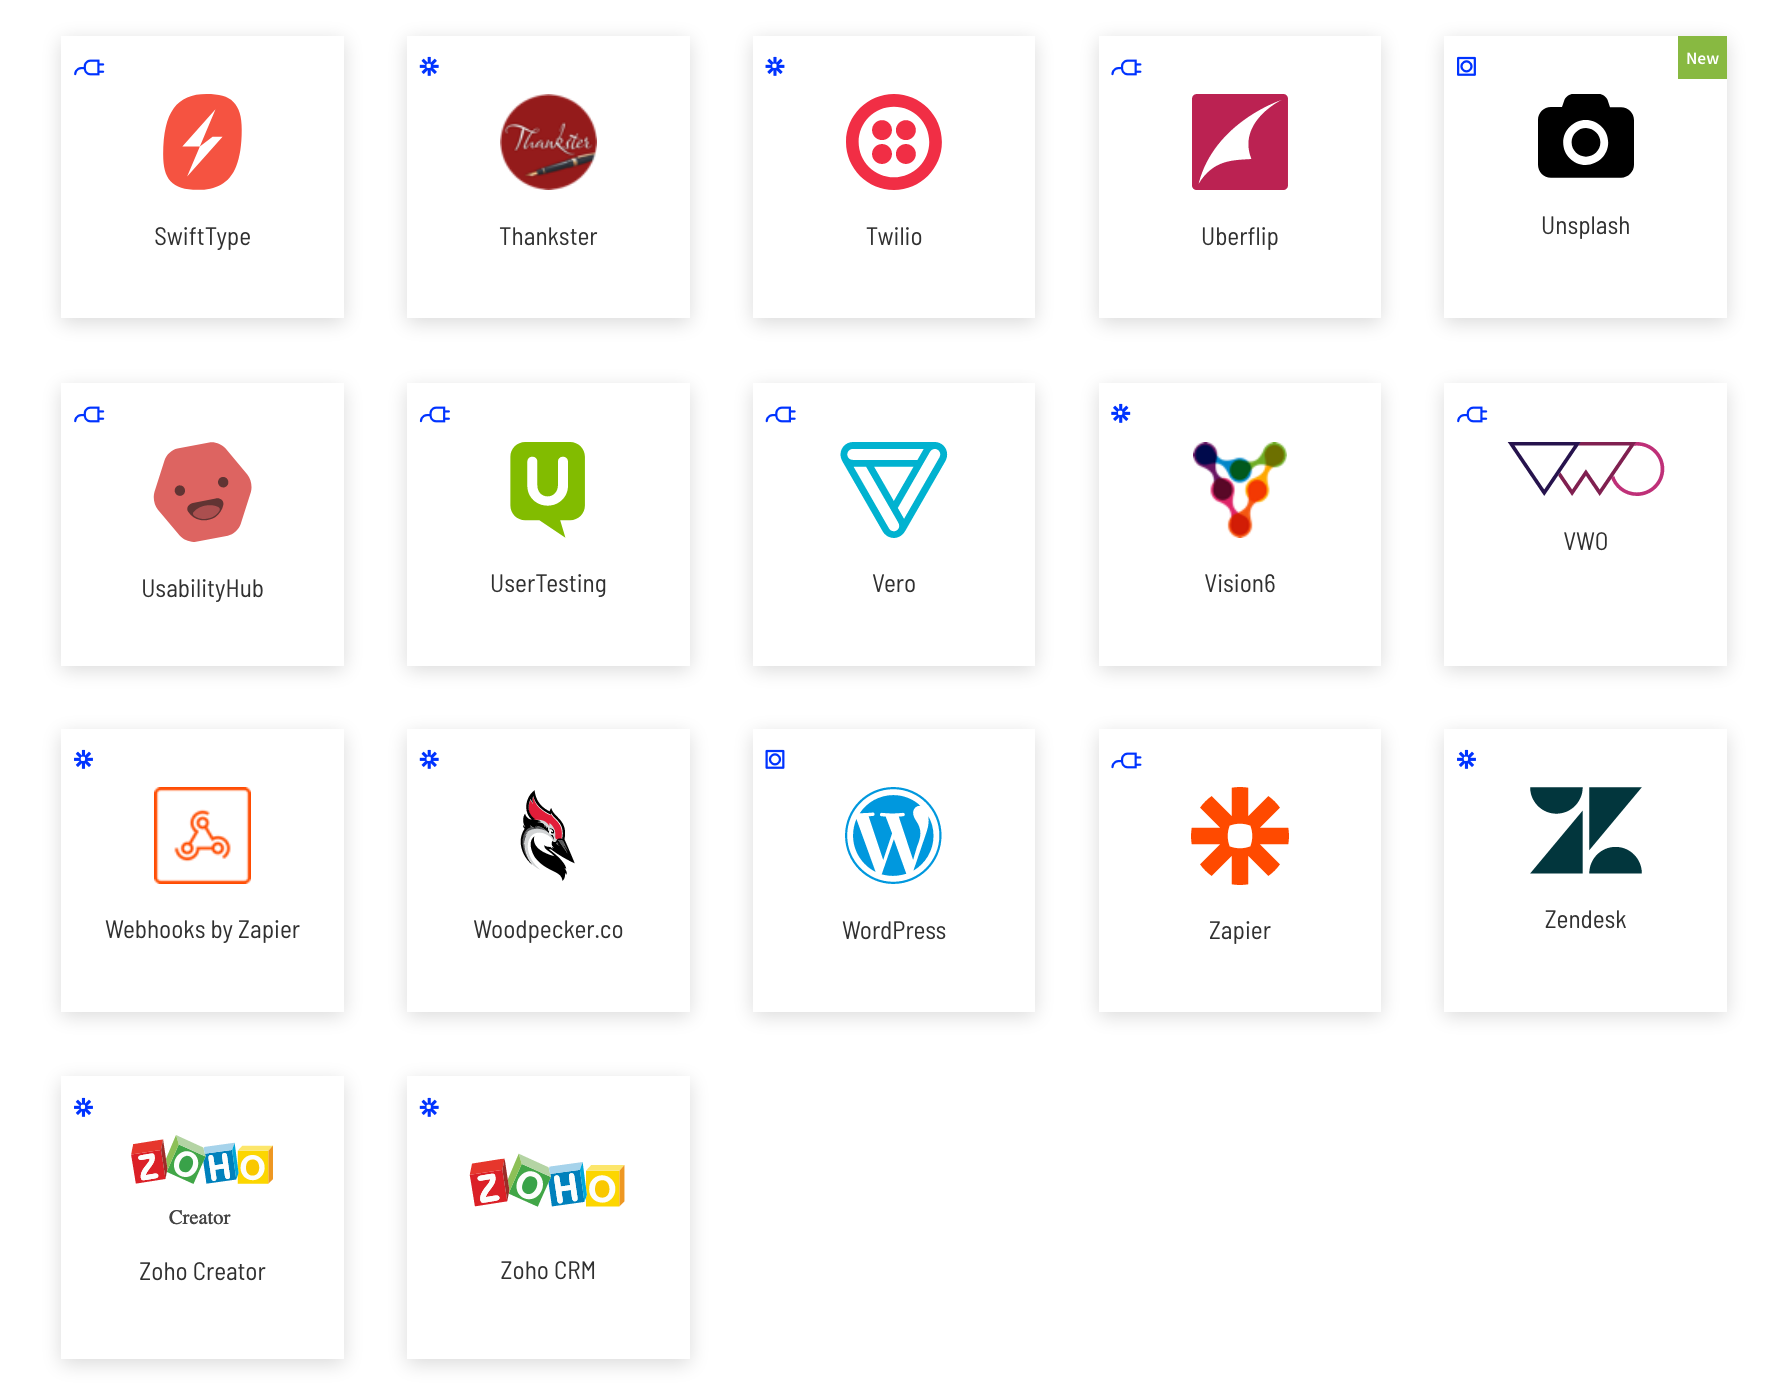
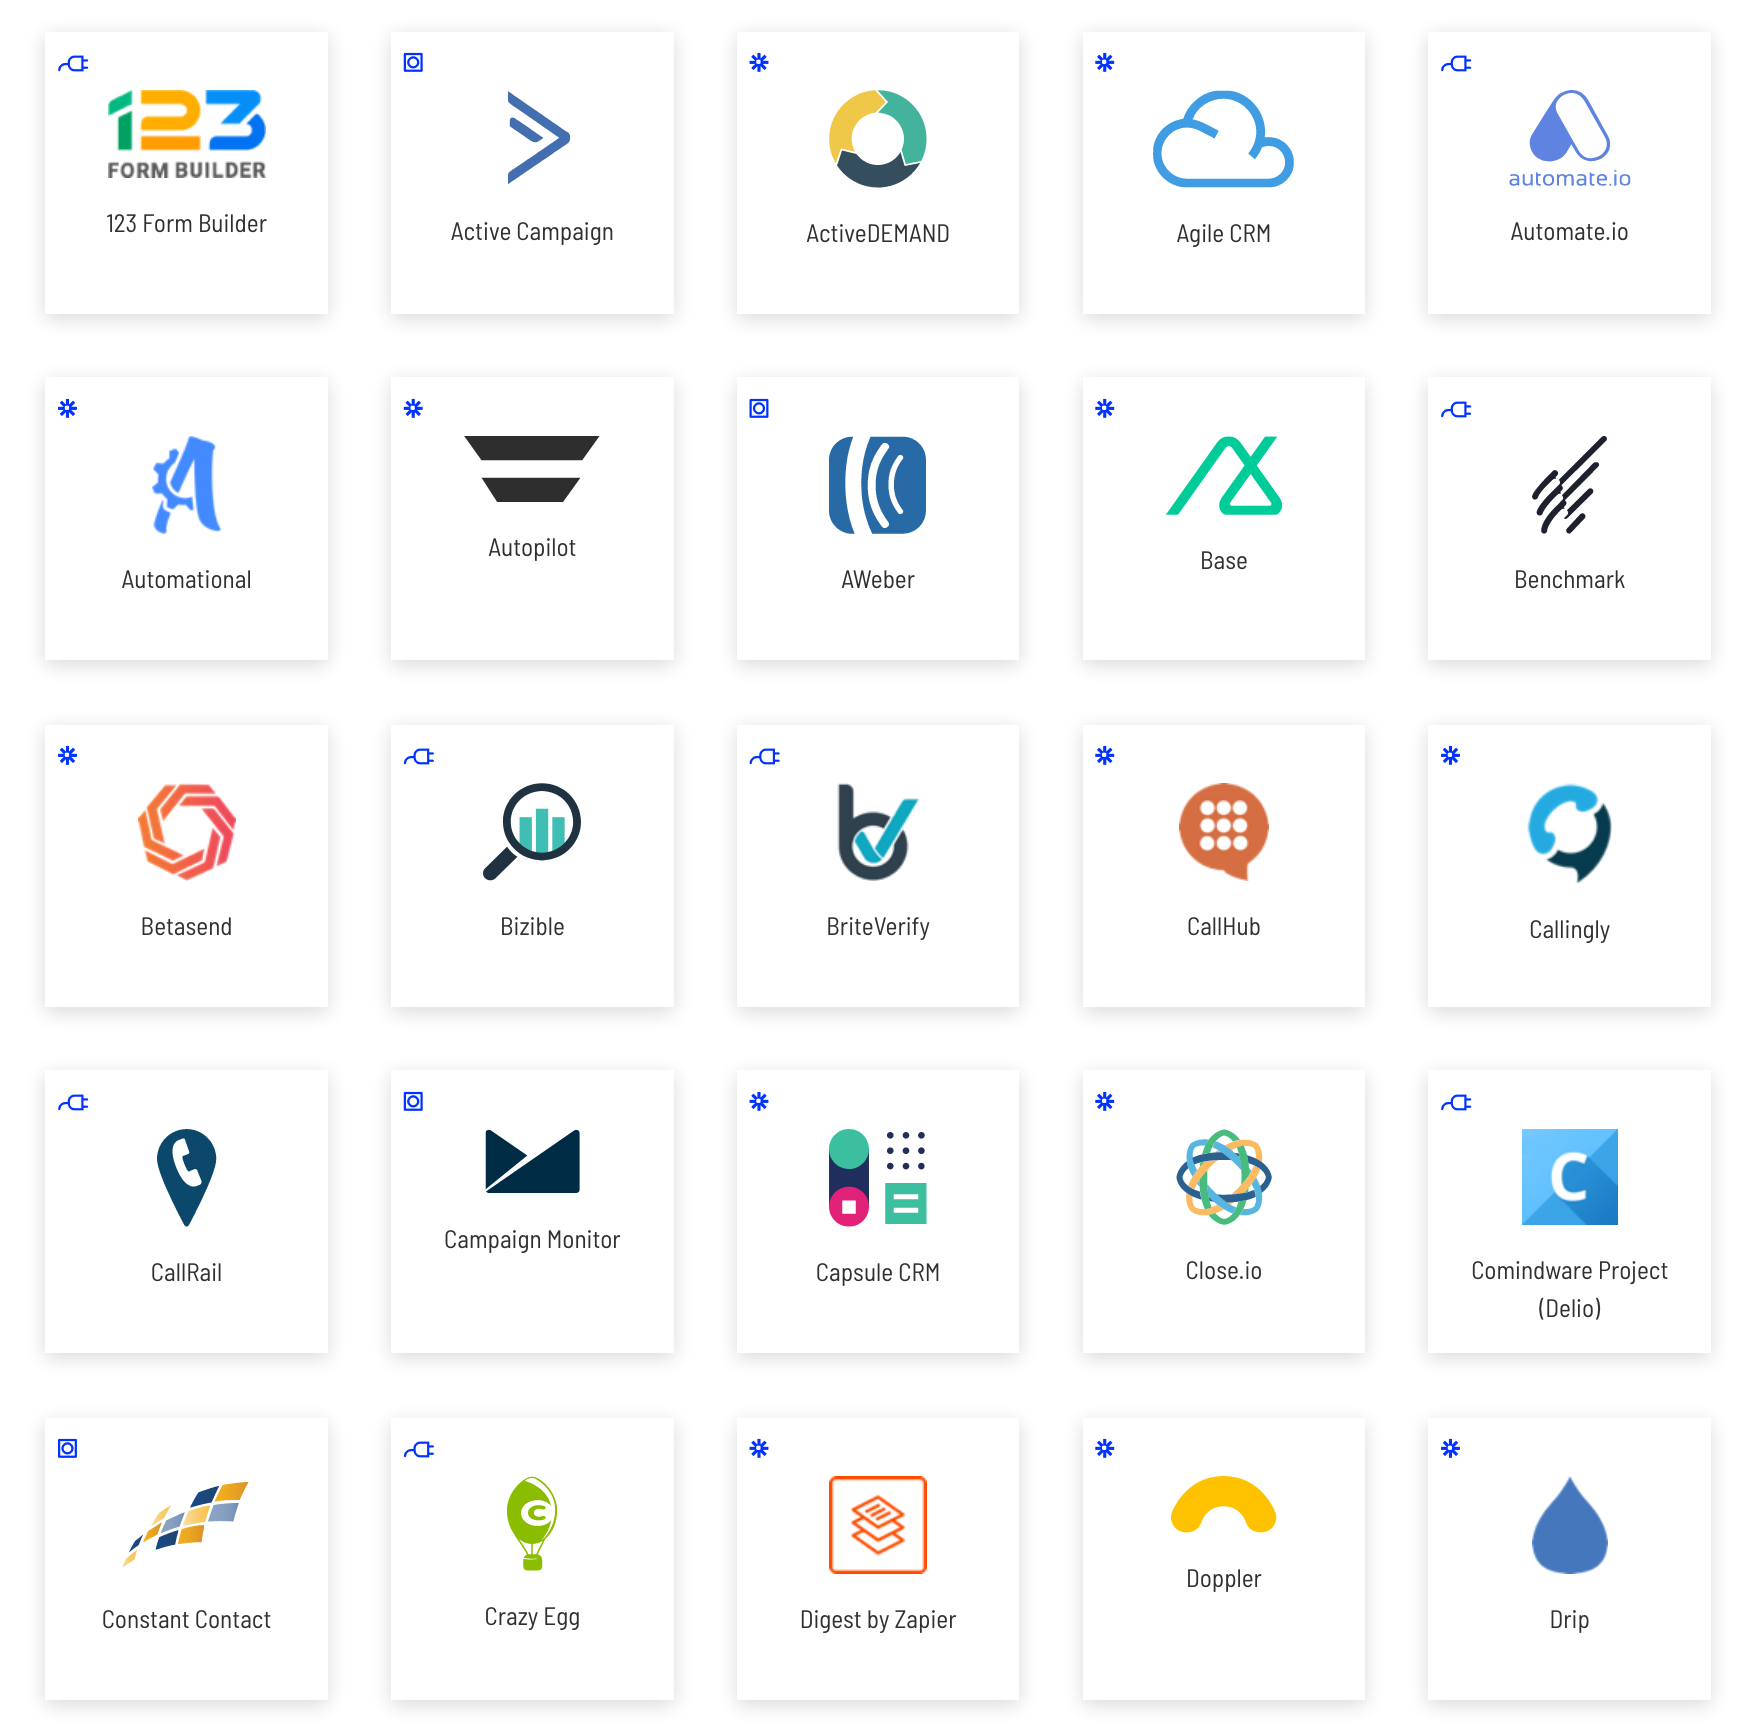
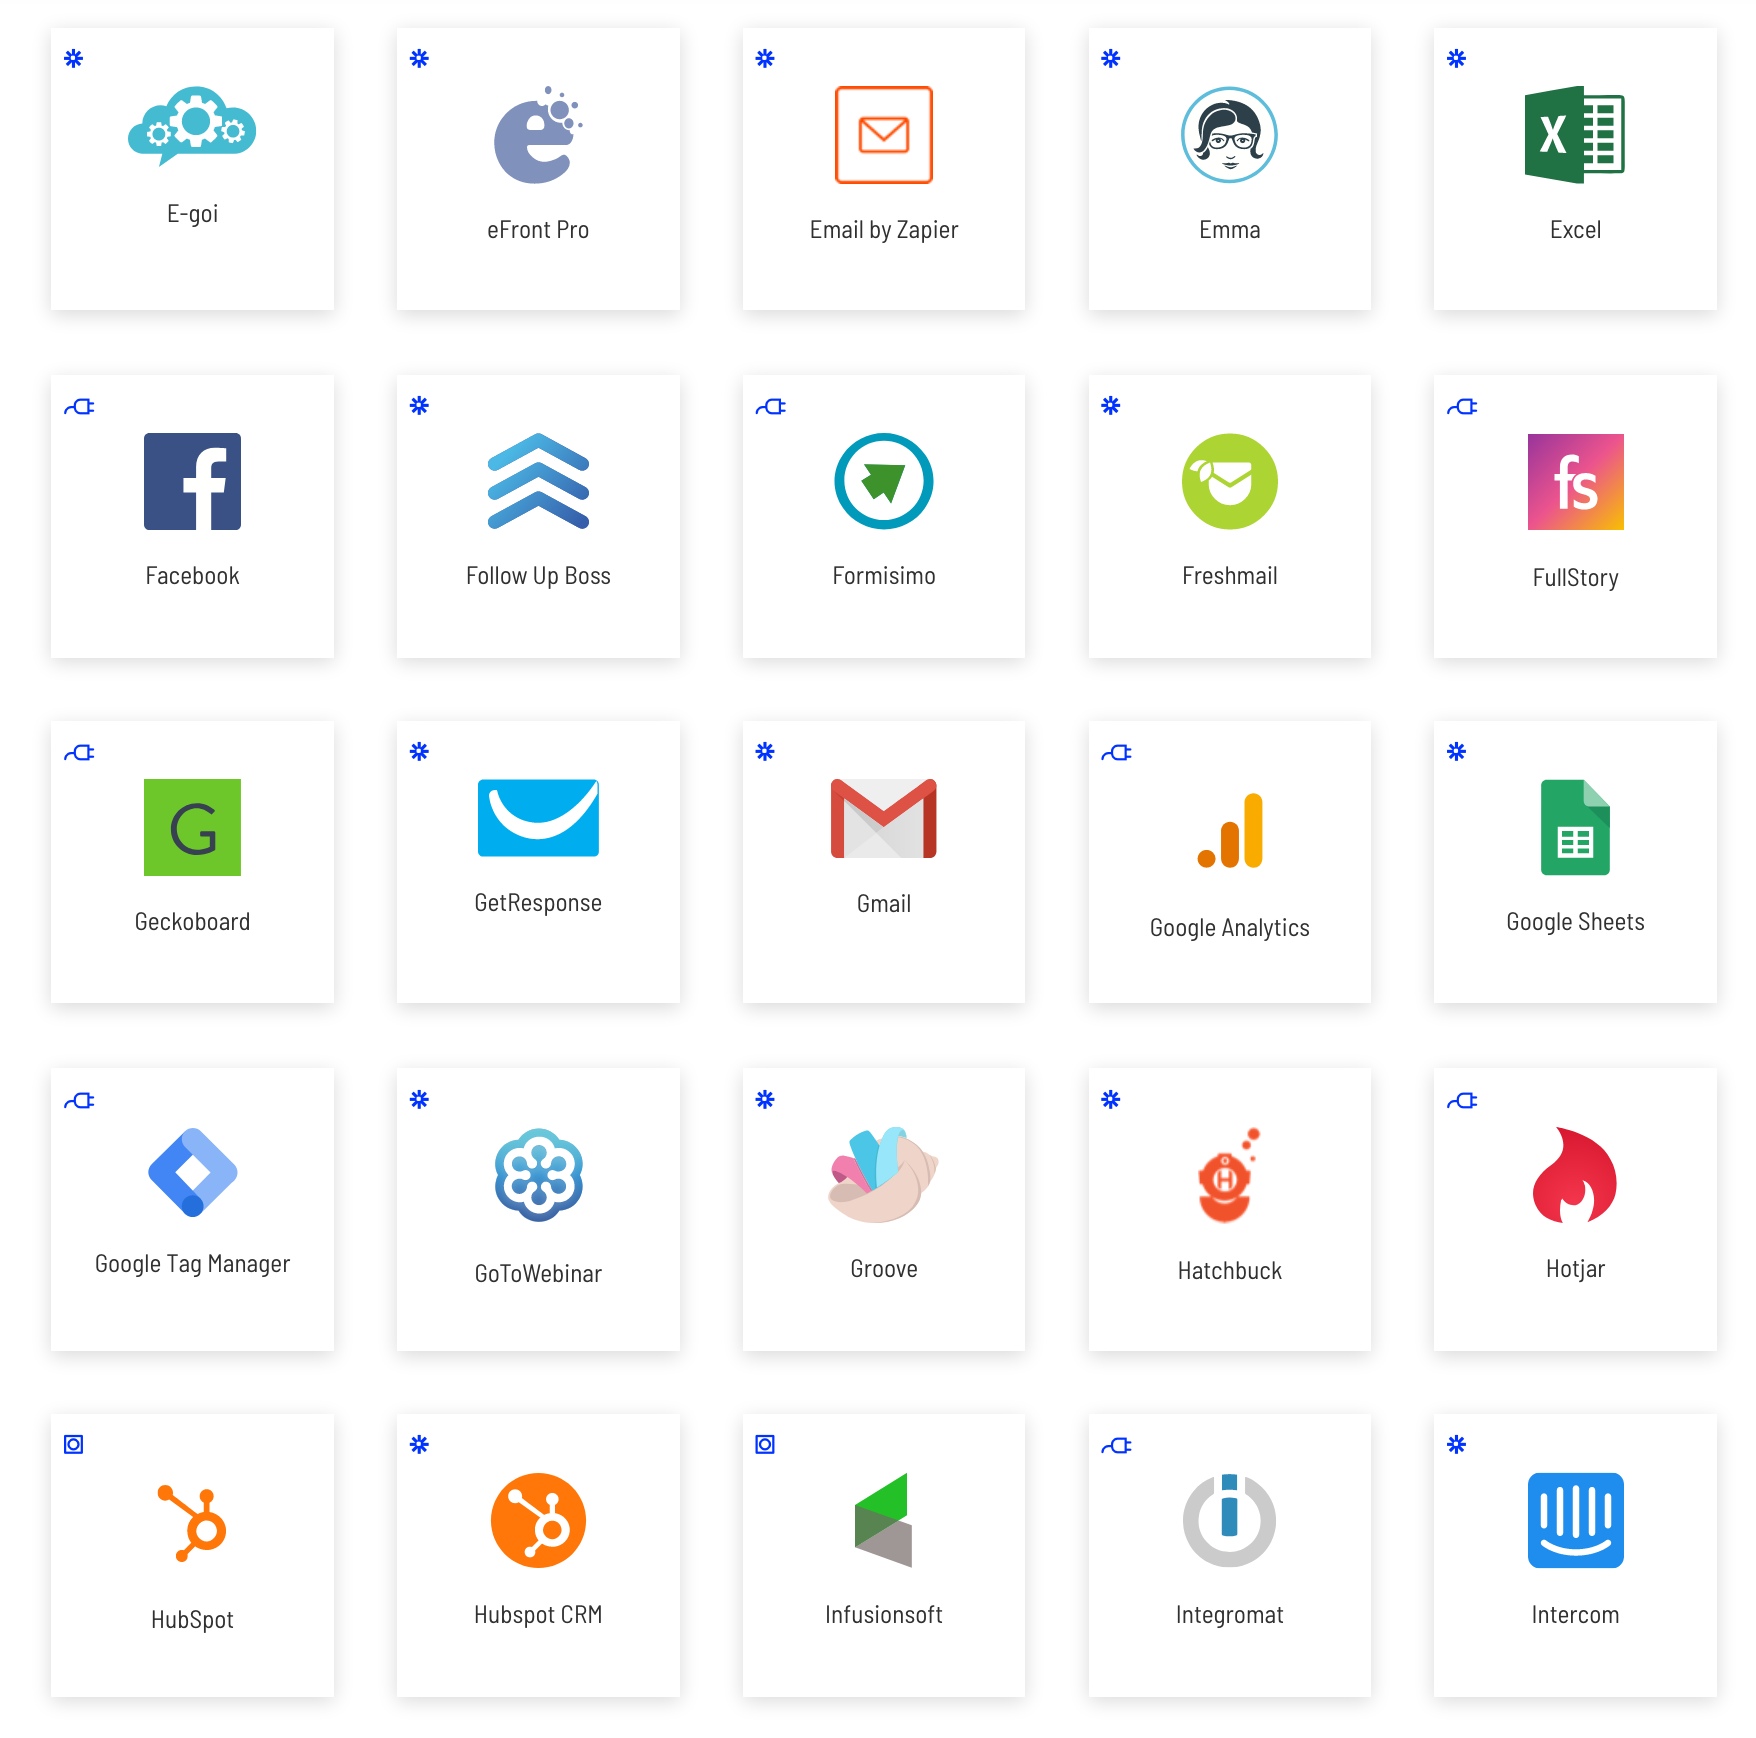
Seamless integration saves time and minimises repetitive tasks like logging in and out of various apps. Unbounce integrates with 60+ tools including popular ones like Aweber, Active Campaign and Convert Kit, ZenDesk, WordPress, Crazy Egg and Marketo.
Here’s the complete list:
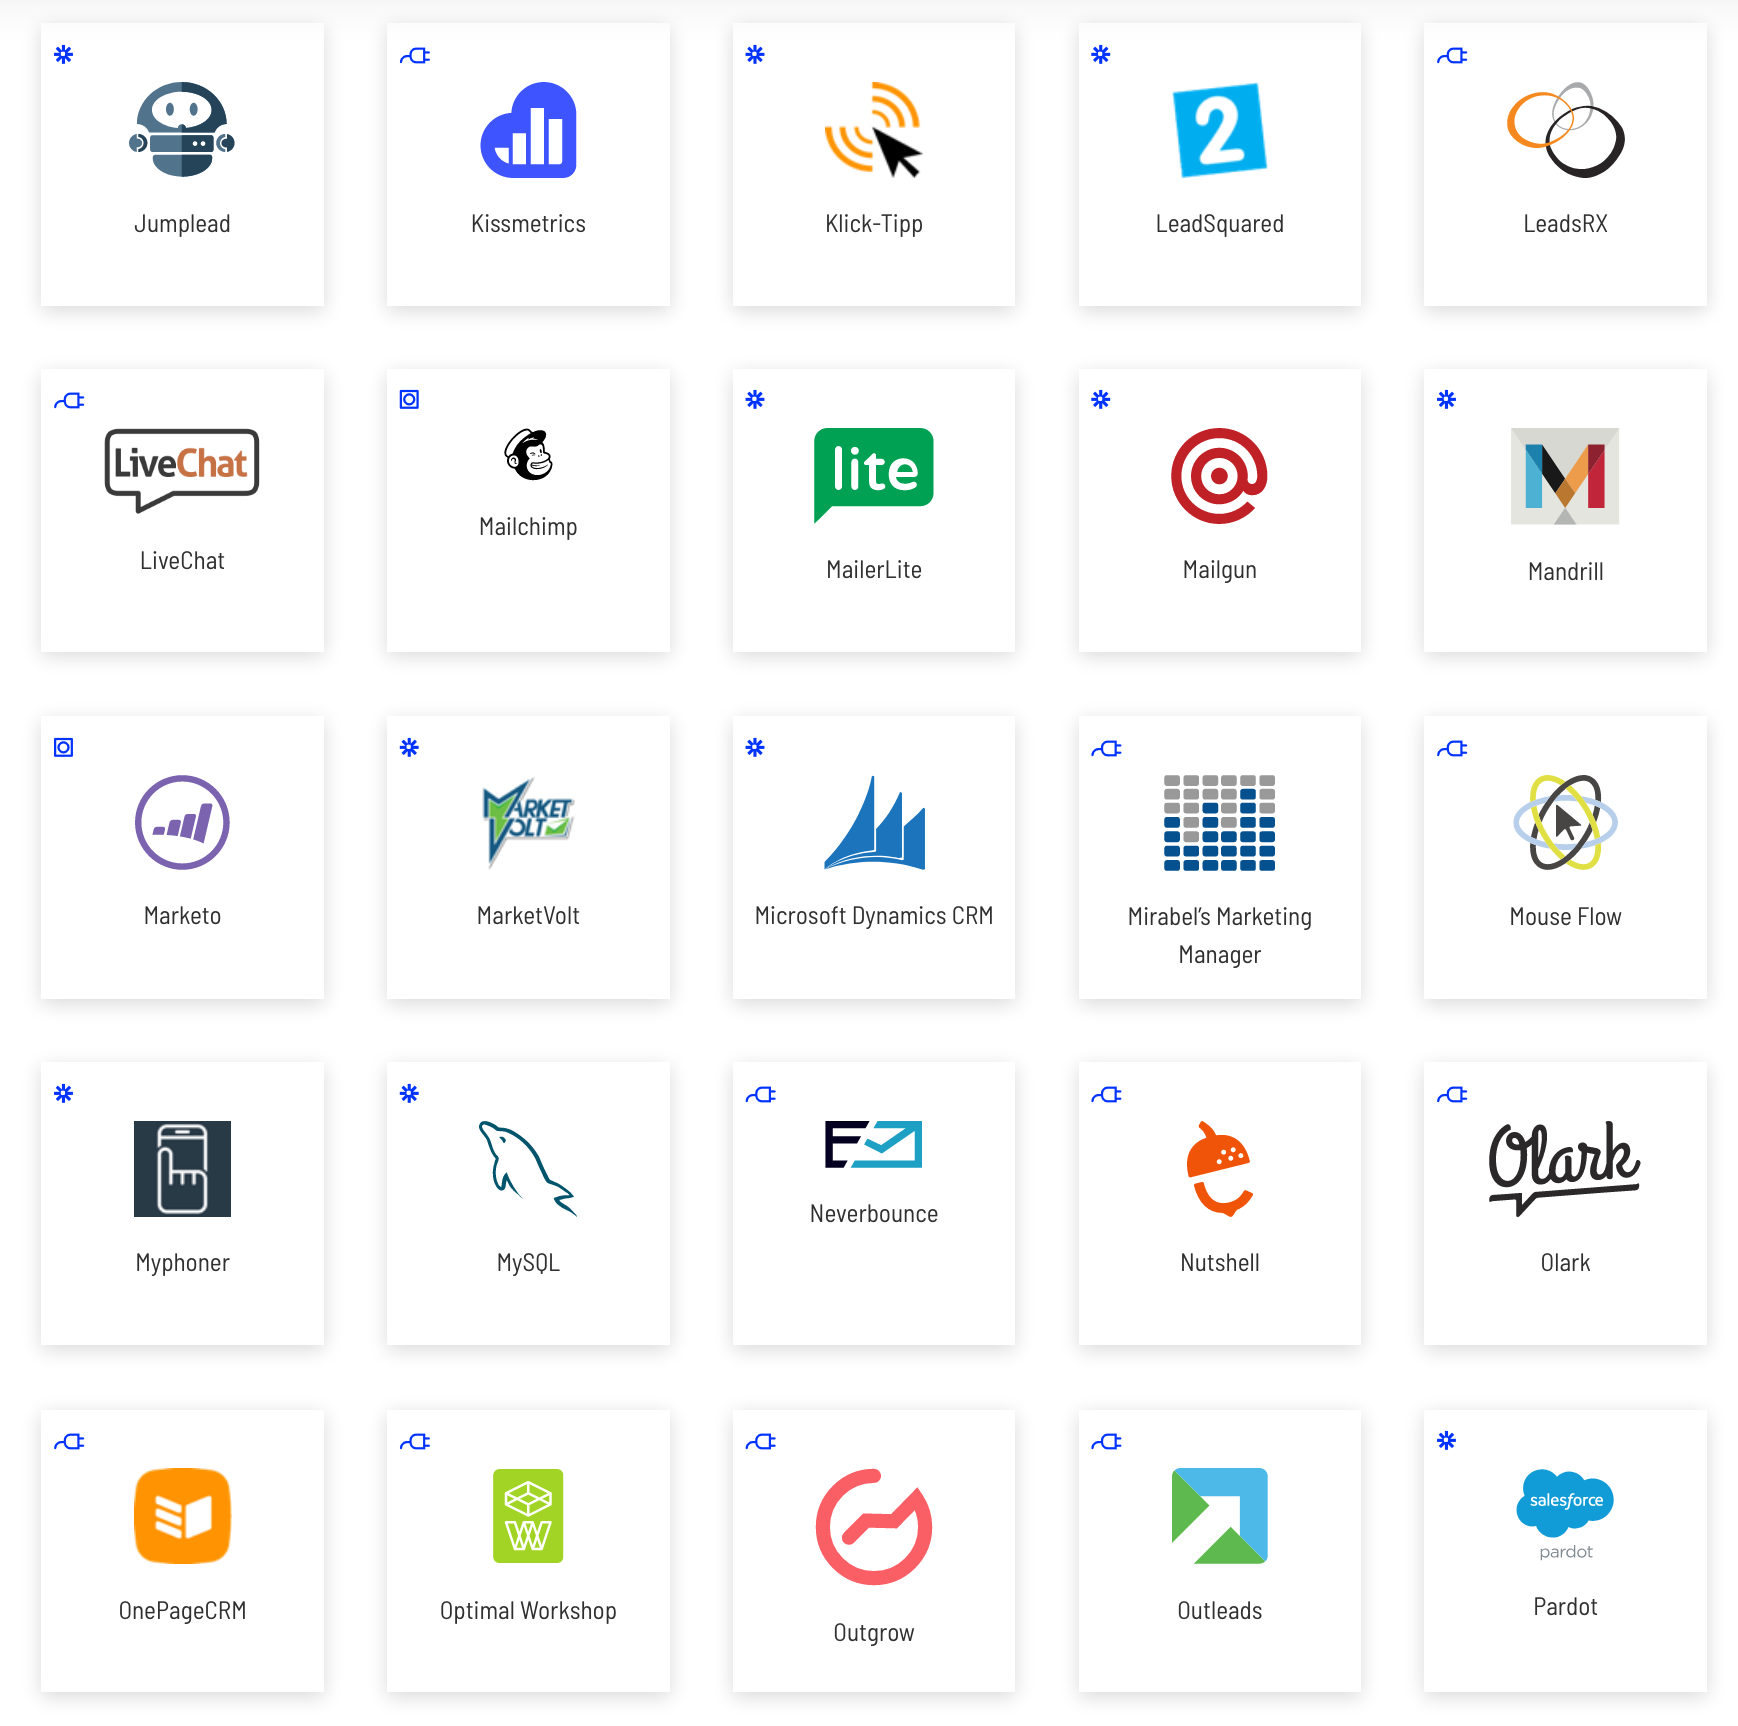
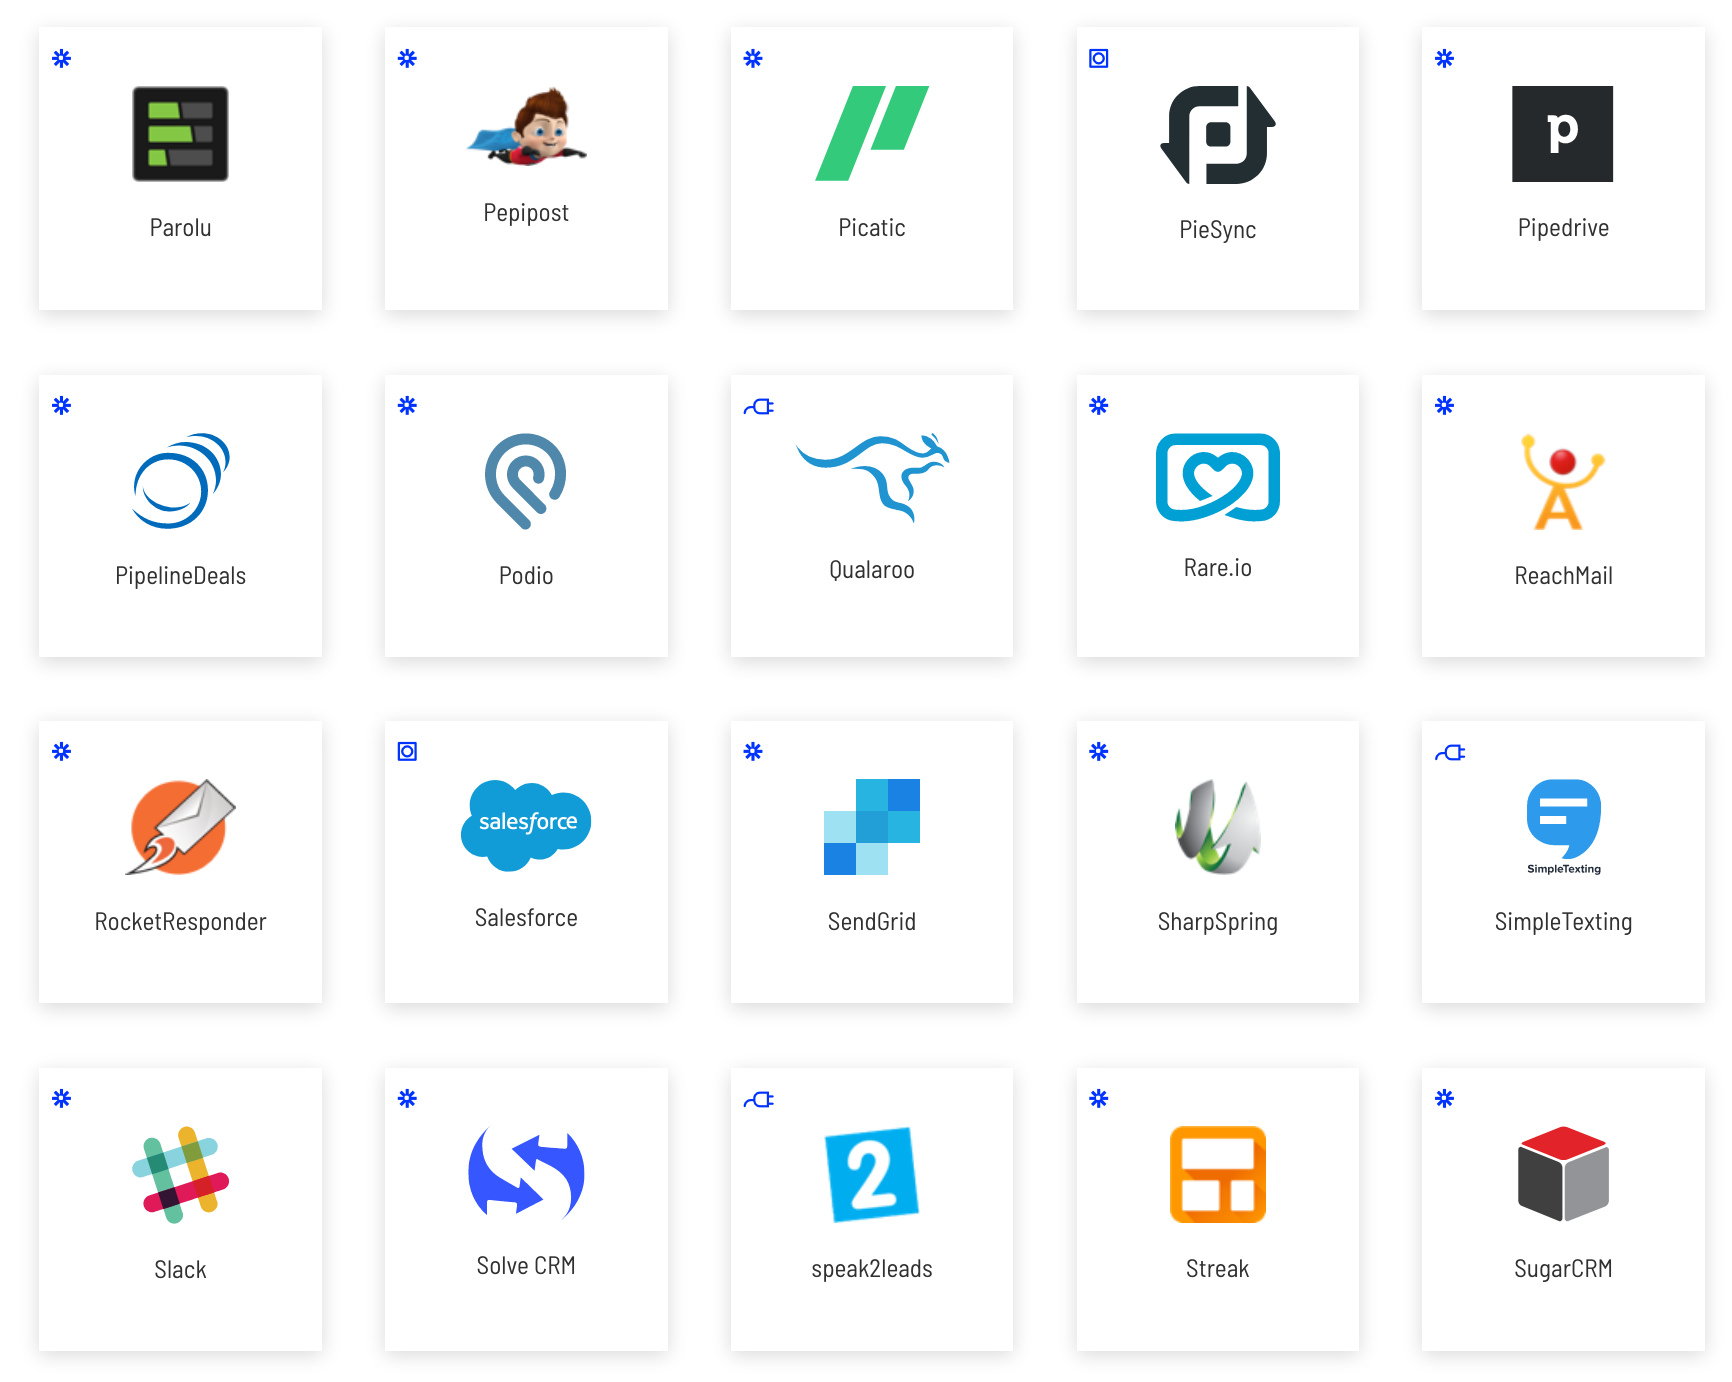
It’s worth noting that many of the above integrations will require you to sign-up for an additional tool. This is something not made very clear by Unbounce and can cause some confusion.
The tool in question is called Zapier — a well-known software app that helps you link your apps together.
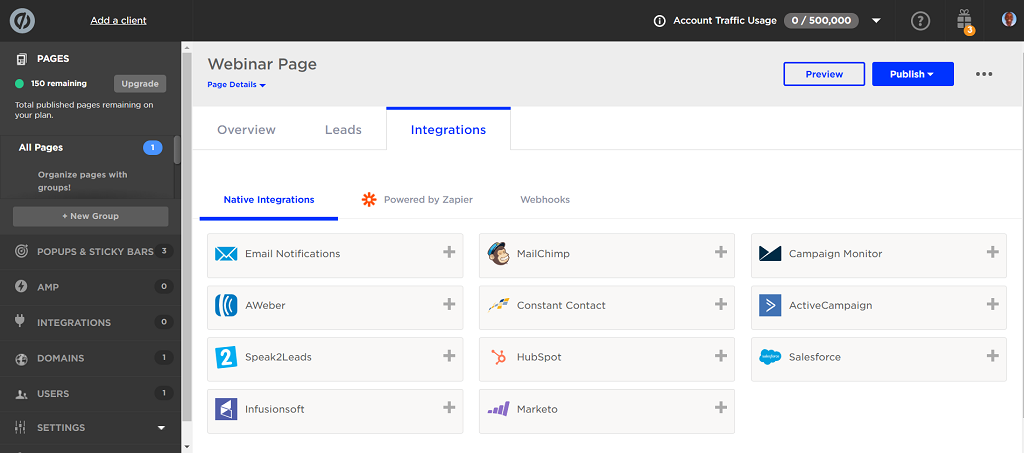
I found this a little disappointing because when you look at Unbounce’s native integrations, they’re pretty thin on the ground:
Sure, you can use Webhooks to connect many of your favourite apps (like we do with Convertkit) but I would have liked to see more native integrations from a premium tool like Unbounce.
So how do you actually link your tools to Unbounce?
There are 3 ways:
Method 1: Direct native integration
For the first method, you don’t do anything at all. Unbounce already has direct integrations with HubSpot, Marketo, MailChimp, AWeber, Constant Contact, Infusionsoft, and a few more baked into their software:
If your best-loved tools are not on the list, it’s time to do a bit of work.
Method 2: Indirect integration through Zapier
With a Zapier account, you can connect your landing pages, popups, and sticky bars to your favourite tools without typing a single line of code. Zapier is an automation tool that allows you to connect 1,500+ apps, for a monthly fee.
Here’s how to set it up:
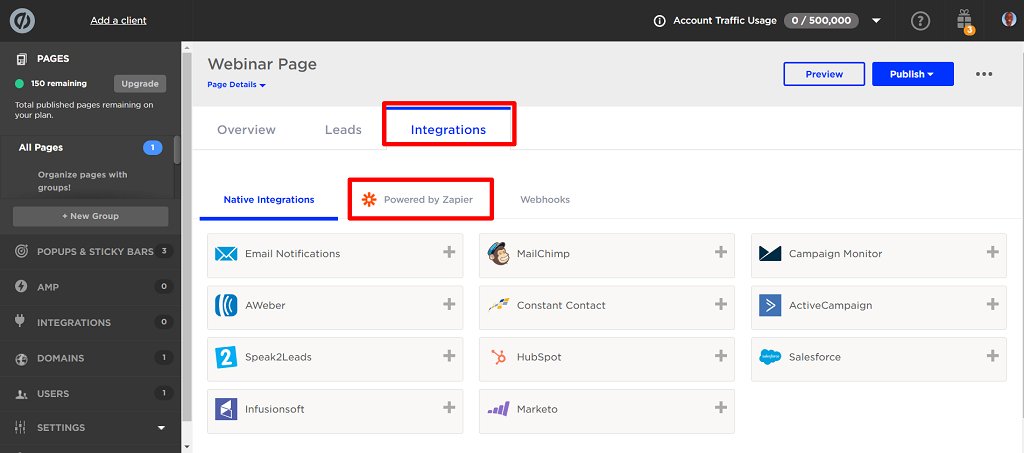
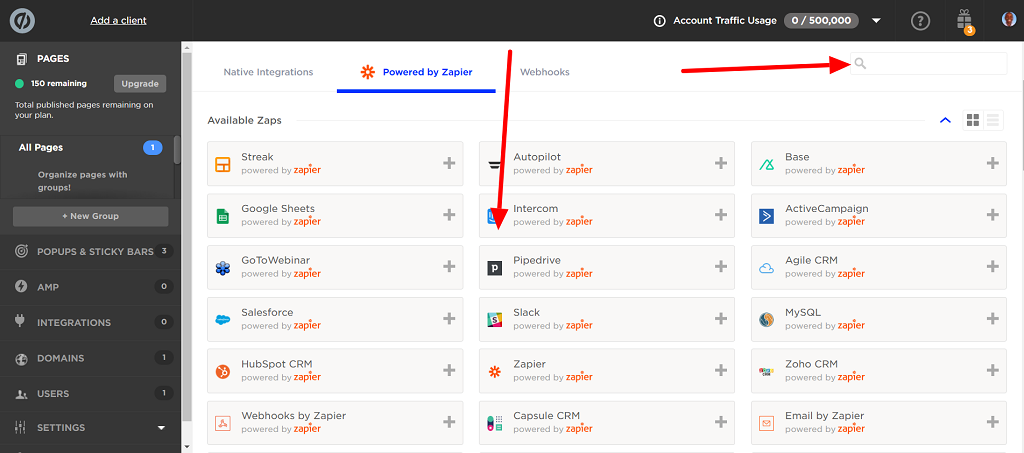
Step 1: Select the page you wish to set up with a Zapier integration-click the Integrations tab, then click the “Powered by Zapier” tab:
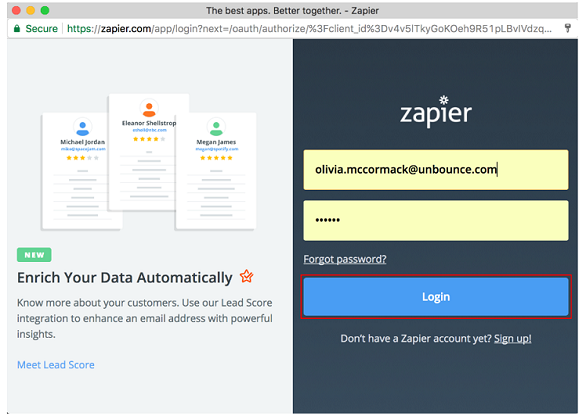
Step 2: Log in with the email address and password associated with your Zapier account, or click “Sign Up!” to start your free trial of a Premium Zapier account.
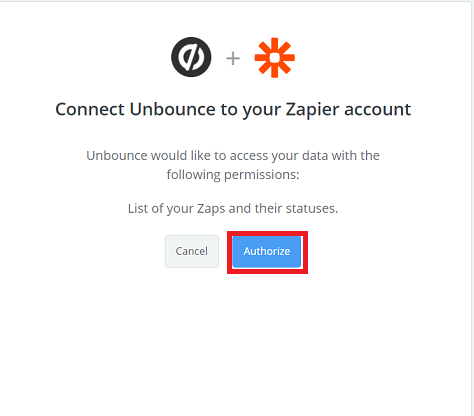
Step 3: Click ‘Authorise’
Step 4: Select the app you want to integrate from the tile list or use the search bar on the right to look for it.
Click on the app, authorise Unbounce and choose the trigger events you want to automate and finish setting up the Zap. Sit back and watch Zapier work its magic.
While Zapier is great and connects to most apps, some aren’t included in their suite. To connect those, you can use webhooks.
In fact:
For many tools, you can actually bypass Zapier and use Webhooks for free.
Method 3: Indirect integration through Webhooks
What are webhooks?
I’ll spare you the technical mumbo-jumbo:
Webhooks are how online apps speak to and notify each other automatically when something new happens on one end.
Basically, to enable webhooks you must post Unbounce data to an external application that accepts the request and can respond.
You can do it by clicking integrations > “add a webhook” on the page where you’d like to send data, as shown below:
A webhook link is usually provided in your software tool, so you would copy the webhook link from your tool and paste into the Unbounce form shown above.
Then you’d click on “save changes”. You are done.
Unbounce Pricing
So, how much does it cost to use Unbounce? Good question.
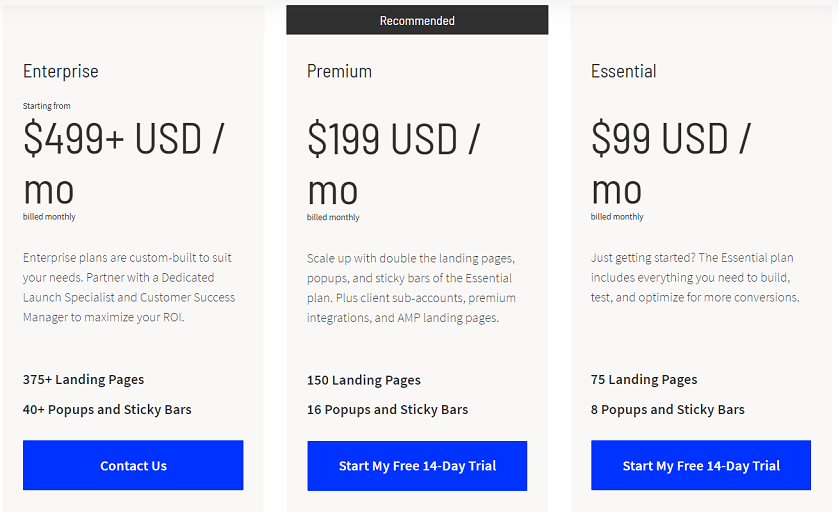
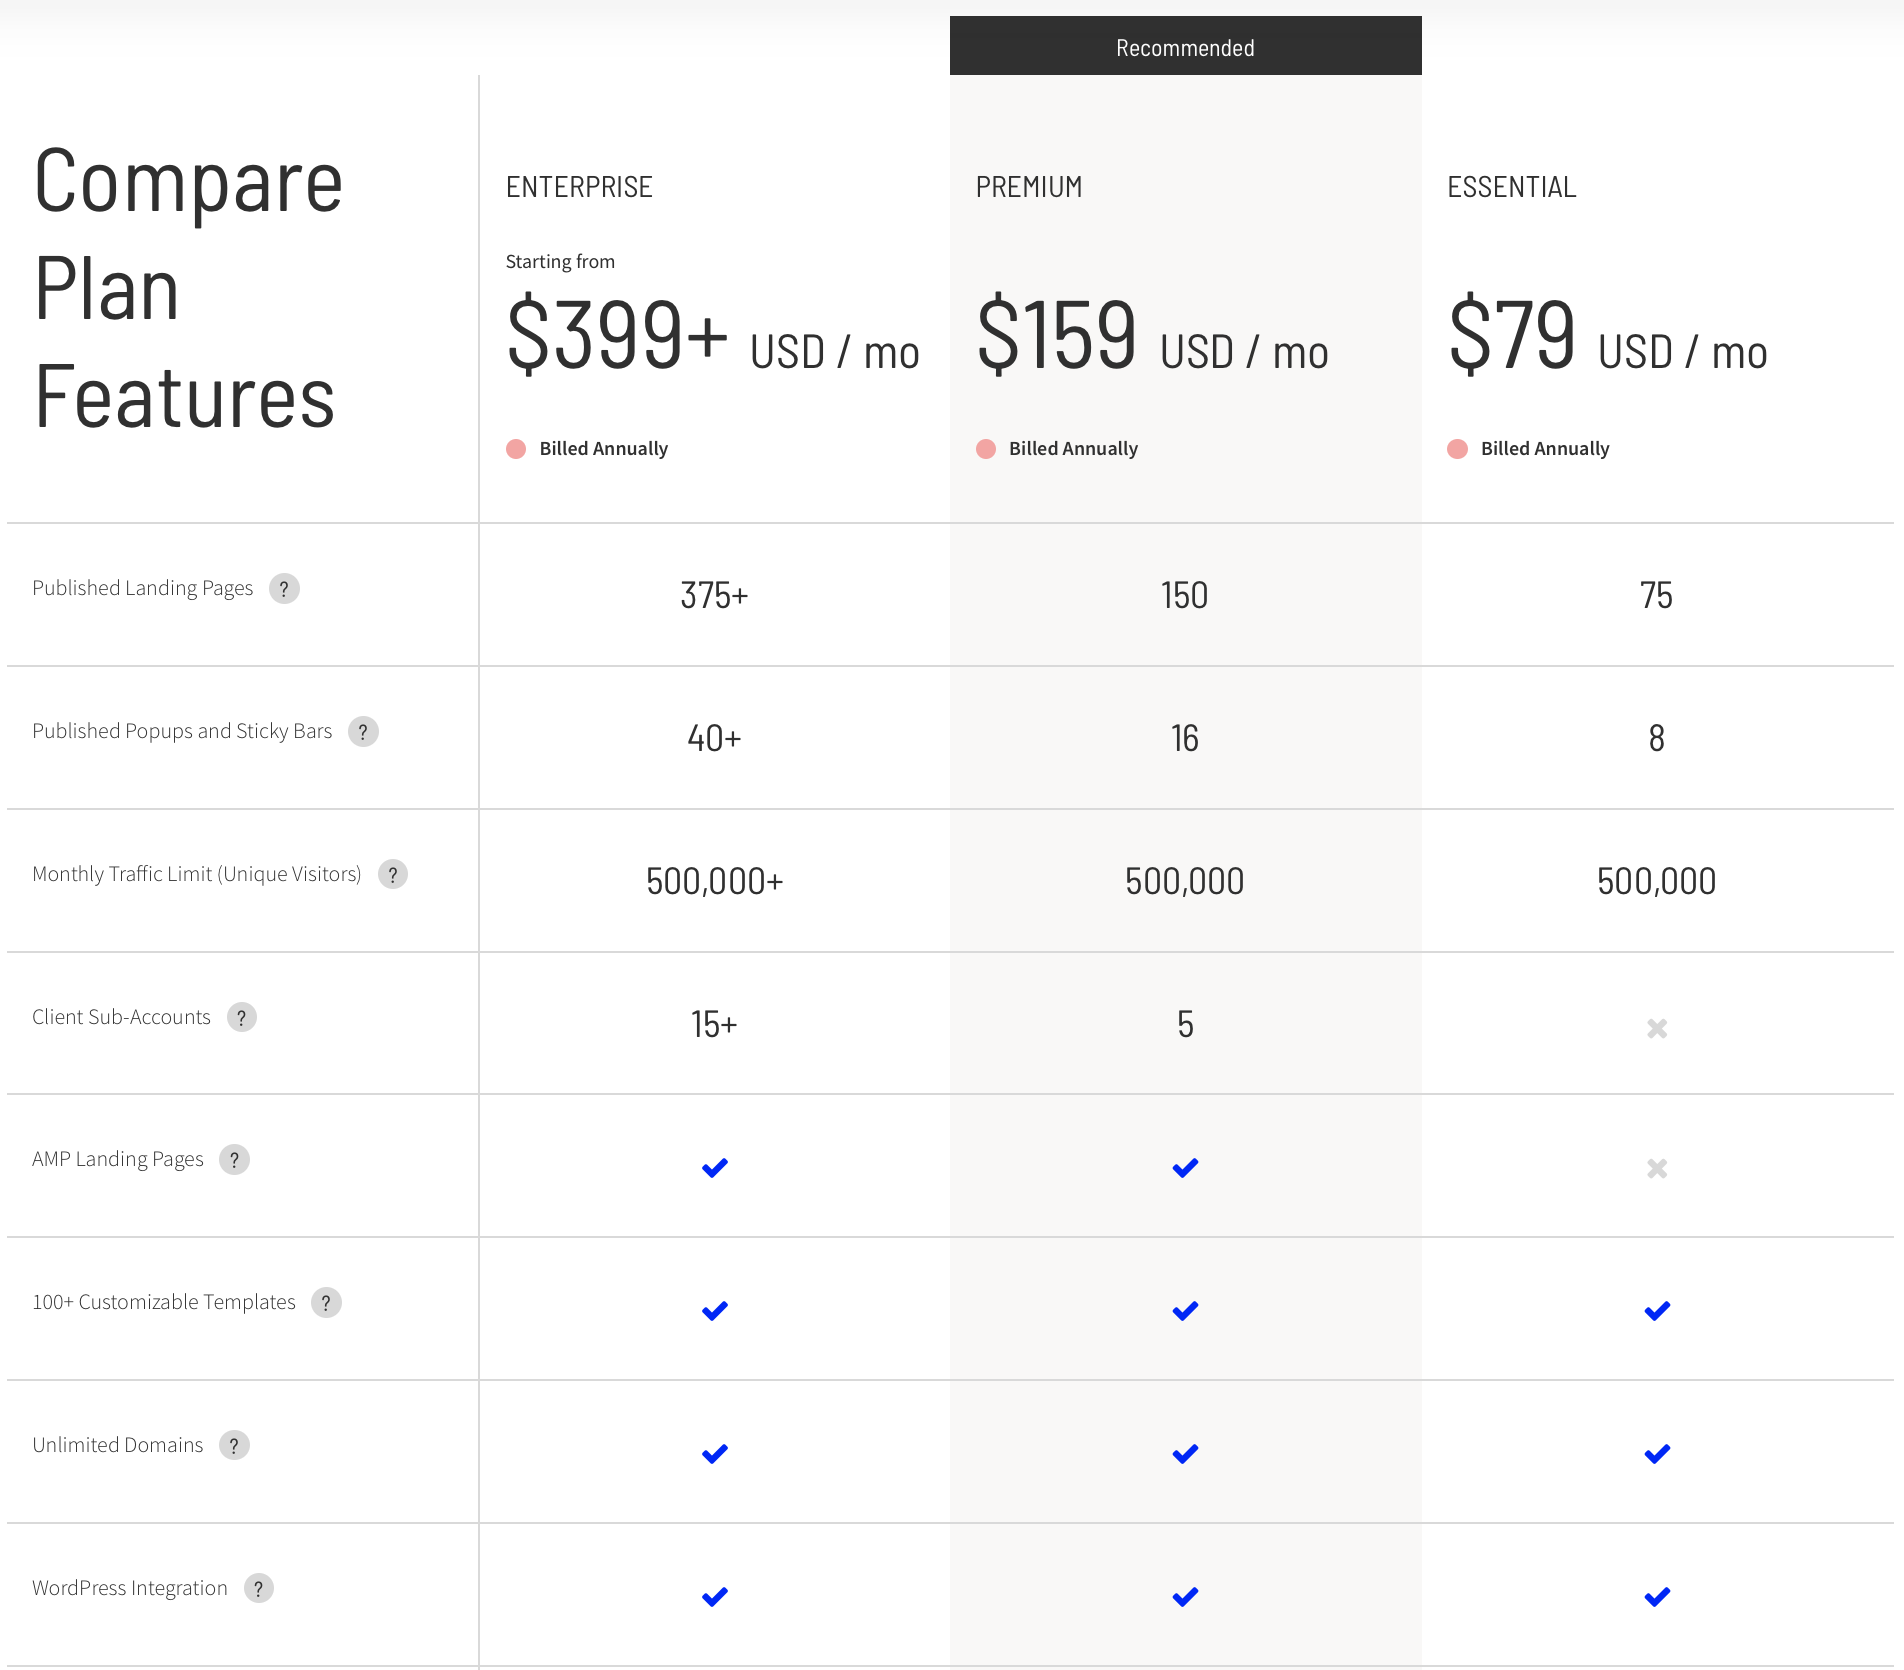
Here’s an overview of the 3 pricing plans available on the platform:
Let’s unpack what’s included in each plan.
Essential Plan
First of all the Essential Plan costs $99 per month and comes with the following goodies:
- 75 Published Landing Pages
- 8 Published Popups and Sticky Bars
- 500,000 Monthly Traffic Limit (Unique Visitors)
- 100+ Customizable Templates
- Unlimited Domains
- WordPress Integration
- Free Professional Photos from Unsplash
- Dynamic Text Replacement
- A/B Testing
- Smart Traffic (Beta)
- Infusionsoft Integration HubSpot Integration Zapier Integration
- Google Single Sign-On (SSO)
- Unlimited Users
- SSL Encryption and Two-Factor Authentication (2FA)
Premium Plan
The premium plan comes to $199 a month. It includes everything in Essential plus:
- 75 more Landing Pages
- 8 more Popups and Sticky bars
- 5 Client Sub-Accounts
- AMP Landing Pages
- Launch Scheduling
- Advanced popup and sticky bar targeting
- Marketo & Salesforce integration
- Page redirects
Enterprise Plan
For Enterprise, you’re looking at a cash outlay of $499 per month. The plan covers everything in Premium plus:
- 375+ Published Landing Pages
- 40+ Published Popups and Sticky Bars
- 15+ Client Sub-Accounts
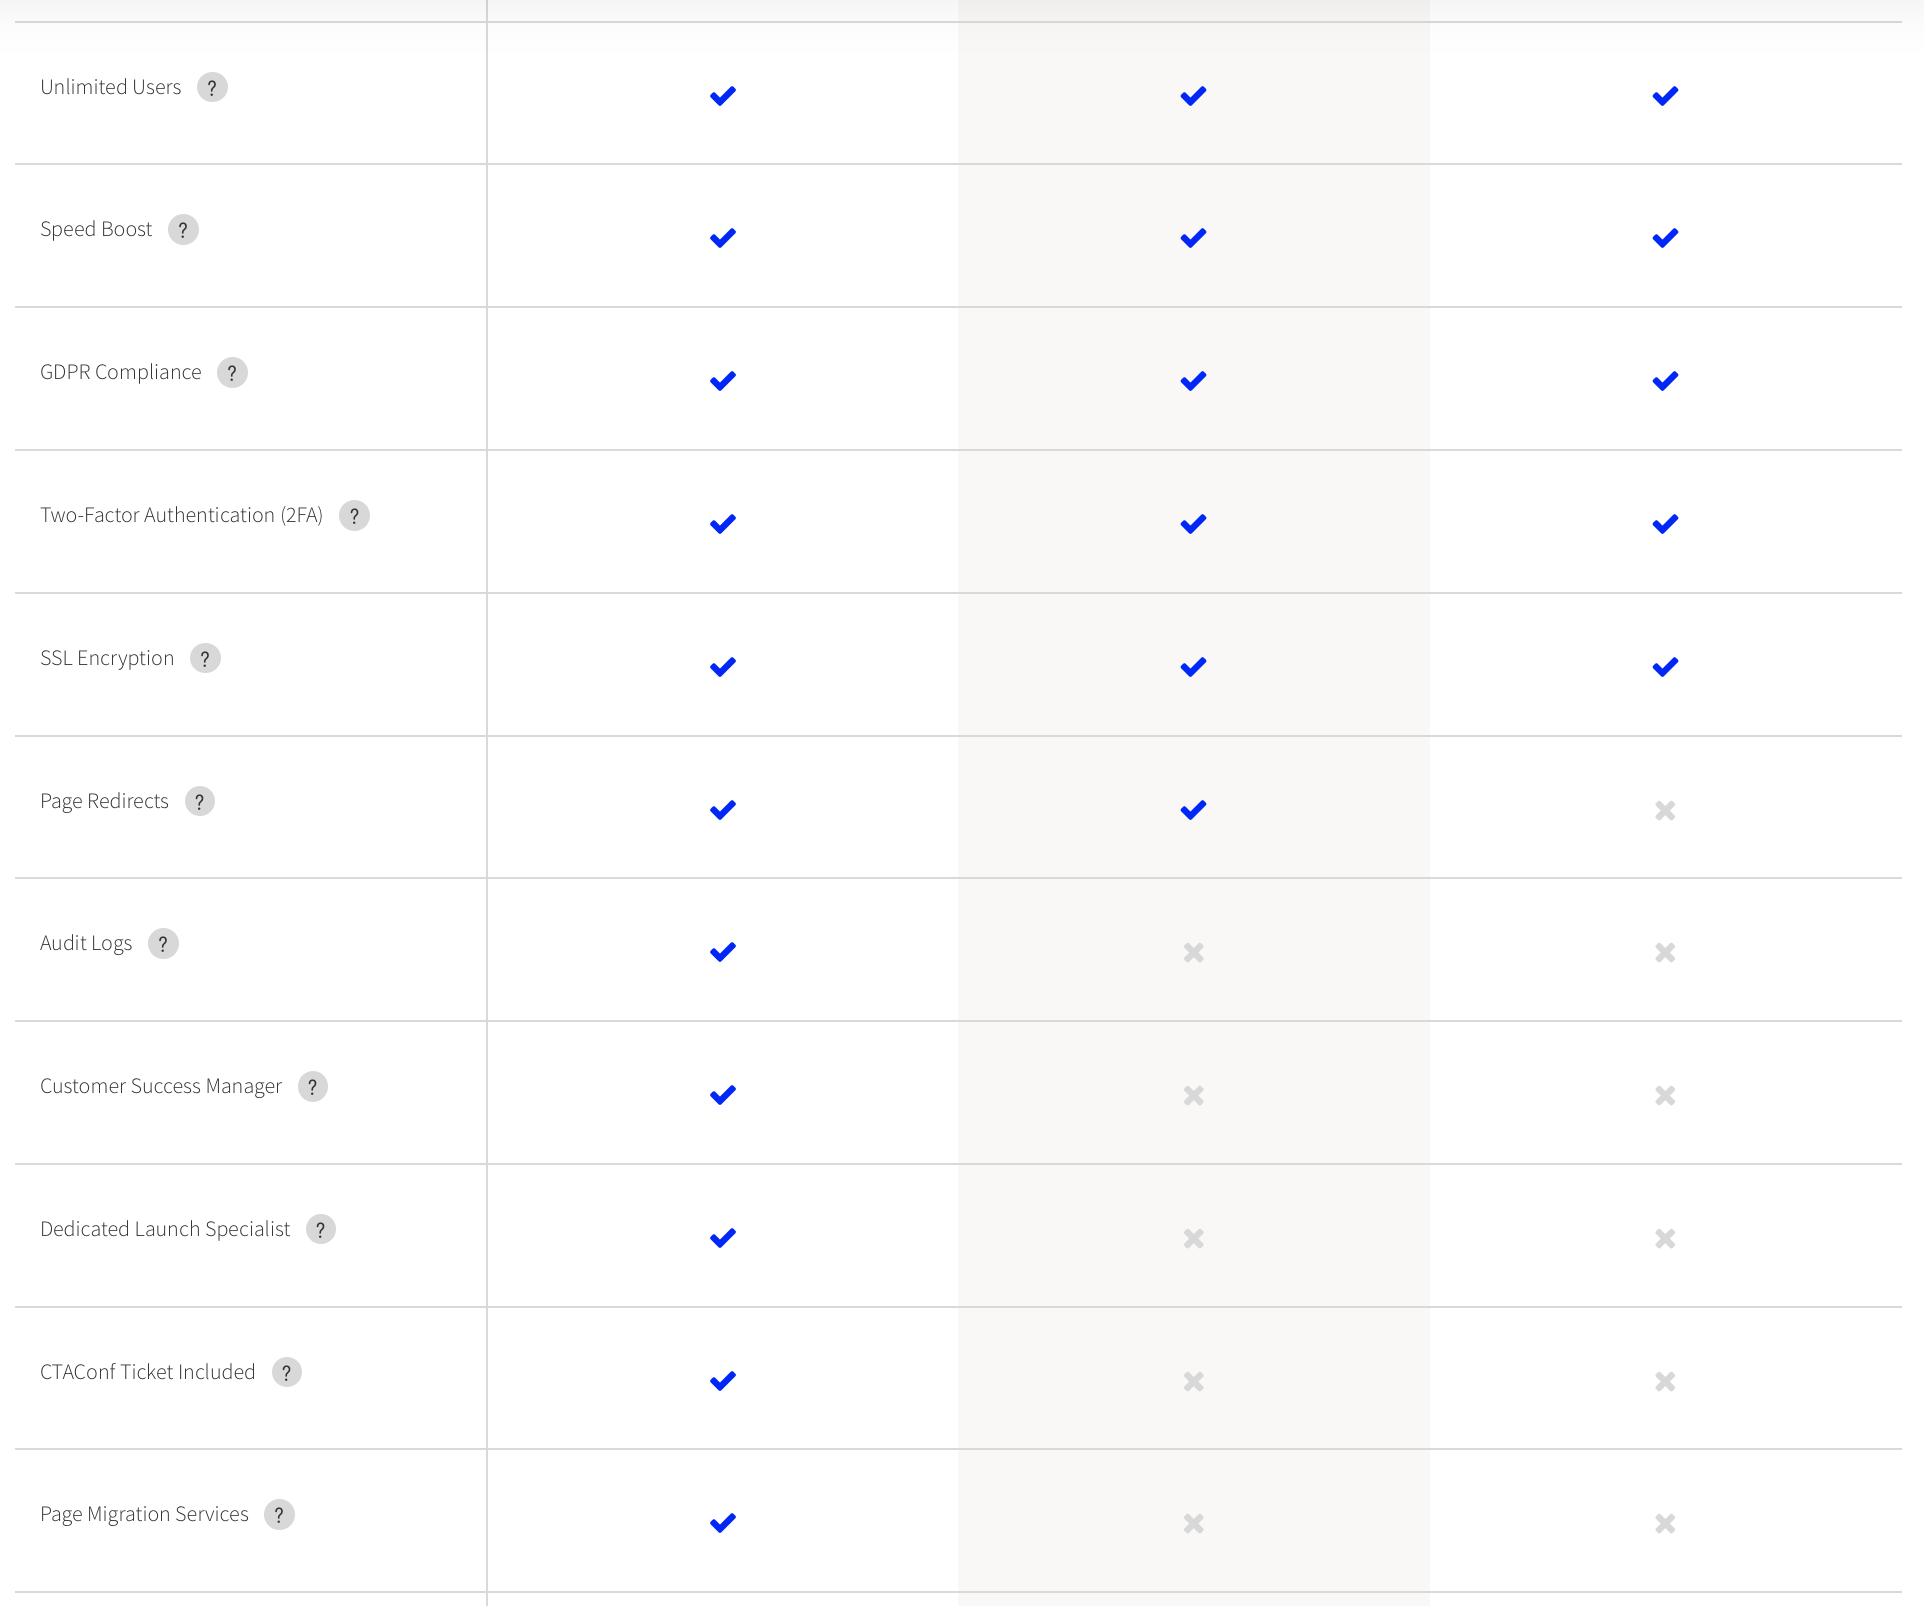
- Audit Logs
- Customer Success Manager and Dedicated Launch Specialist
- Page Migration Services
- CTAConf Ticket Included
You can create an unlimited number of pages in your account, but only the number in your current plan cap can go live. You can save 20% on all plans if you join on an annual plan.
You can also save a further 20% on your first 3 months, through this referral link.
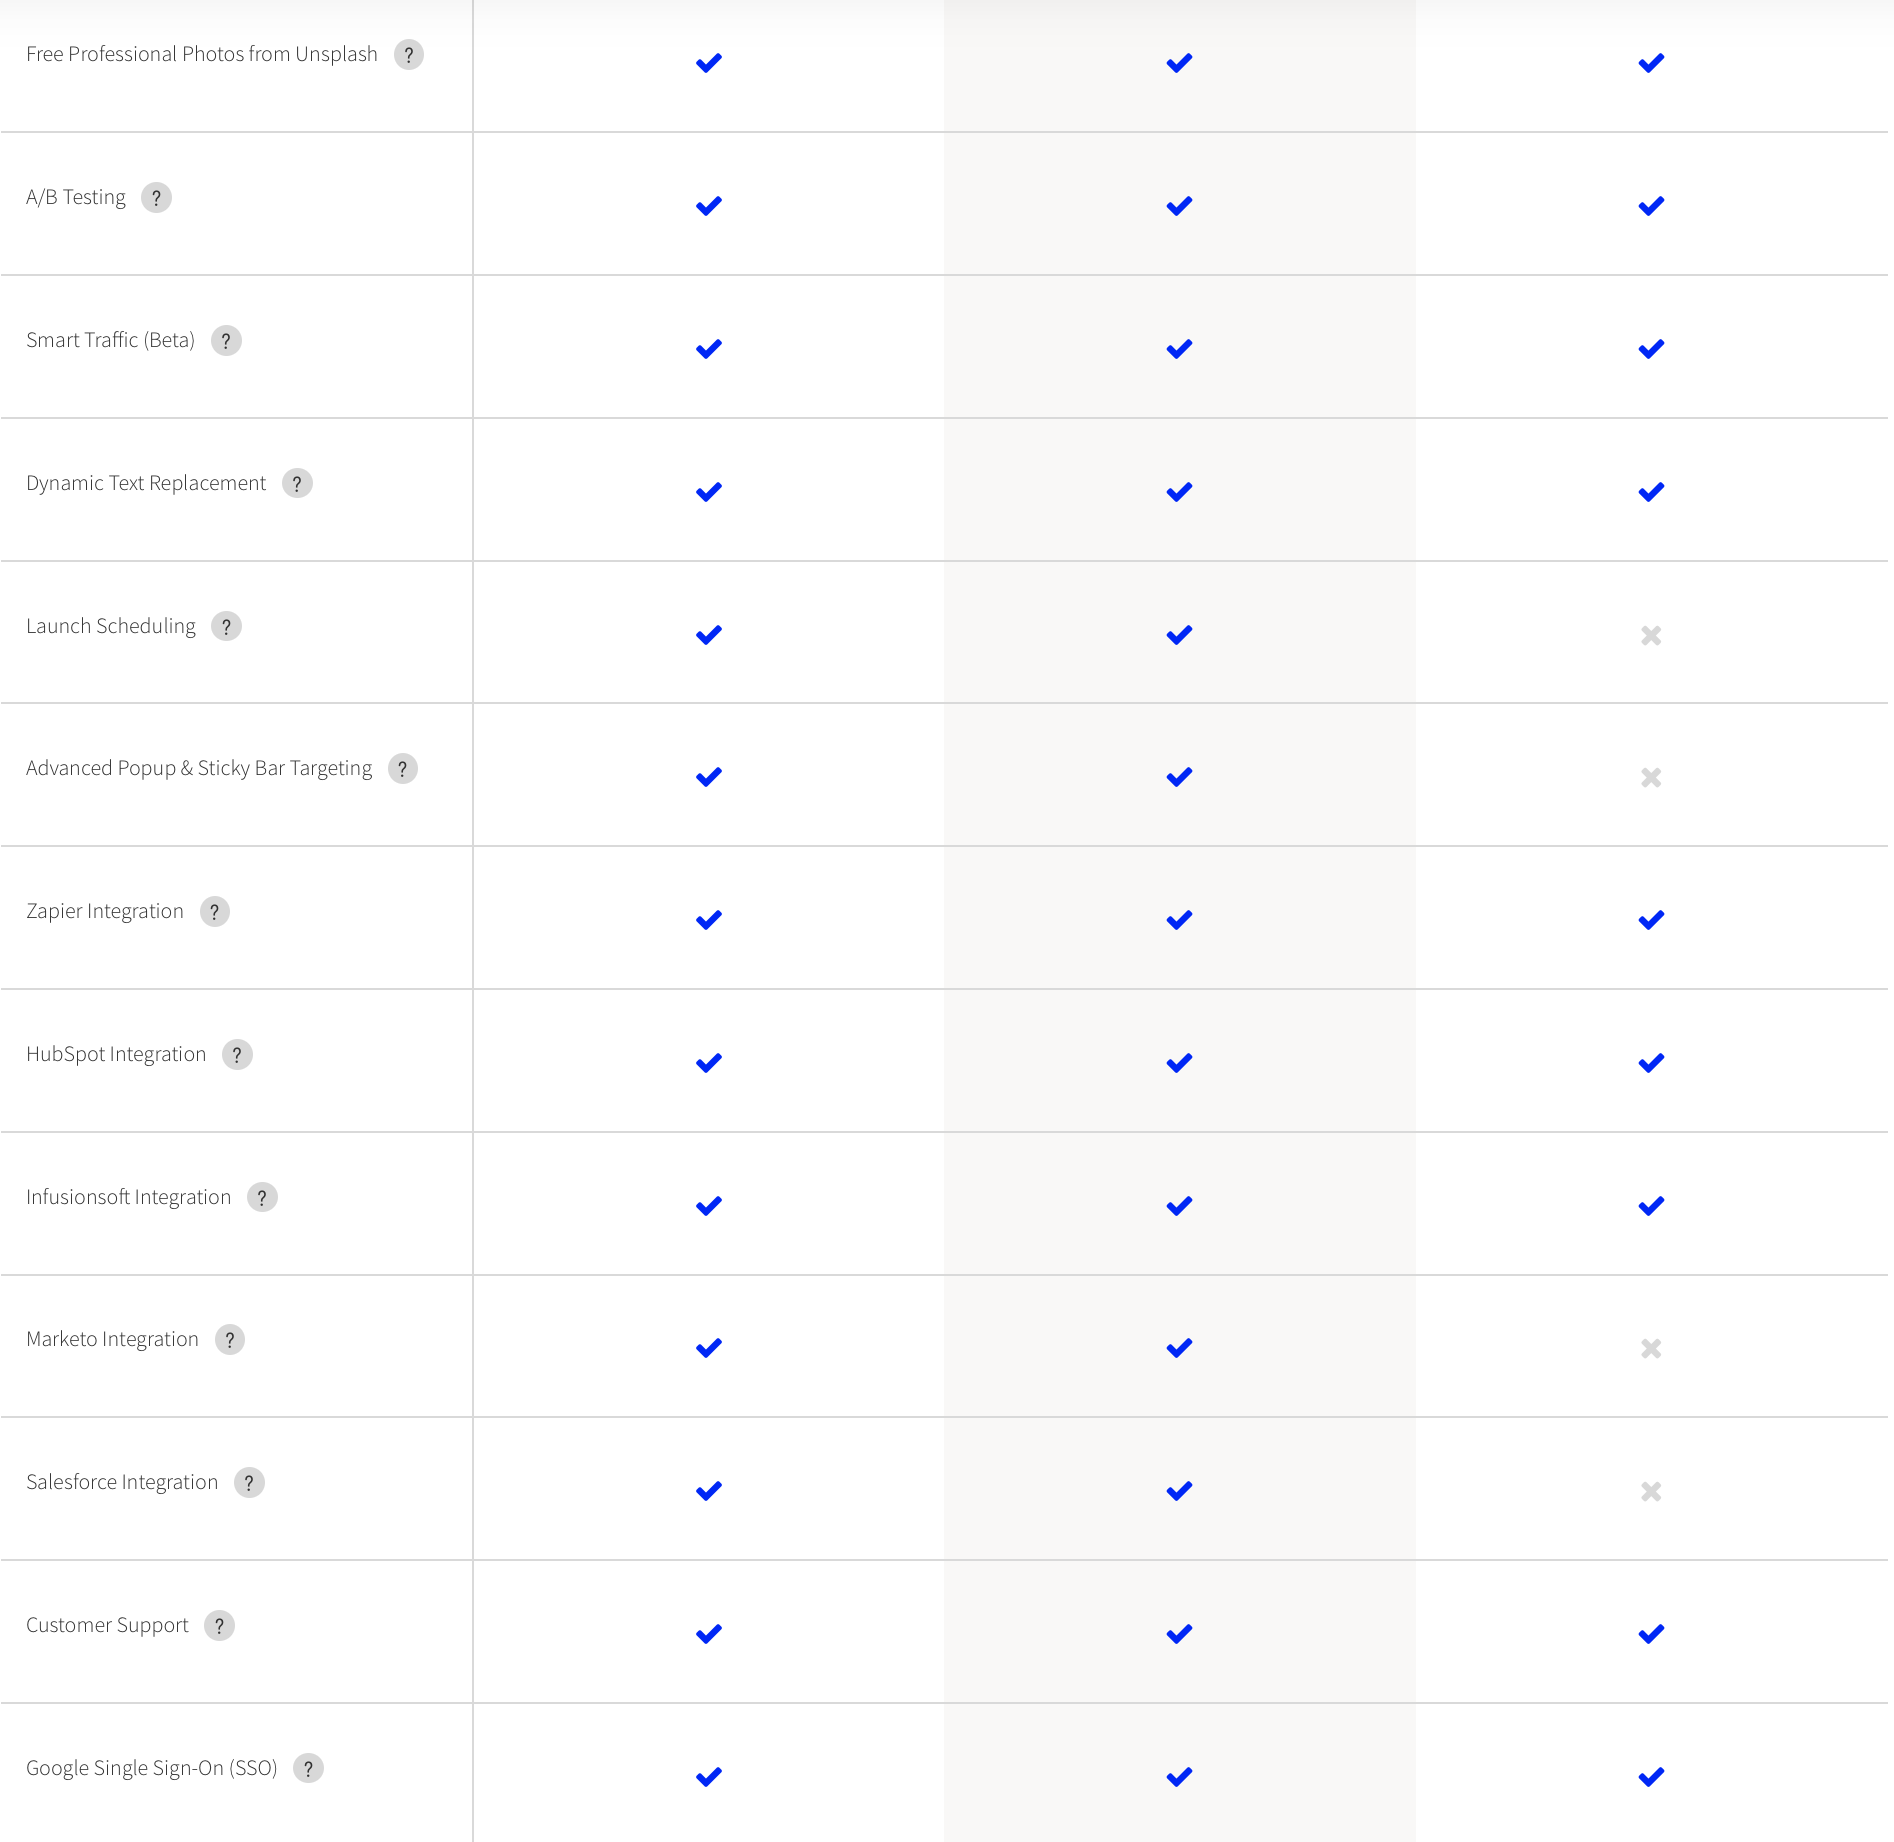
Here’s a full comparison of all the plans:
Summing up:
$99 ($79 monthly) for the Essential Plan is affordable. However, with a price tag of $199 ($159) and $499 ($399) respectively, higher plans are costly. Even if you factor in the 20% discount, it’s still a significant outlay.
Similar tools like Leadpages offer more affordable pricing plans.
Furthermore, Unbounce plans limit the number of pages you can publish even if you are on the Enterprise. That’s a problem if you publish a serious number of pages.
Unbounce Standout Features
Besides regular features, what else makes Unbounce special? Two features stand out.
1. Smart Traffic
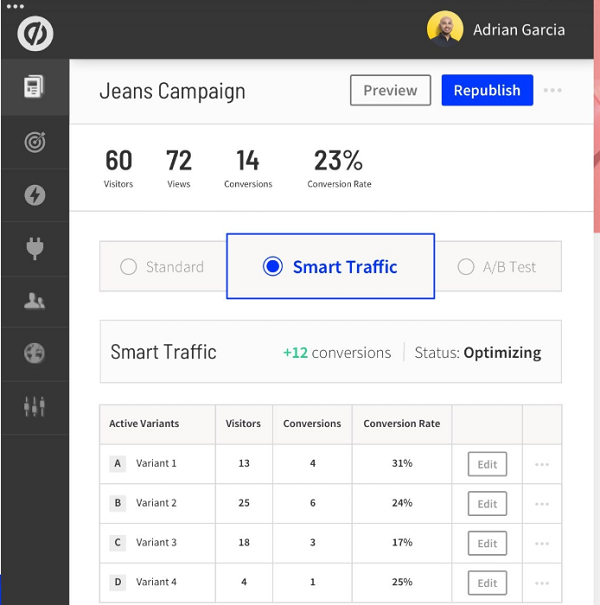
Firstly, they’ve launched Smart Traffic, an AI-powered feature that uses artificial intelligence to match your visitor with a landing page most likely to convert.
Apparently, robots can help you make more money. :)
According to research by Unbounce, pages using Smart Traffic see an impressive 20% conversion lift. Moreover, this awesome new feature has several benefits:
- Saves time – because Smart Traffic auto matches users to the most relevant page, there’s no need for you to waste precious time manually optimising your pages.
- Convenience – you set it once and can take much more of a hands-off approach with your advertising strategy.
- Speed – unlike regular optimisation, you don’t have to wait months for enough traffic to hit your landing page, Smart Traffic kicks in after only 50 visits so you see results faster.
The best part?
You get these benefits by merely flipping a switch in your dashboard. Above all, this feature is available to all users, so you won’t pay an extra penny for it.
2. Scheduled Publication
Equally noteworthy is the platform’s ability to pre-schedule publication of your landing pages.
In other words, you don’t have to manually publish every page or set an alarm so you wake up early and publish on time when you have an upcoming campaign. Instead, you can schedule the publication of your page at a future date and time.
Here’s how to publish your pages into the future in two simple steps:
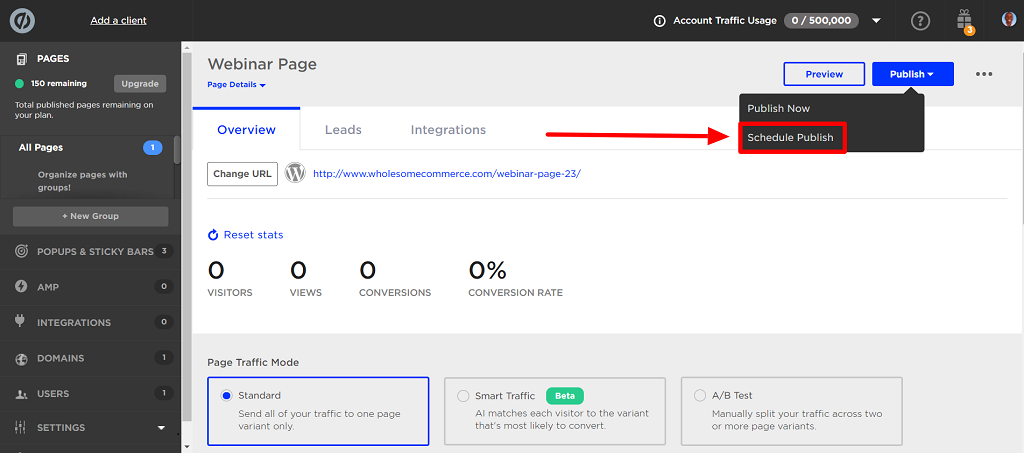
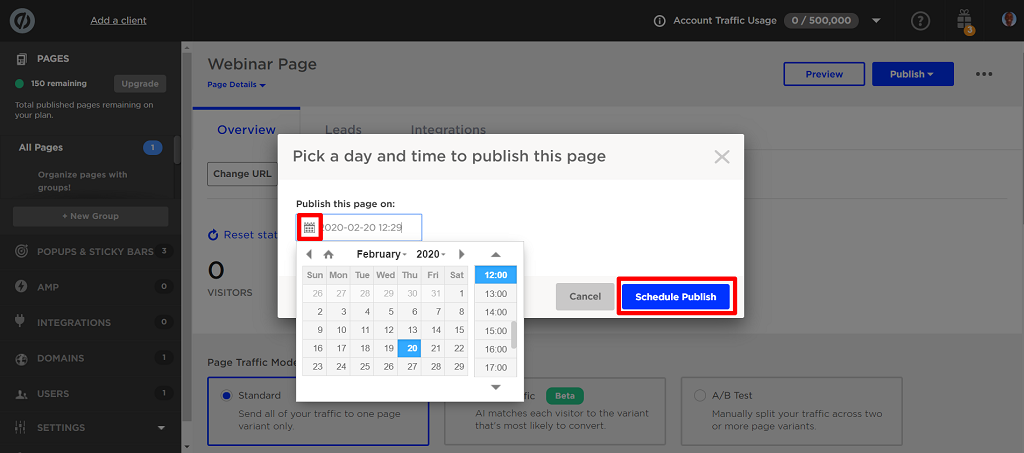
First, go to the page you want to schedule and click ‘publish’. You’ll see a drop-down menu with the option to either publish now or to schedule a time and date to publish later. Click ‘schedule publish’:
Second, choose the date and time you want the page to go live on by clicking on the calendar icon and hit ‘schedule publish.’
Then, fold your hands and gaze into the future — the page will go live on your chosen day. The scheduling feature comes in especially handy when doing seasonal offers.
Support & Help Documentation
It must be remembered, no matter how brilliant a tool is, you’ll get stuck at sometimes.
When that happens, who or where do you turn to?
Luckily for you, Unbounce has a superb support system. Important to realise, right from the initial video when you first log in to the super active community, help is on hand. Before reaching out to the support team, see if you can find help on your own from the rich knowledge base.
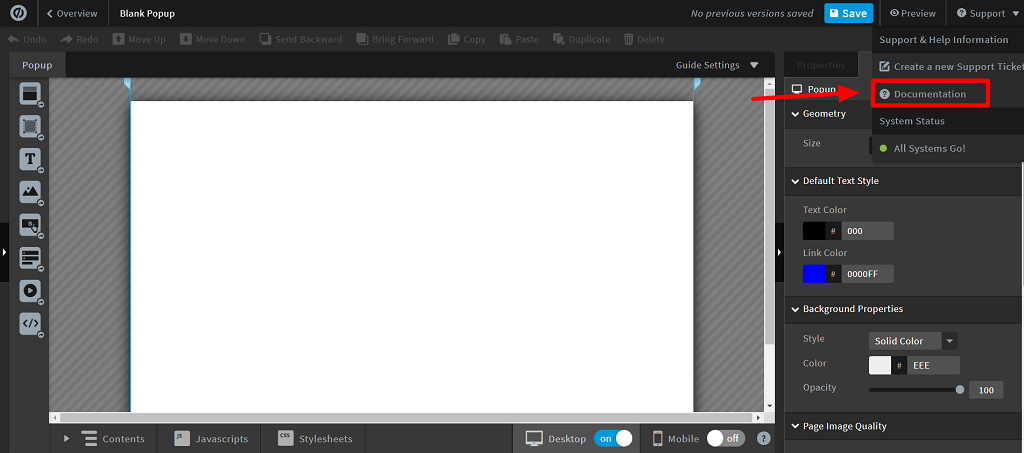
Click on the question mark icon > documentation on the top right-hand corner and fire away:
If you don’t find answers there, try other channels. You can get help through:
- Live chat – the most effective way if you want to share screenshots and get live troubleshooting (unavailable after hours, leave a message if reaching out then).
- Email – leave a message and wait for support staff to respond by email to help you with your issue.
- Forum – very active, knowledgeable, friendly, and supportive members.
- Phone – a biggie if you prefer the human touch- 5 available lines for North America, the United Kingdom, Australia, Germany and the rest of the world.
- Knowledgebase – the best place to start so you get answers without contacting support.
- Blog posts – you can also get help by reading fresh and insightful blog posts that address whatever is vexing you.
Undoubtedly, with so many channels customers can use to reach out, clearly Unbounce prioritises support. As a matter of fact, their support is prompt, helpful, and pain-free.
Unbounce: Contender Or Pretender For Best Landing Page Builder?
To sum up, is Unbounce the best landing page builder on the market?
Best is subjective, but Unbounce is certainly one of the best landing page tools, all things considered.
Why?
Because it combines an array of user + conversion-friendly features. Unbounce deserves its place on the upper rungs of A-list builders. Importantly, they continue to innovate and improve their product to serve their clients better, a hallmark of a leading service provider.
But Unbounce doesn’t come cheap.
Therefore, it’s suitable for those who have the cash to invest in a premium tool. If you’re just starting out, Unbounce may not be the right choice for you. Try cheaper options like Leadpages or even an all-in-one marketing tool like Get Response.
Finally, let me propose a toast:
To high-converting landing pages, leads and many future sales! Cheers!
According to his cheeky wife, Qhubekani Nyathi aka The Click Guy is an irresistibly handsome guy. He’s an offbeat long-form content writer who helps SMBs grow their income through zingy content that ranks, drives leads, and builds authority. He contributes to prestigious blogs like Search Engine Watch, Crazy Egg, Smart Blogger, Business 2 Community, Clickz, Get Response, and The Drum.
