
Forms are a powerful way to interact with your visitors.
In this article, I’m going to review and walk you through Paperform, an online form builder.
When you hear the term ‘online form’ you may be thinking contact forms or feedback forms. But Paperform is way more advanced than that.
With Paperform, you can create order forms that link to payment options such as Stripe and PayPal. Or create quizzes that use conditional logic.
Here’s a quick look at what we’ll cover in this post:
Let’s get started!
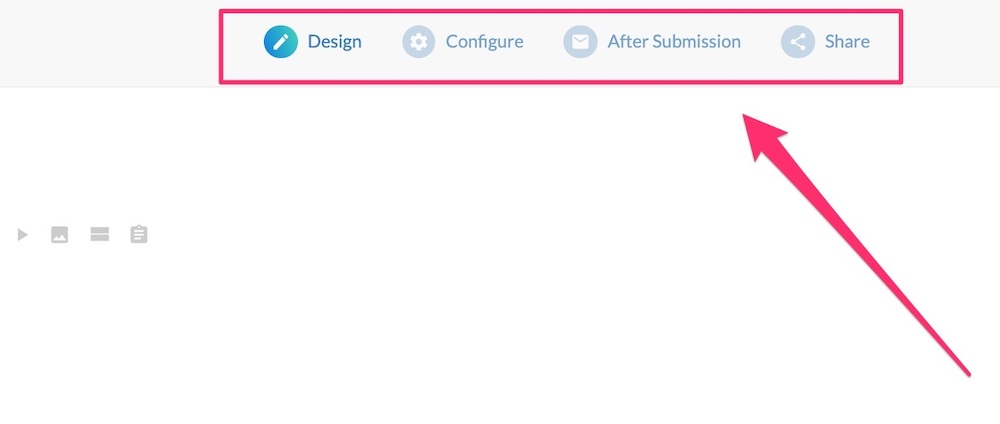
Paperform – The User Interface

The Paperform user interface (UI) consists of four distinct areas:
- Design
- Configure
- After Submission
- Share
Design
This is where you design the layout of your form.
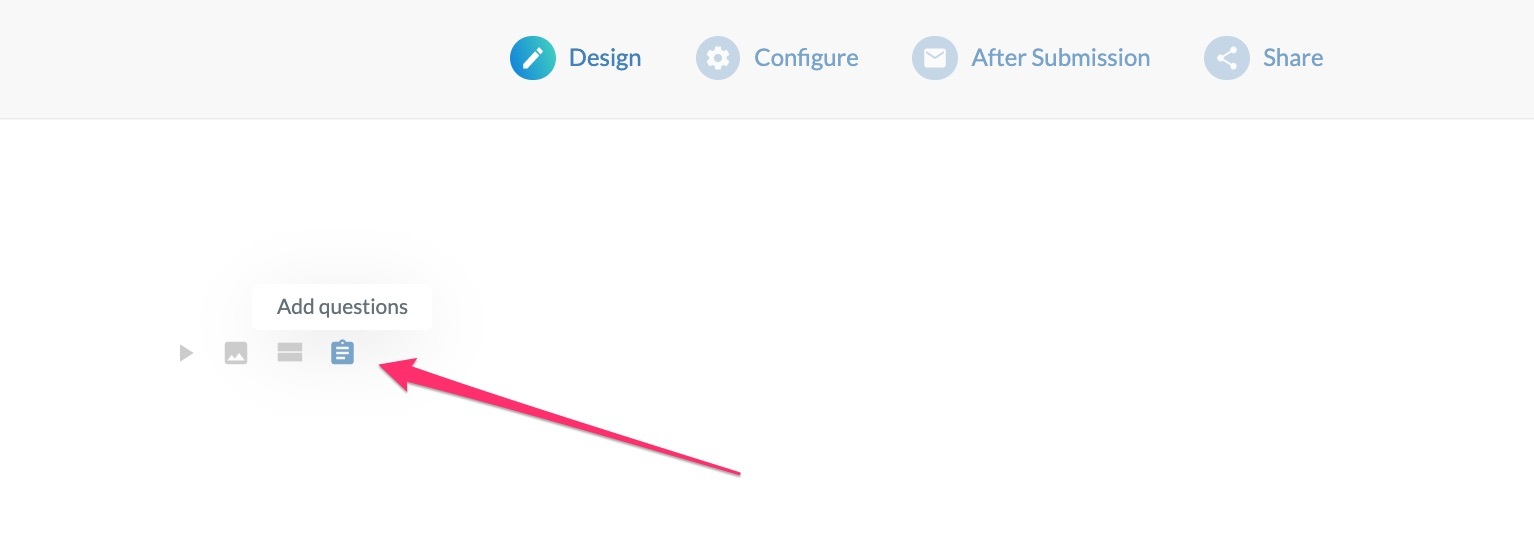
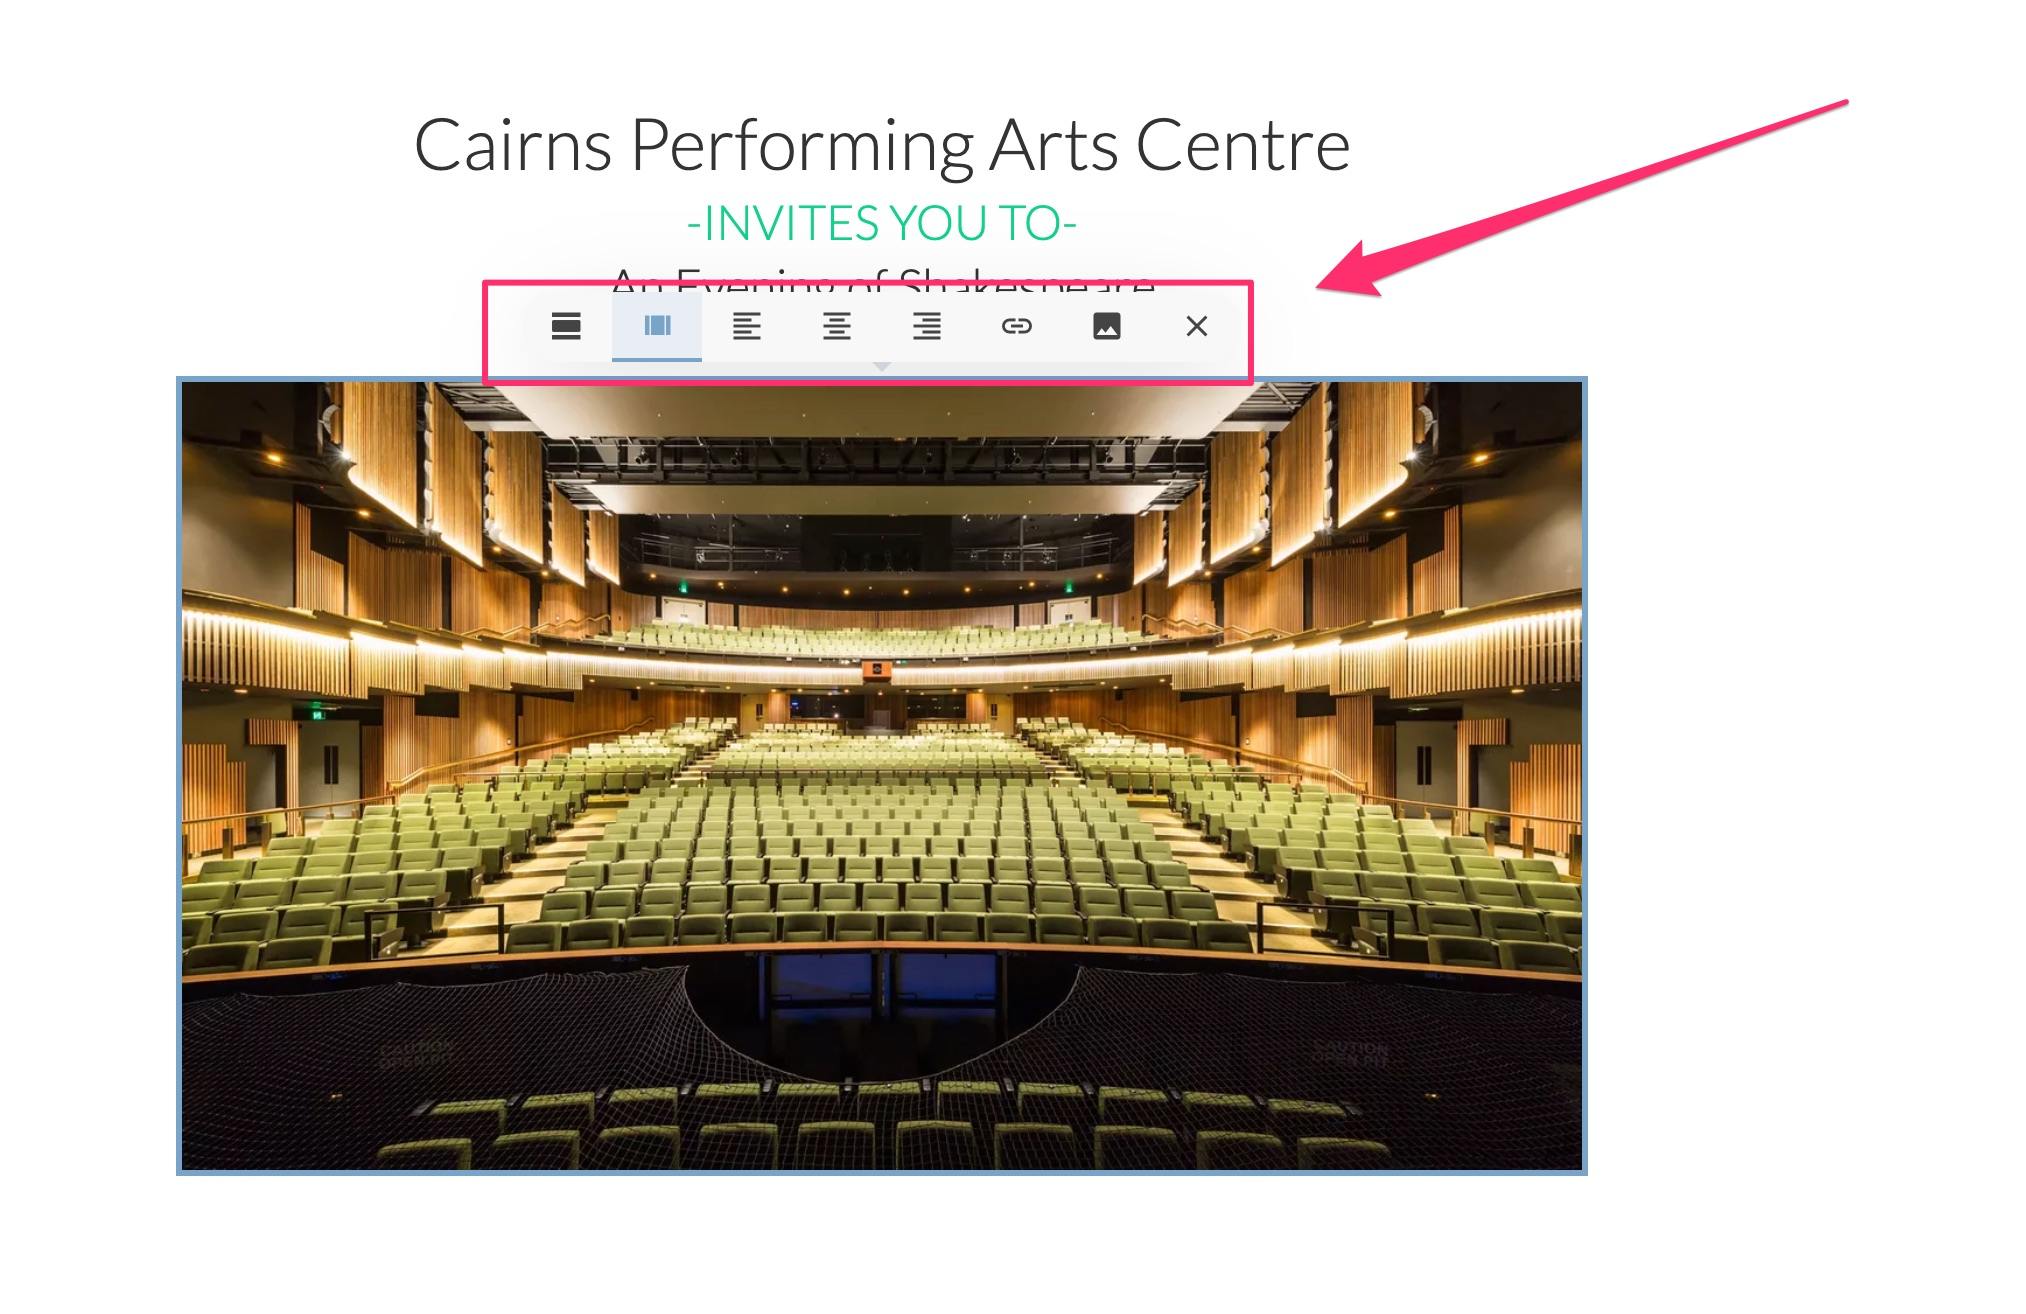
When you click within the design area, a group of four floating icons appears. The innermost icon is marked ‘questions’. This refers to fields that require user input:
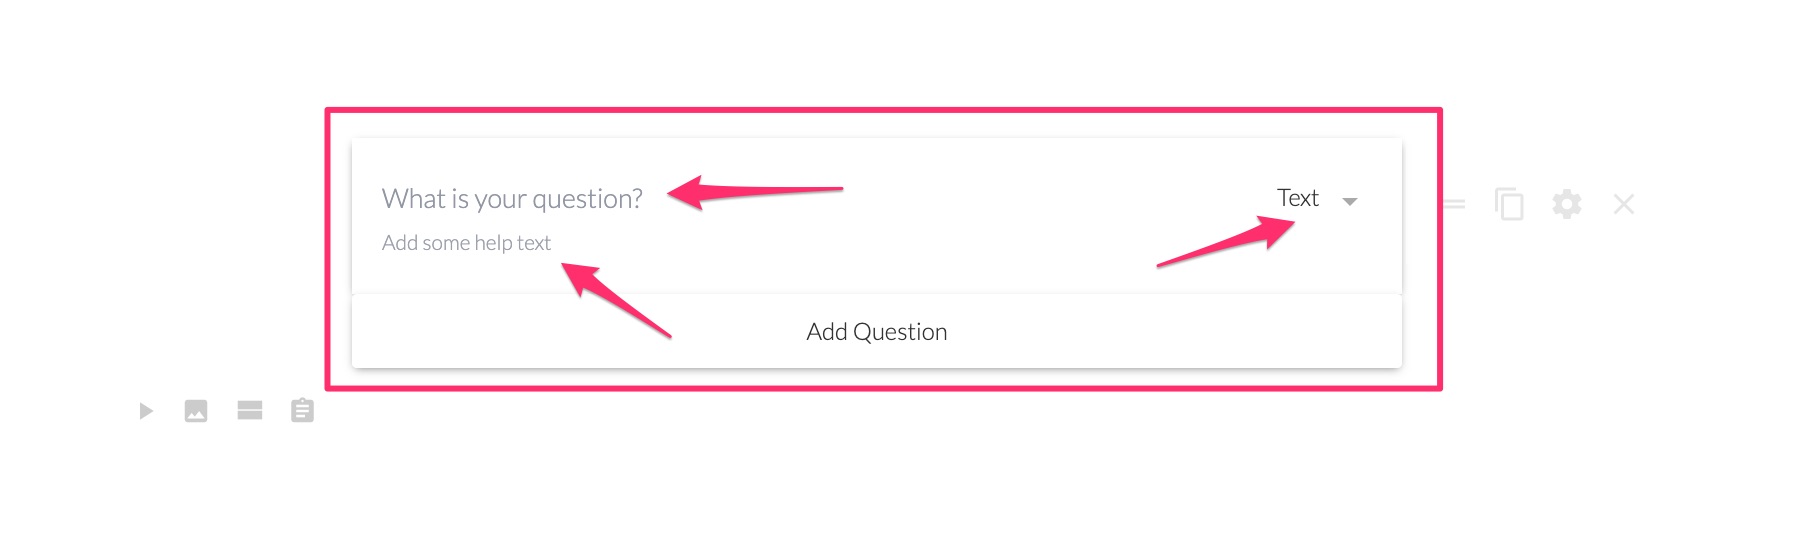
Whenever you add a ‘question’, you create a group that consists of the title of your question, some help text (optional) and the type of user input field:
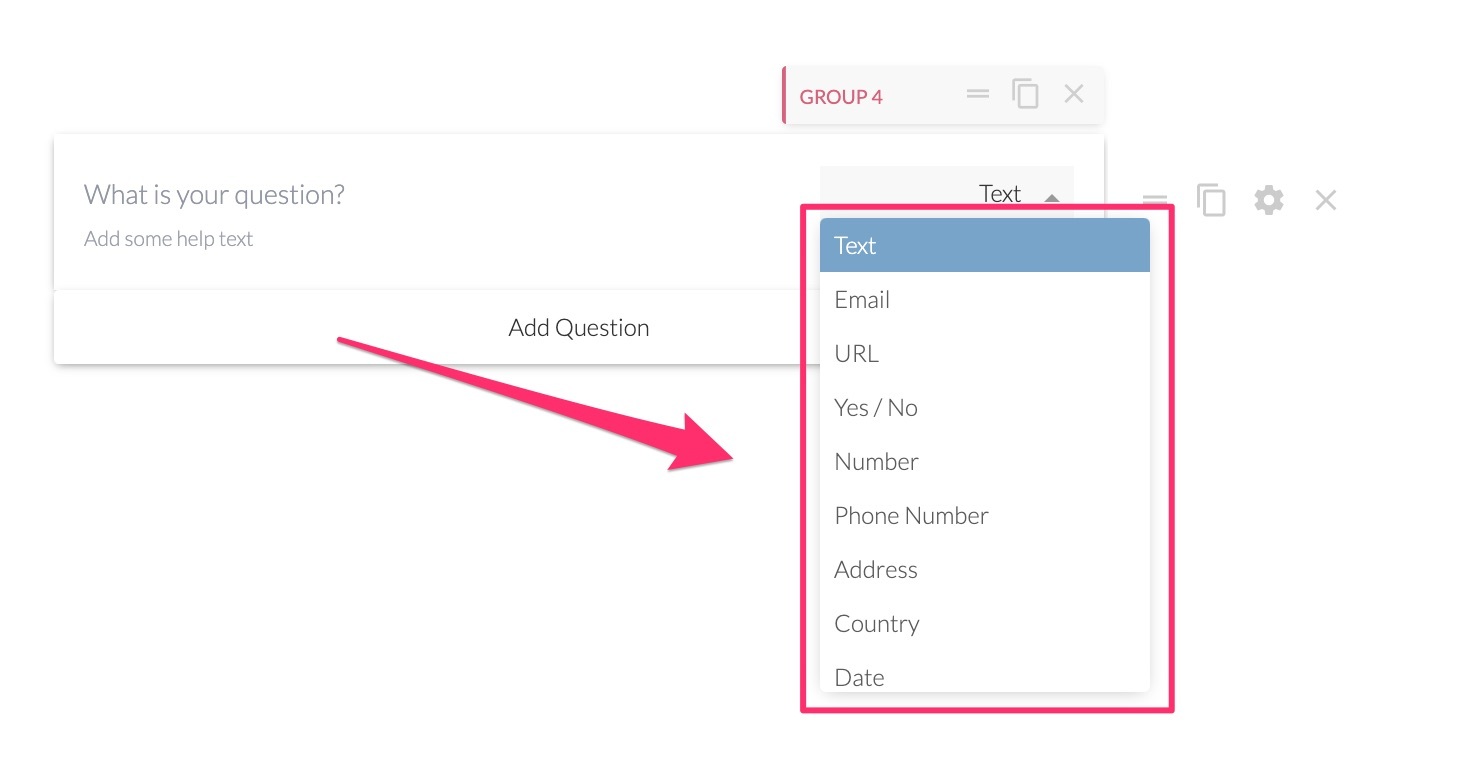
If you click on the down arrow next to the input field, a dropdown appears listing all the types of user fields available:
A ‘group’ can contain more than one question:
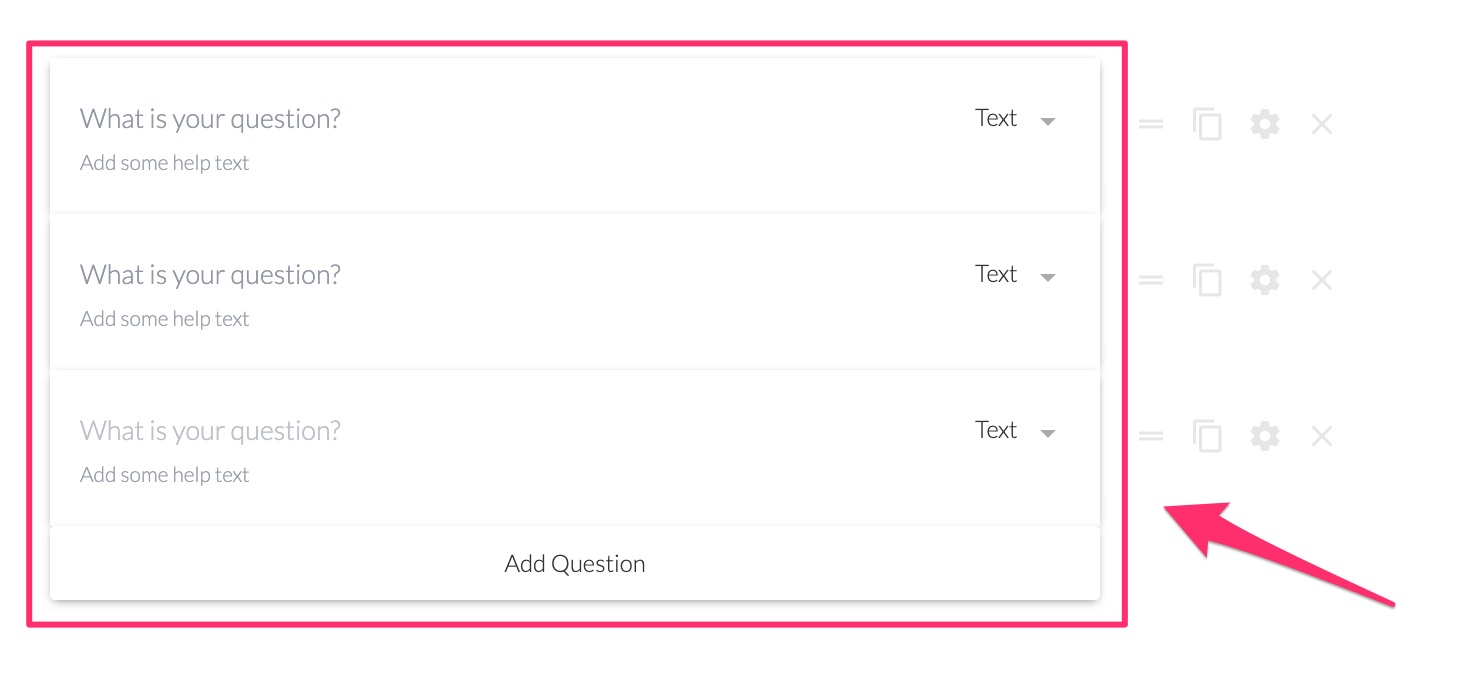
Each ‘question’ within a group can be moved up or down, duplicated, or deleted. And the group itself can be dragged up or down, duplicated, or deleted:
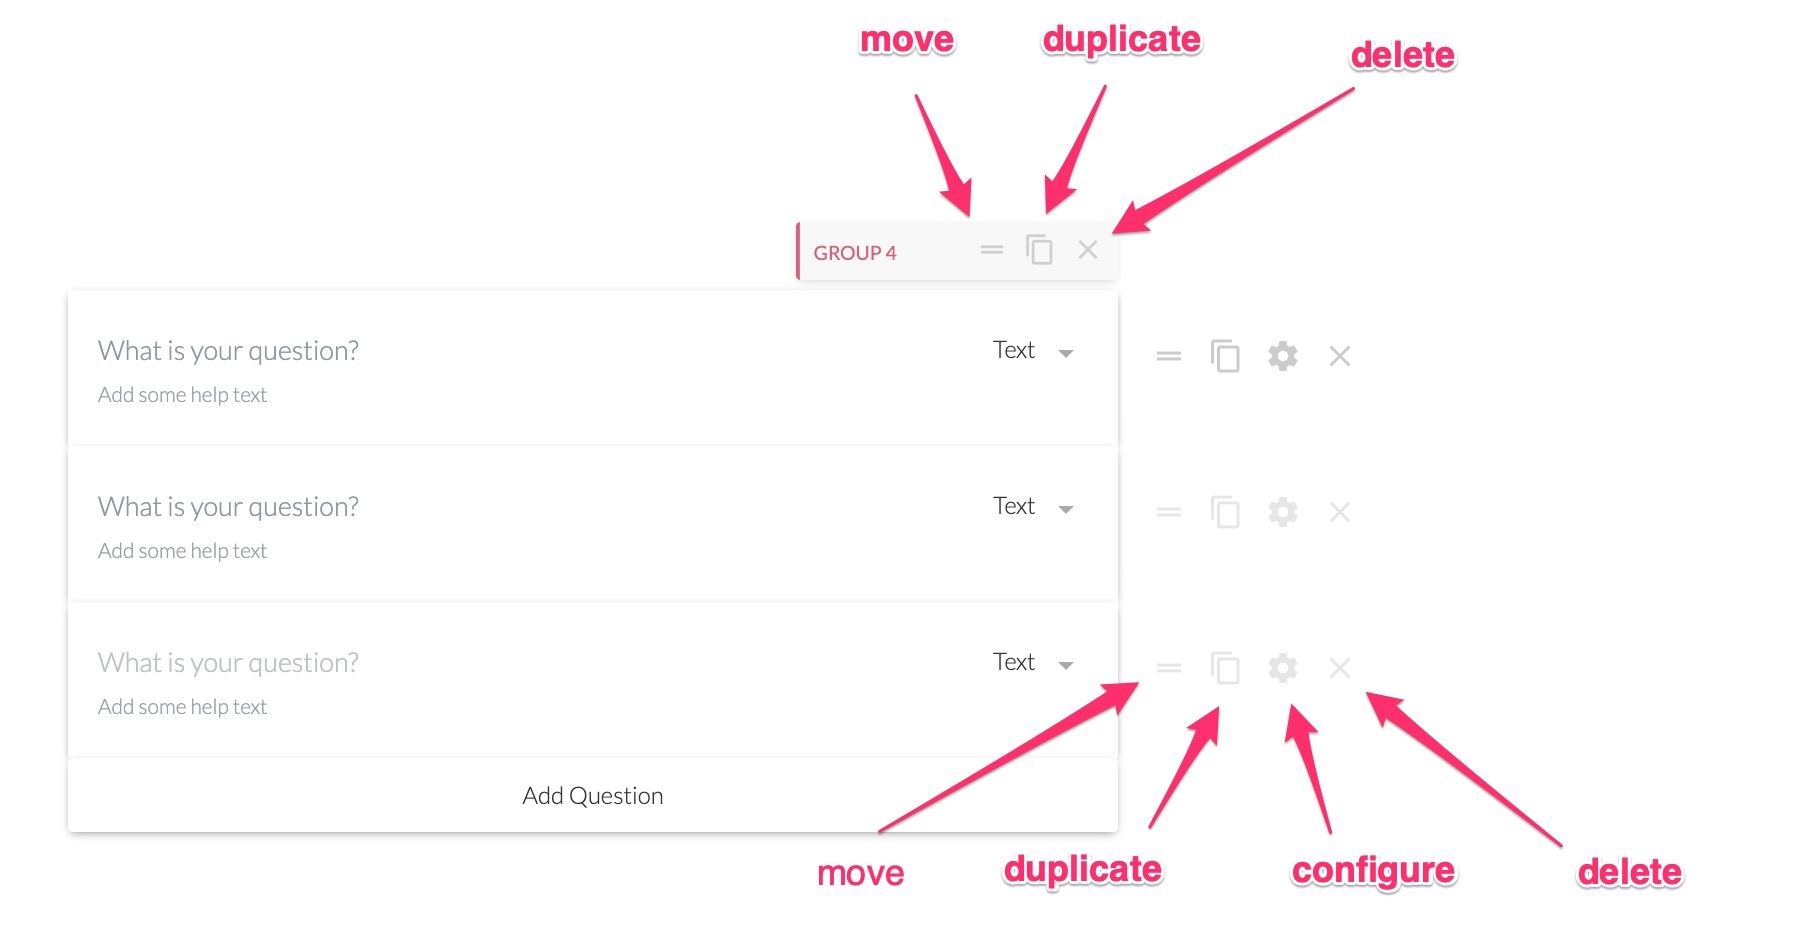
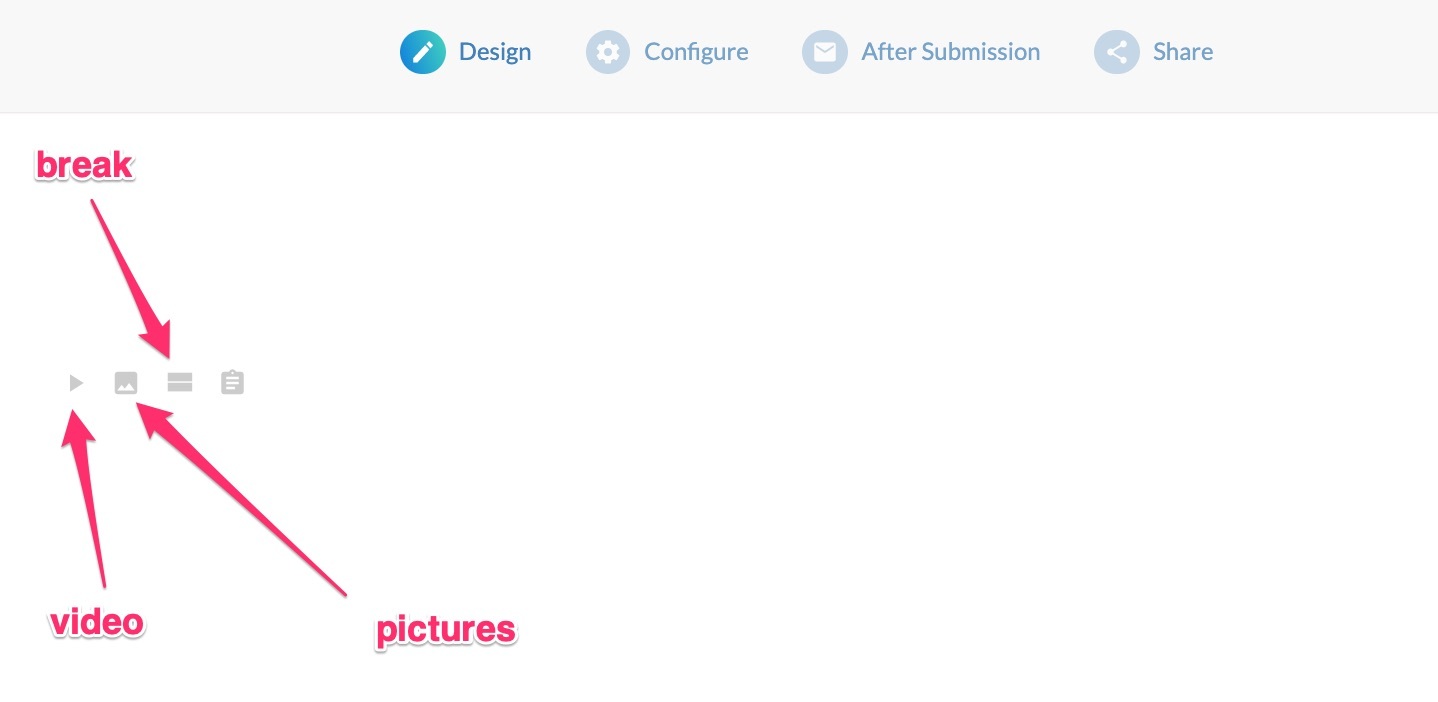
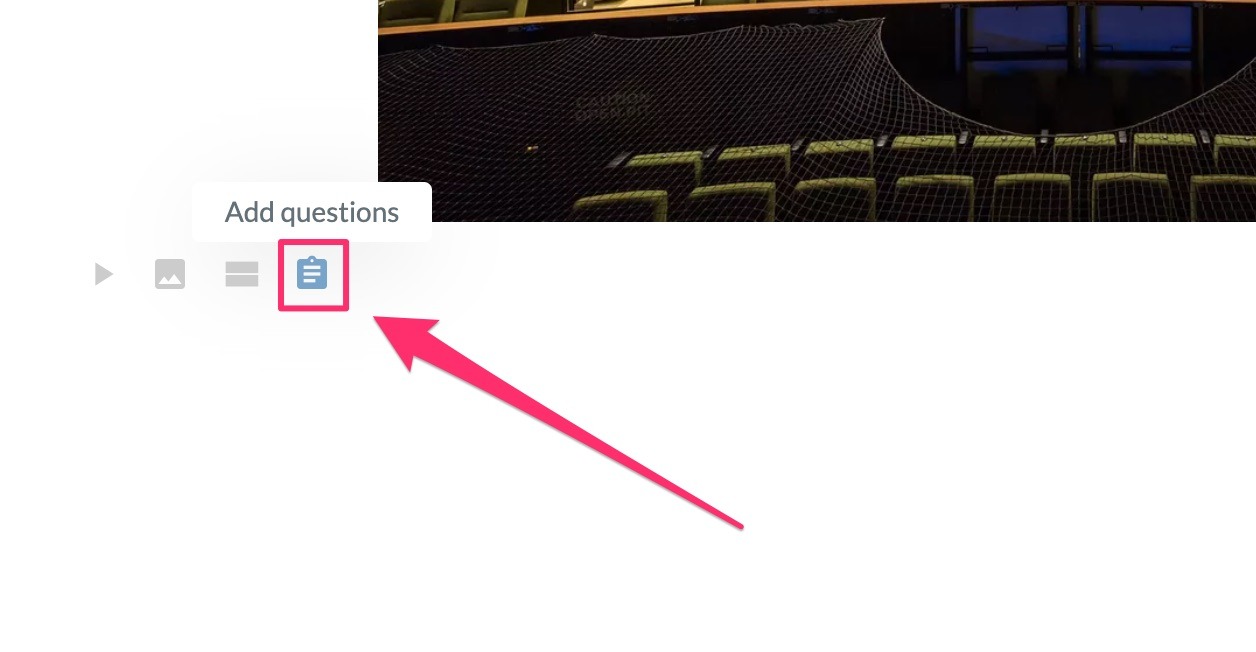
In addition to ‘questions’, the floating menu on the left side of the editing area lets you add video, pictures, and breaks:
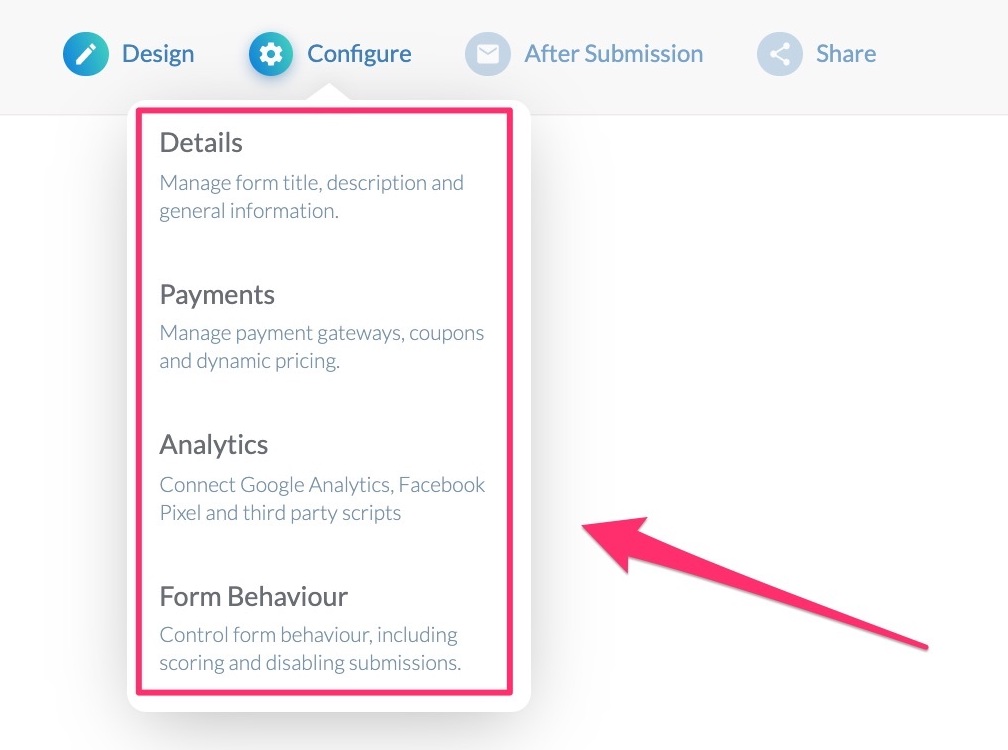
Configure
‘Configure’ is where you:
- Name your form
- Configure payment options
- Connect your form to analytics programs
- Control the behaviour of your form (more about this later)
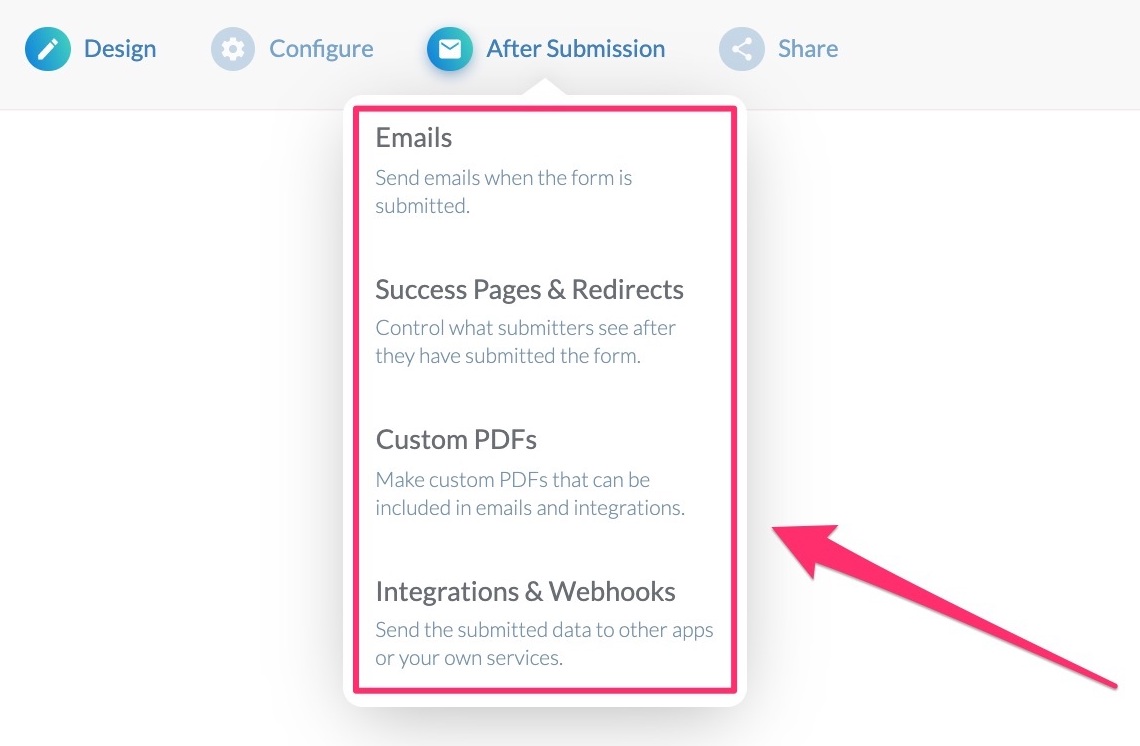
After Submission
The ‘After Submission’ tab deals with:
- Email notifications
- Success pages & redirects
- Customized PDFs
- Integrations with 3rd party services
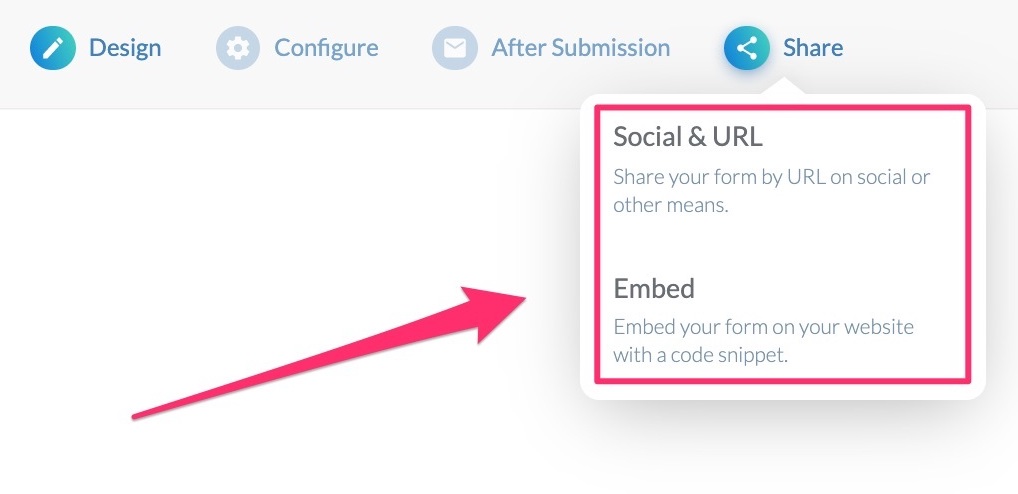
Share
The ‘Share’ tab is where you get links for sharing your form (e.g. on social media) and code snippets for embedding your form in a web page.
Building your form
The form builder works very much like the Gutenberg editor in WordPress. Each new line has a set of floating symbols that allow you to add video, add an image, add a break, or ‘ask a question’.
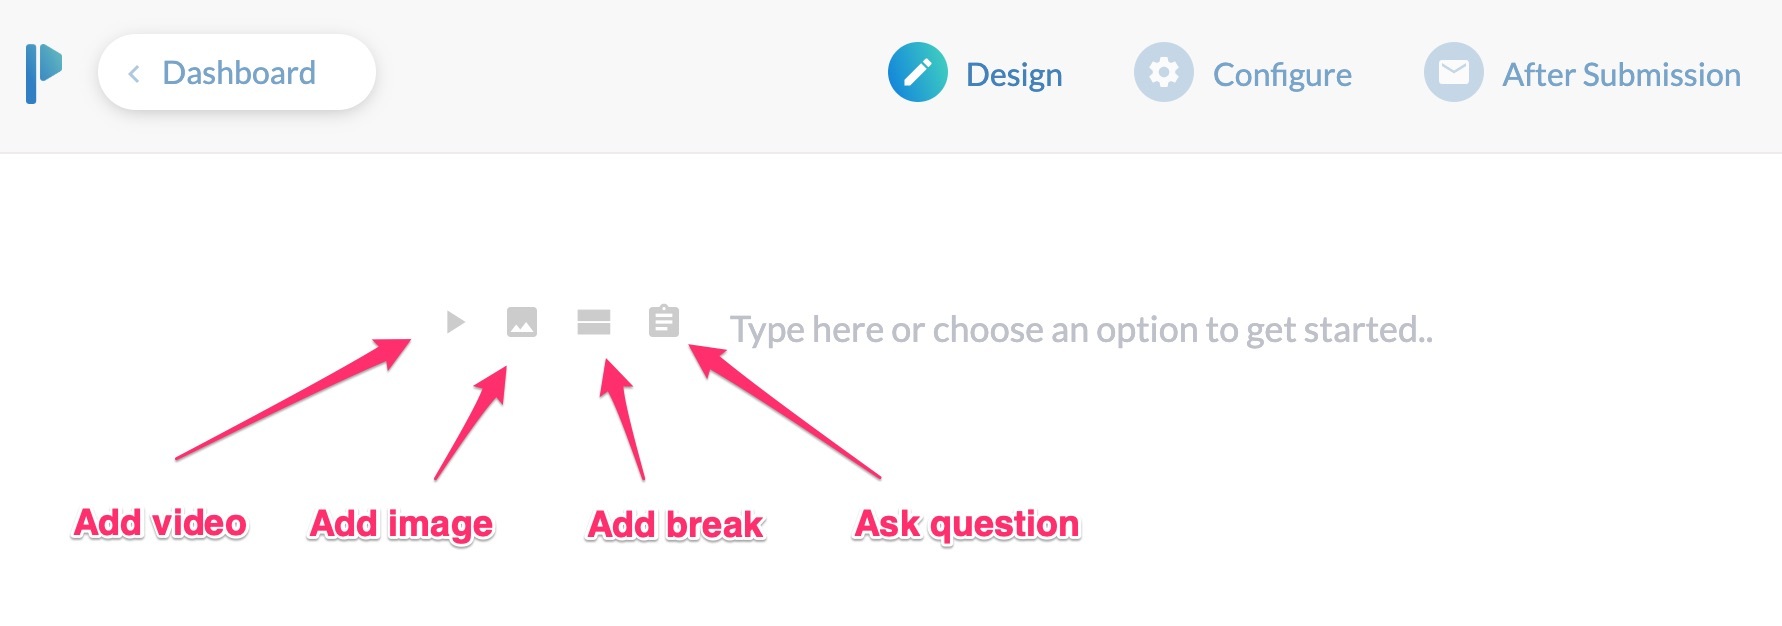
I initially found ‘ask a question’ a bit confusing, until I realized that it means ‘any field that requires user input’:
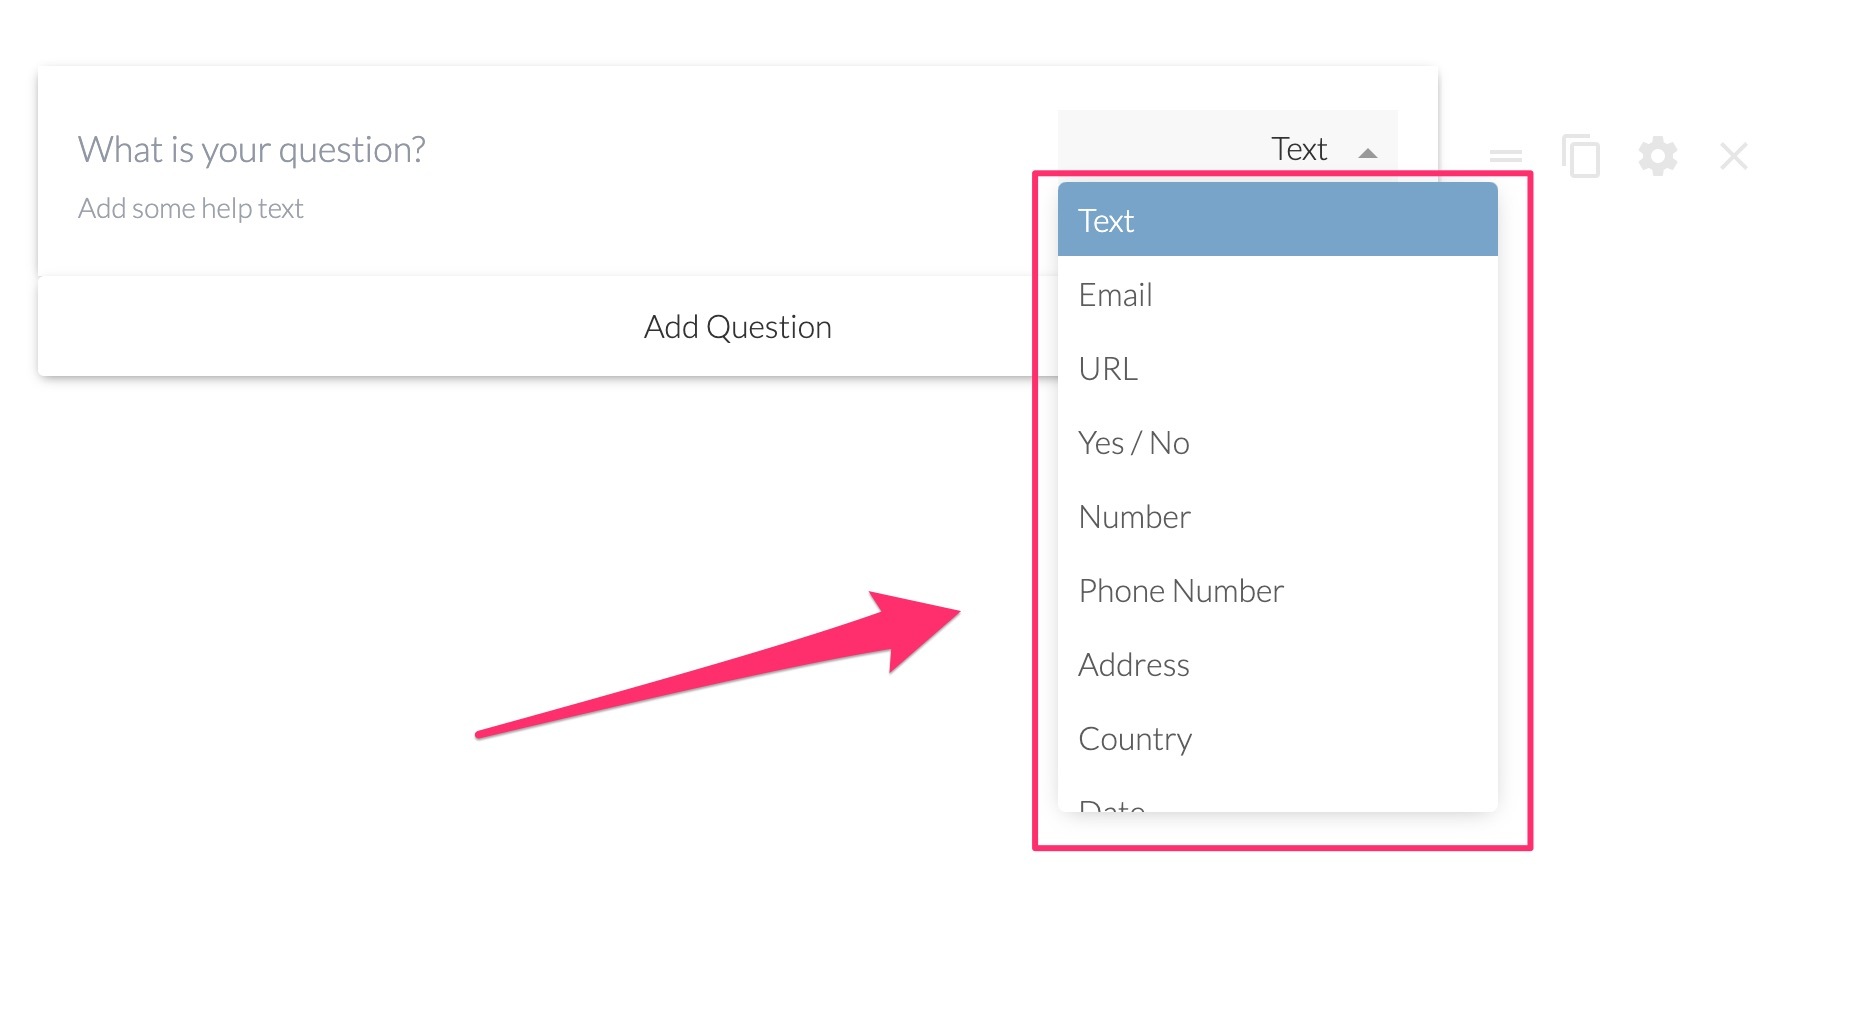
Paperform offers 21 types of user input field:
- Text
- URL
- Yes/No
- Number
- Phone Number
- Address
- Country
- Date
- Time
- Scale
- Multiple-choice
- Dropdown
- Image Upload
- File Upload
- Signature
- Price Products
- Subscriptions
- Calculation
- Hidden
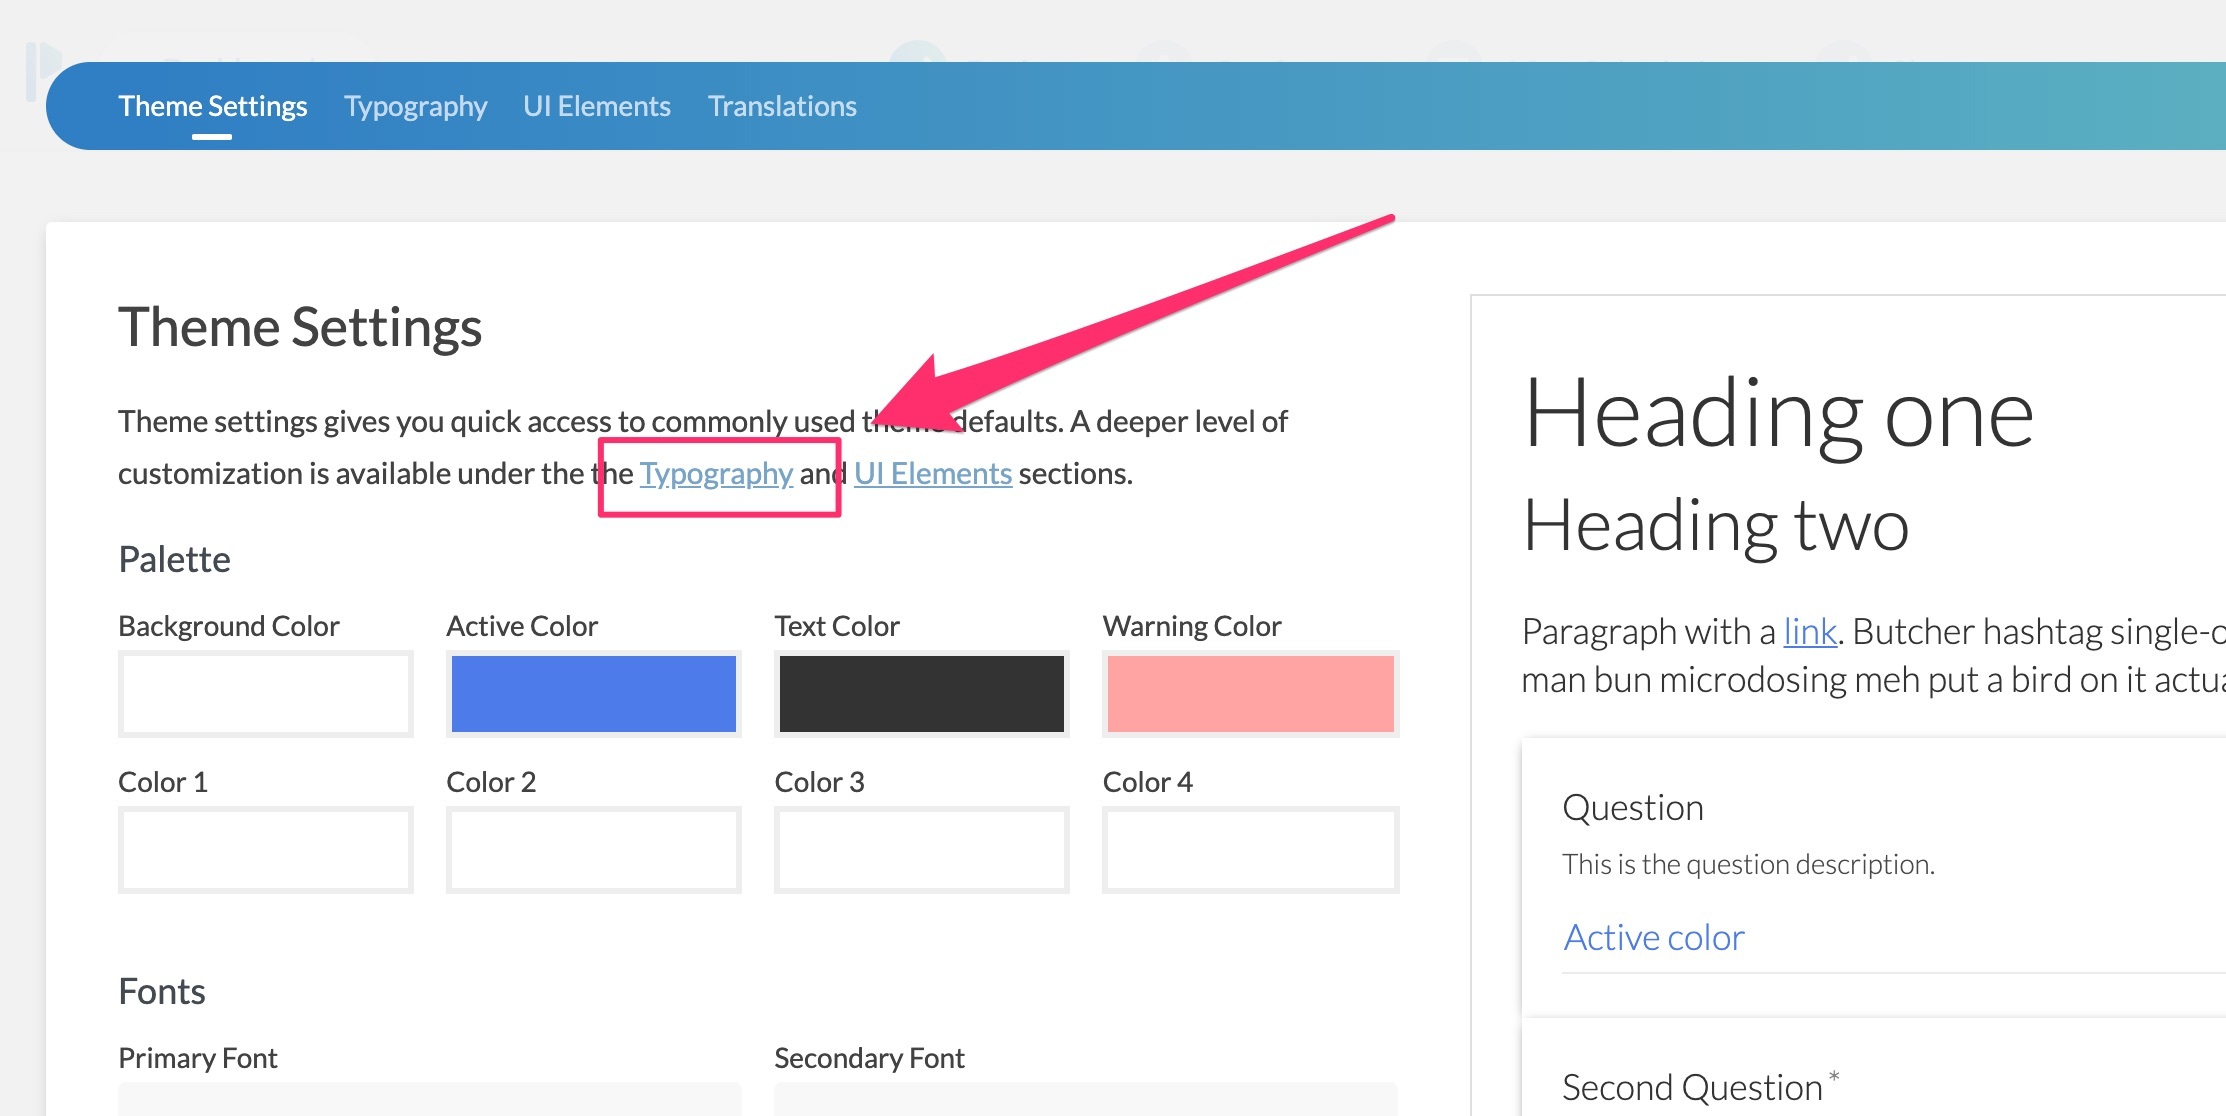
You can change the default format of the H1 and H2 headings by clicking on the ink drop icon on the far right of the screen:
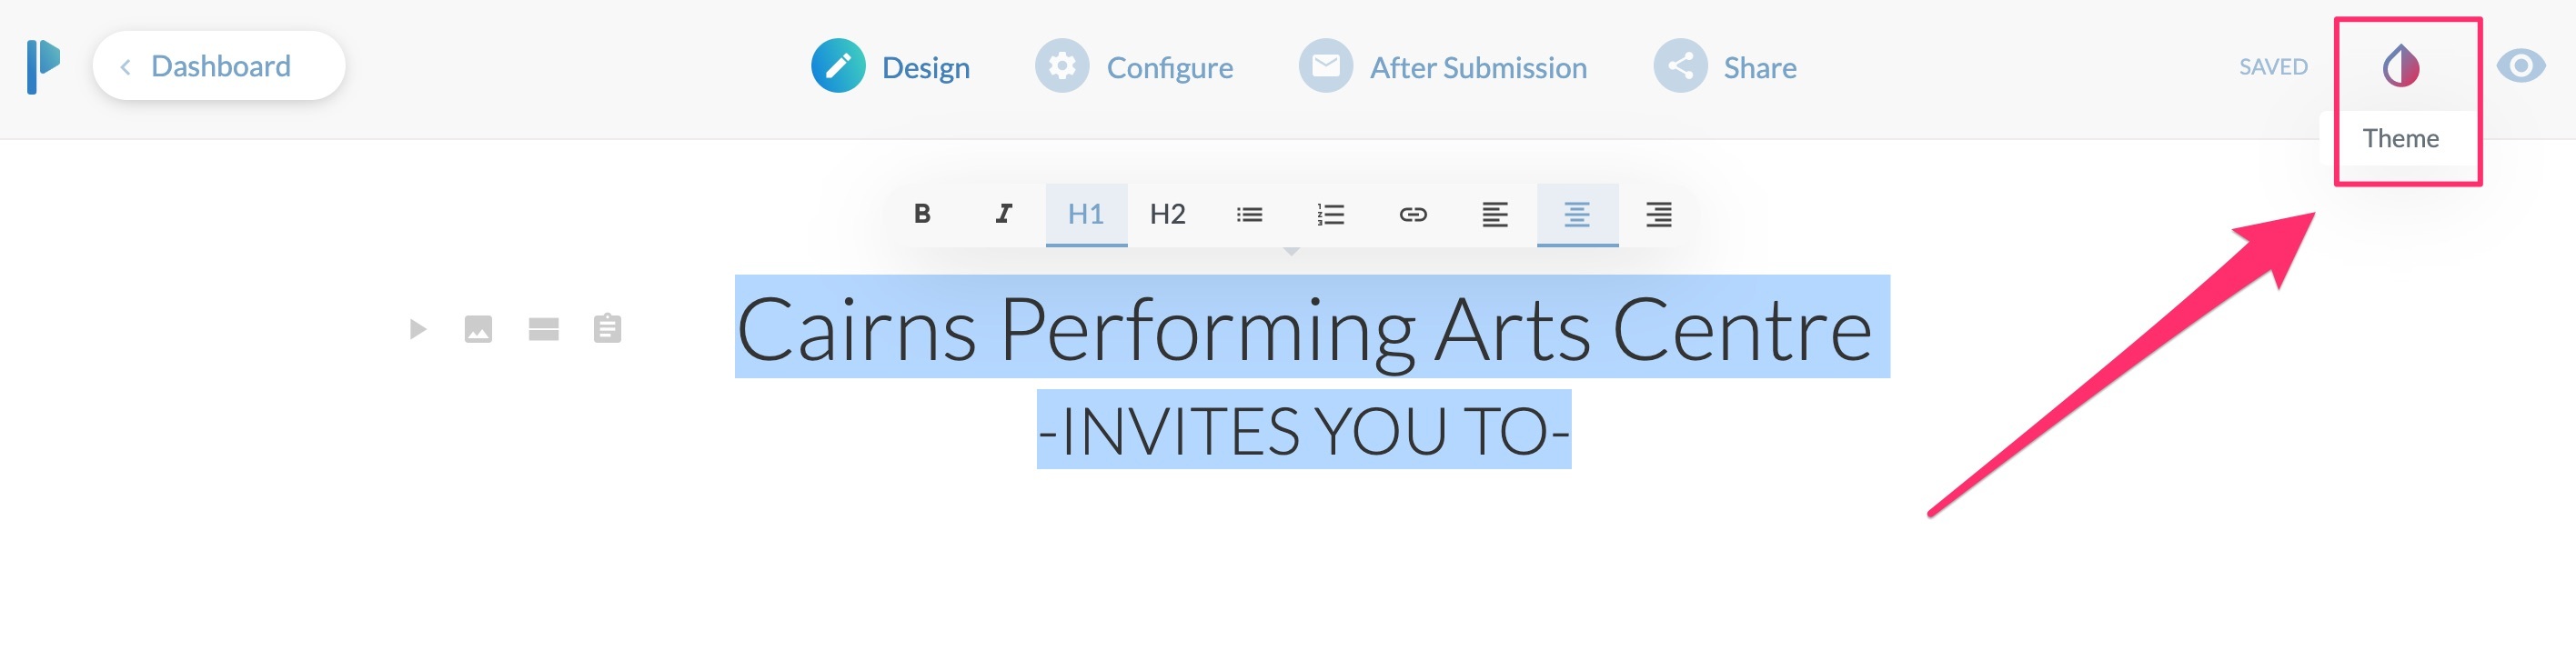
Then click on the ‘Typography’ link:
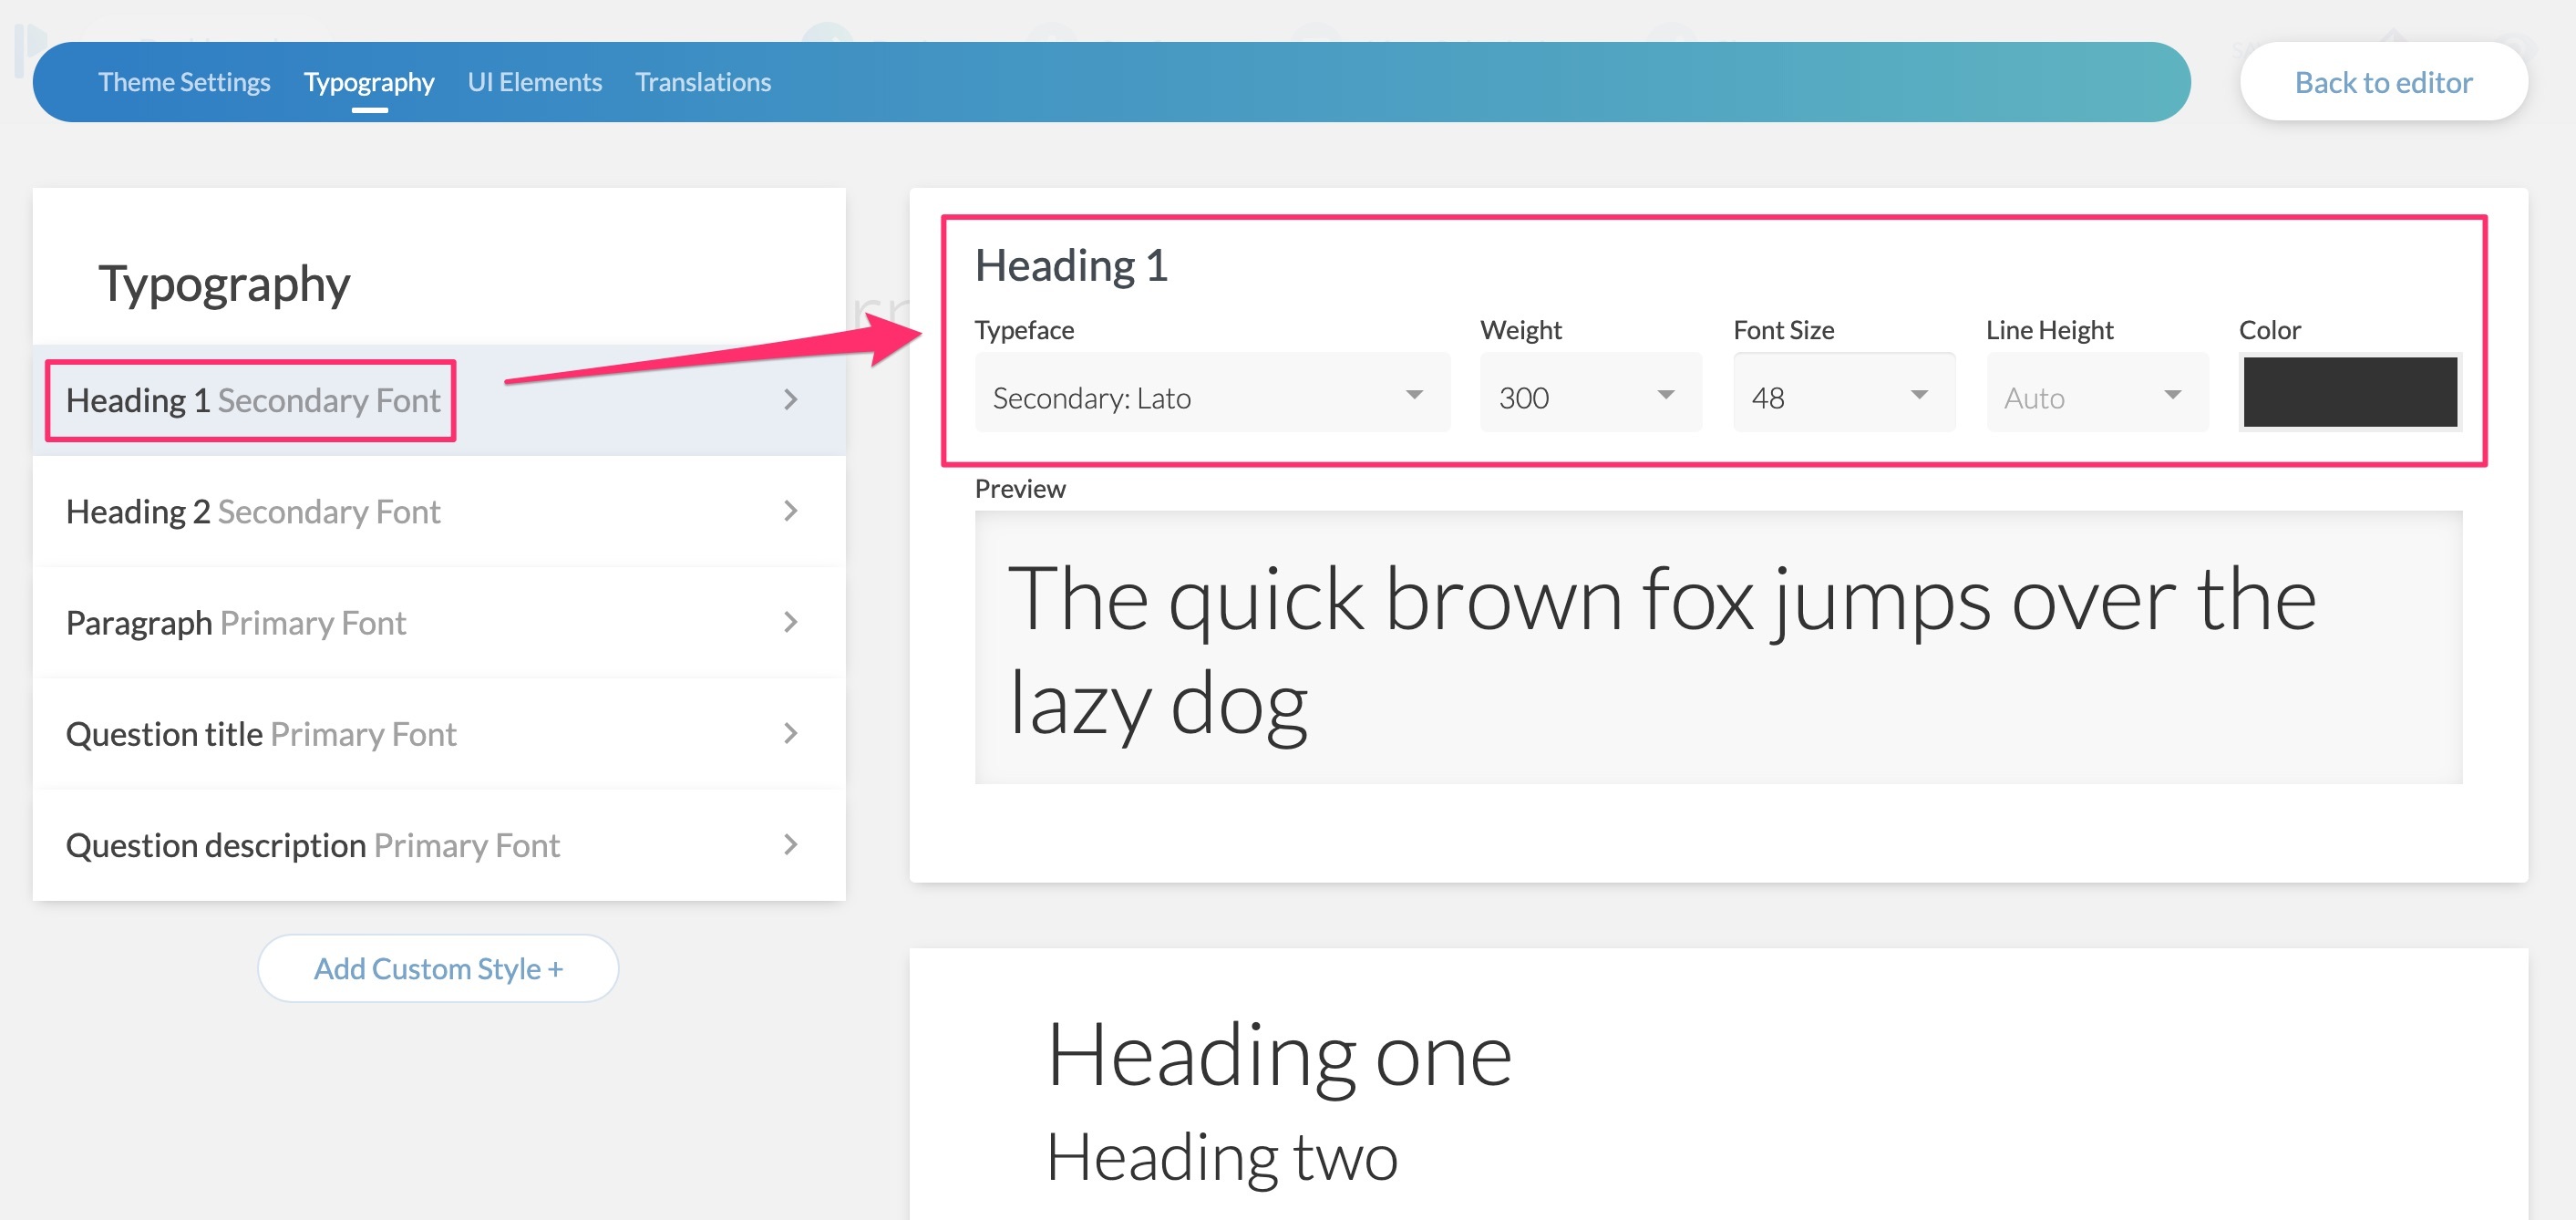
You’ll now be able to customize the formatting for the five different types of text:
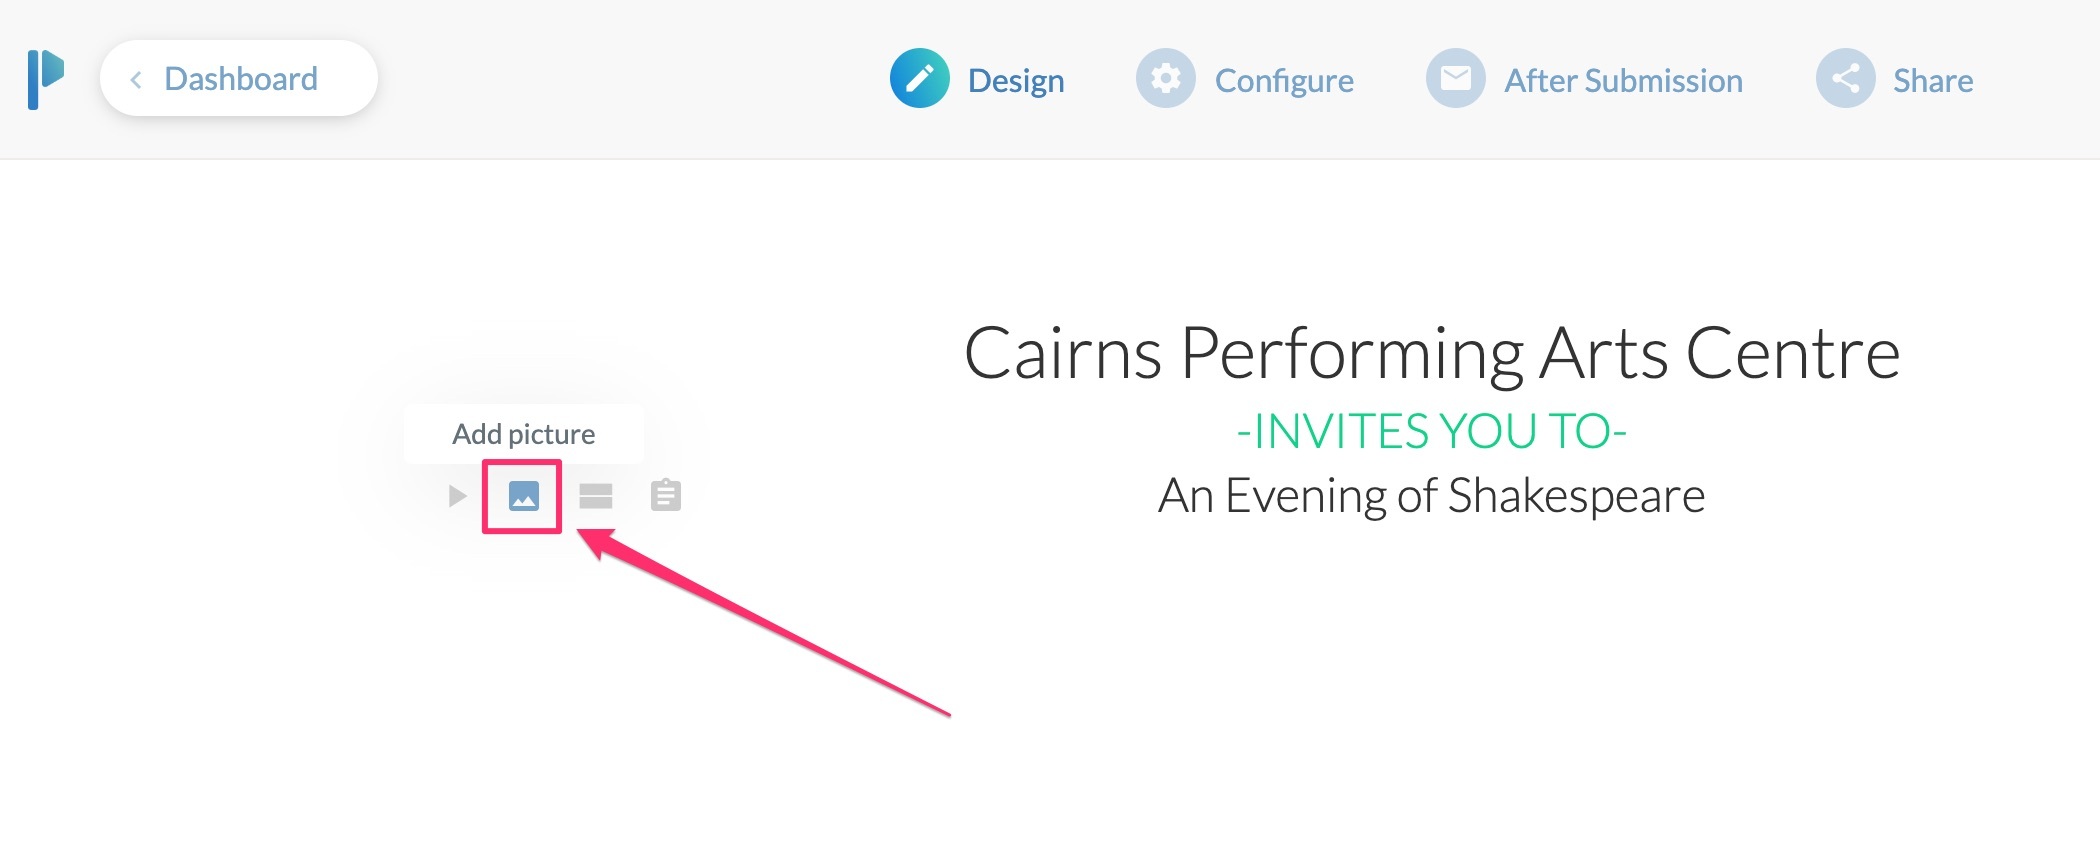
To add an image, click on the floating ‘picture’ icon:
A floating menu above the image gives you some image formatting options:
 To add user input fields, click on ‘Add questions’ from the left side floating menu:
Note that each type of user input field can be customized by clicking on the cogwheel to the right:
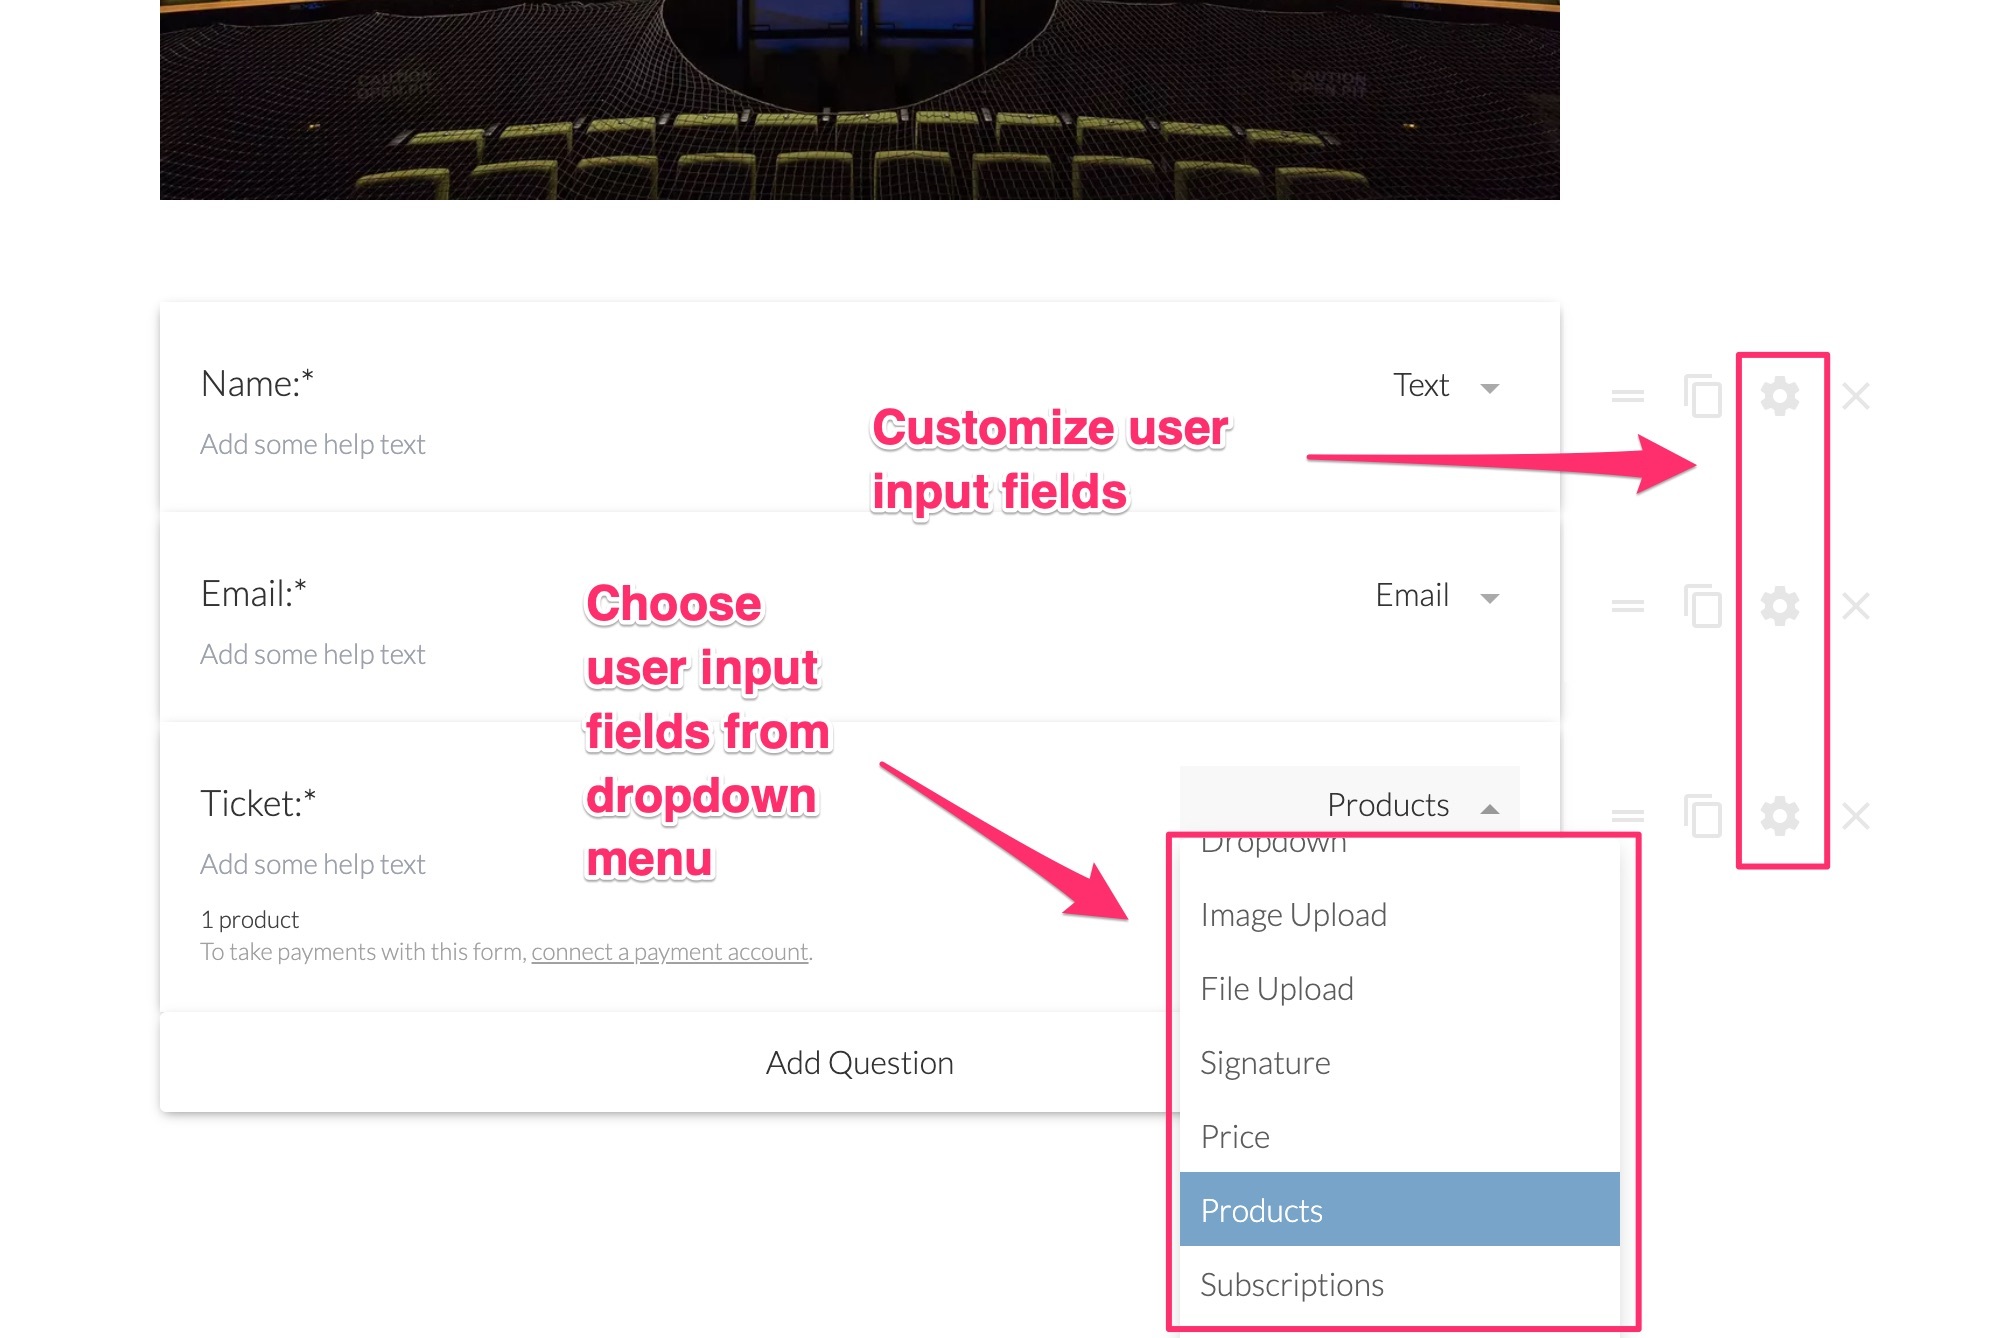
For example, for the ‘Name’ user input, you can choose to make it a required field (marked with an asterisk) and you can choose to have placeholder text in the empty field.
Adding a Product
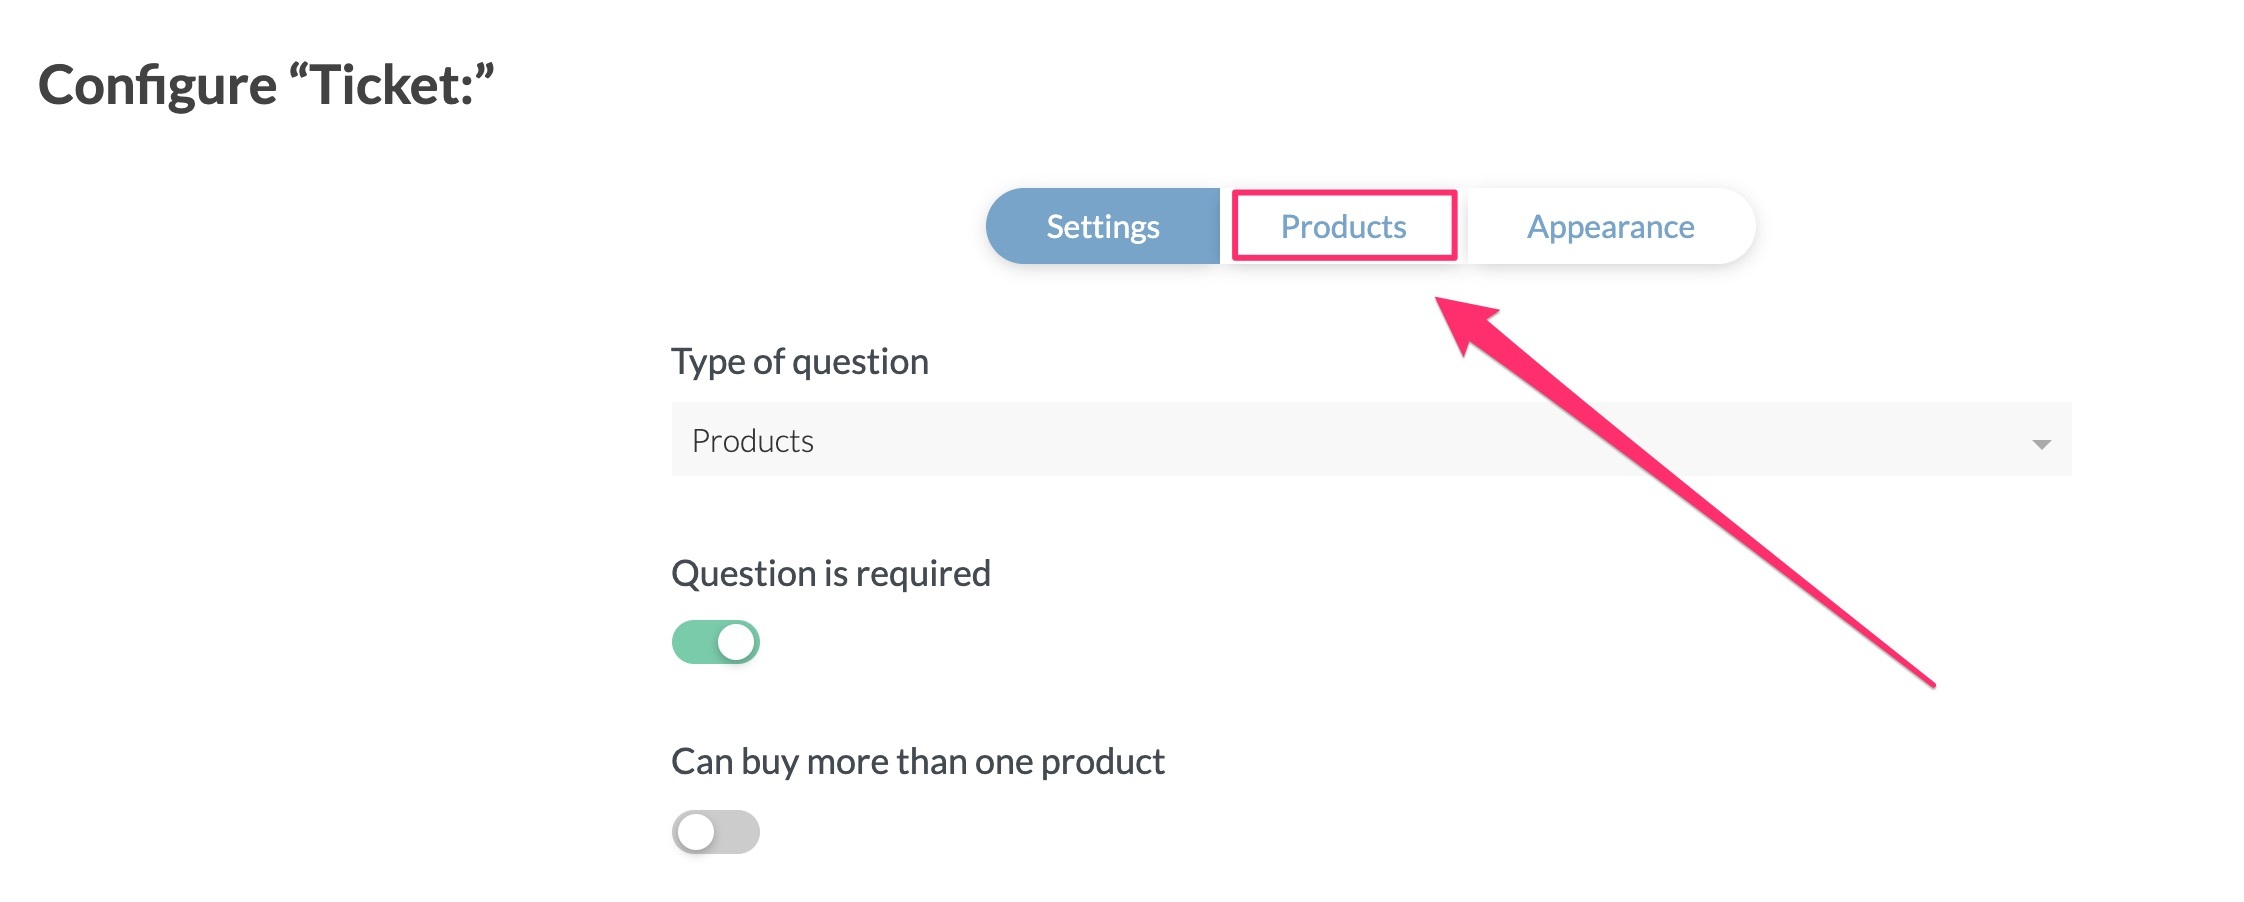
To add a product to your form, click on the cogwheel that corresponds to the product part of your form:
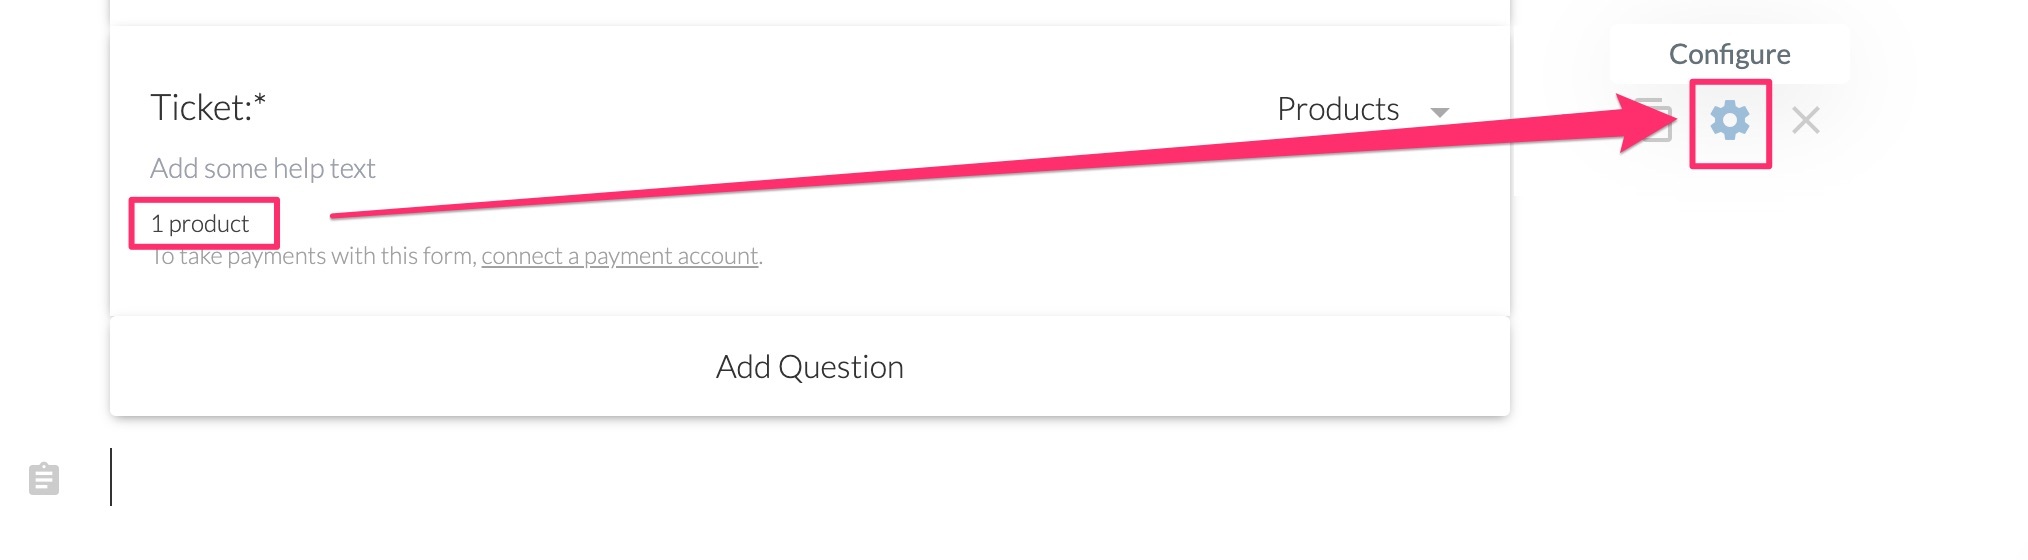
On the next screen, click on ‘Products’:
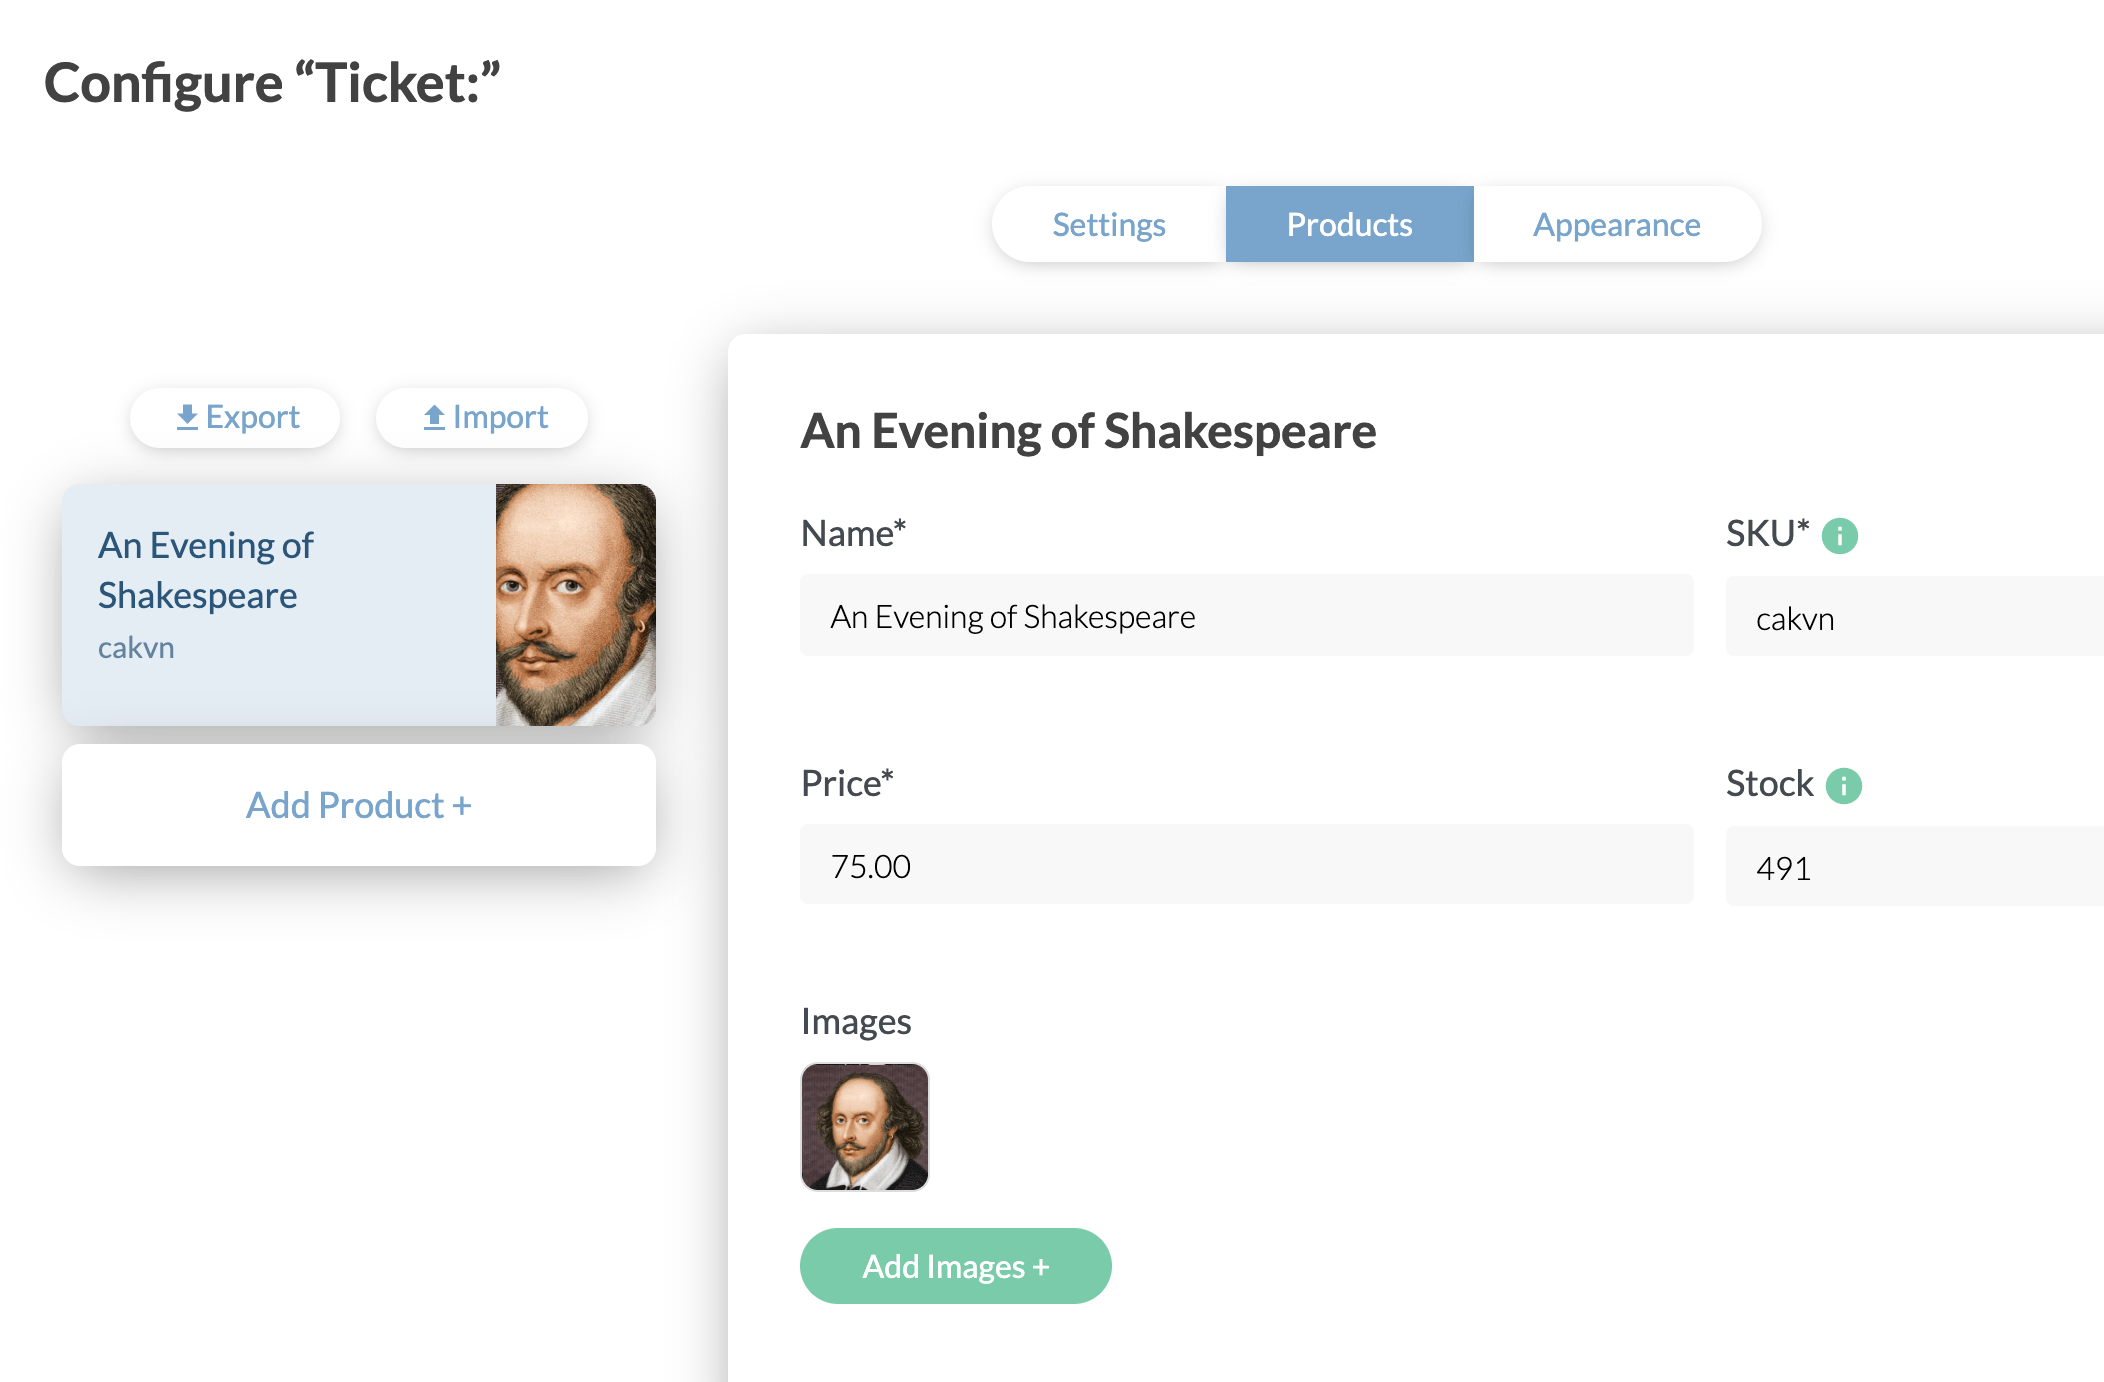
In the next window enter the name of the product, the price, and the number of available units, if applicable.
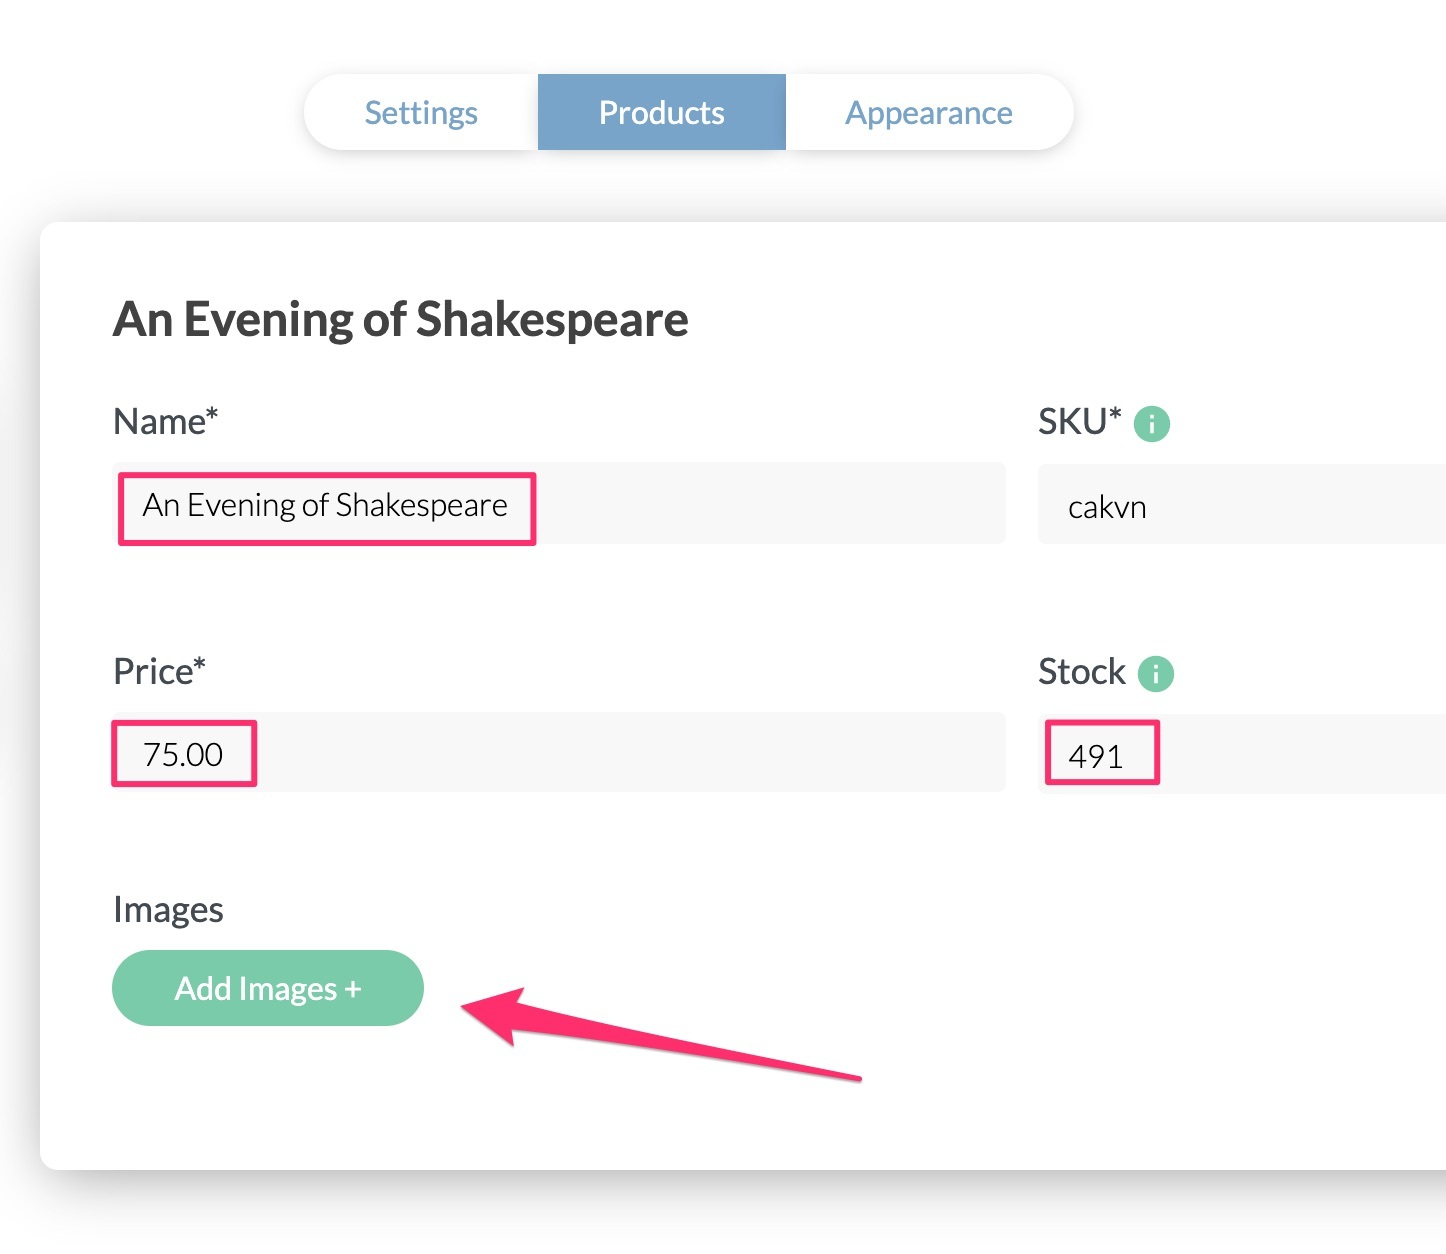 Then click on ‘images’ to add a picture of the product:
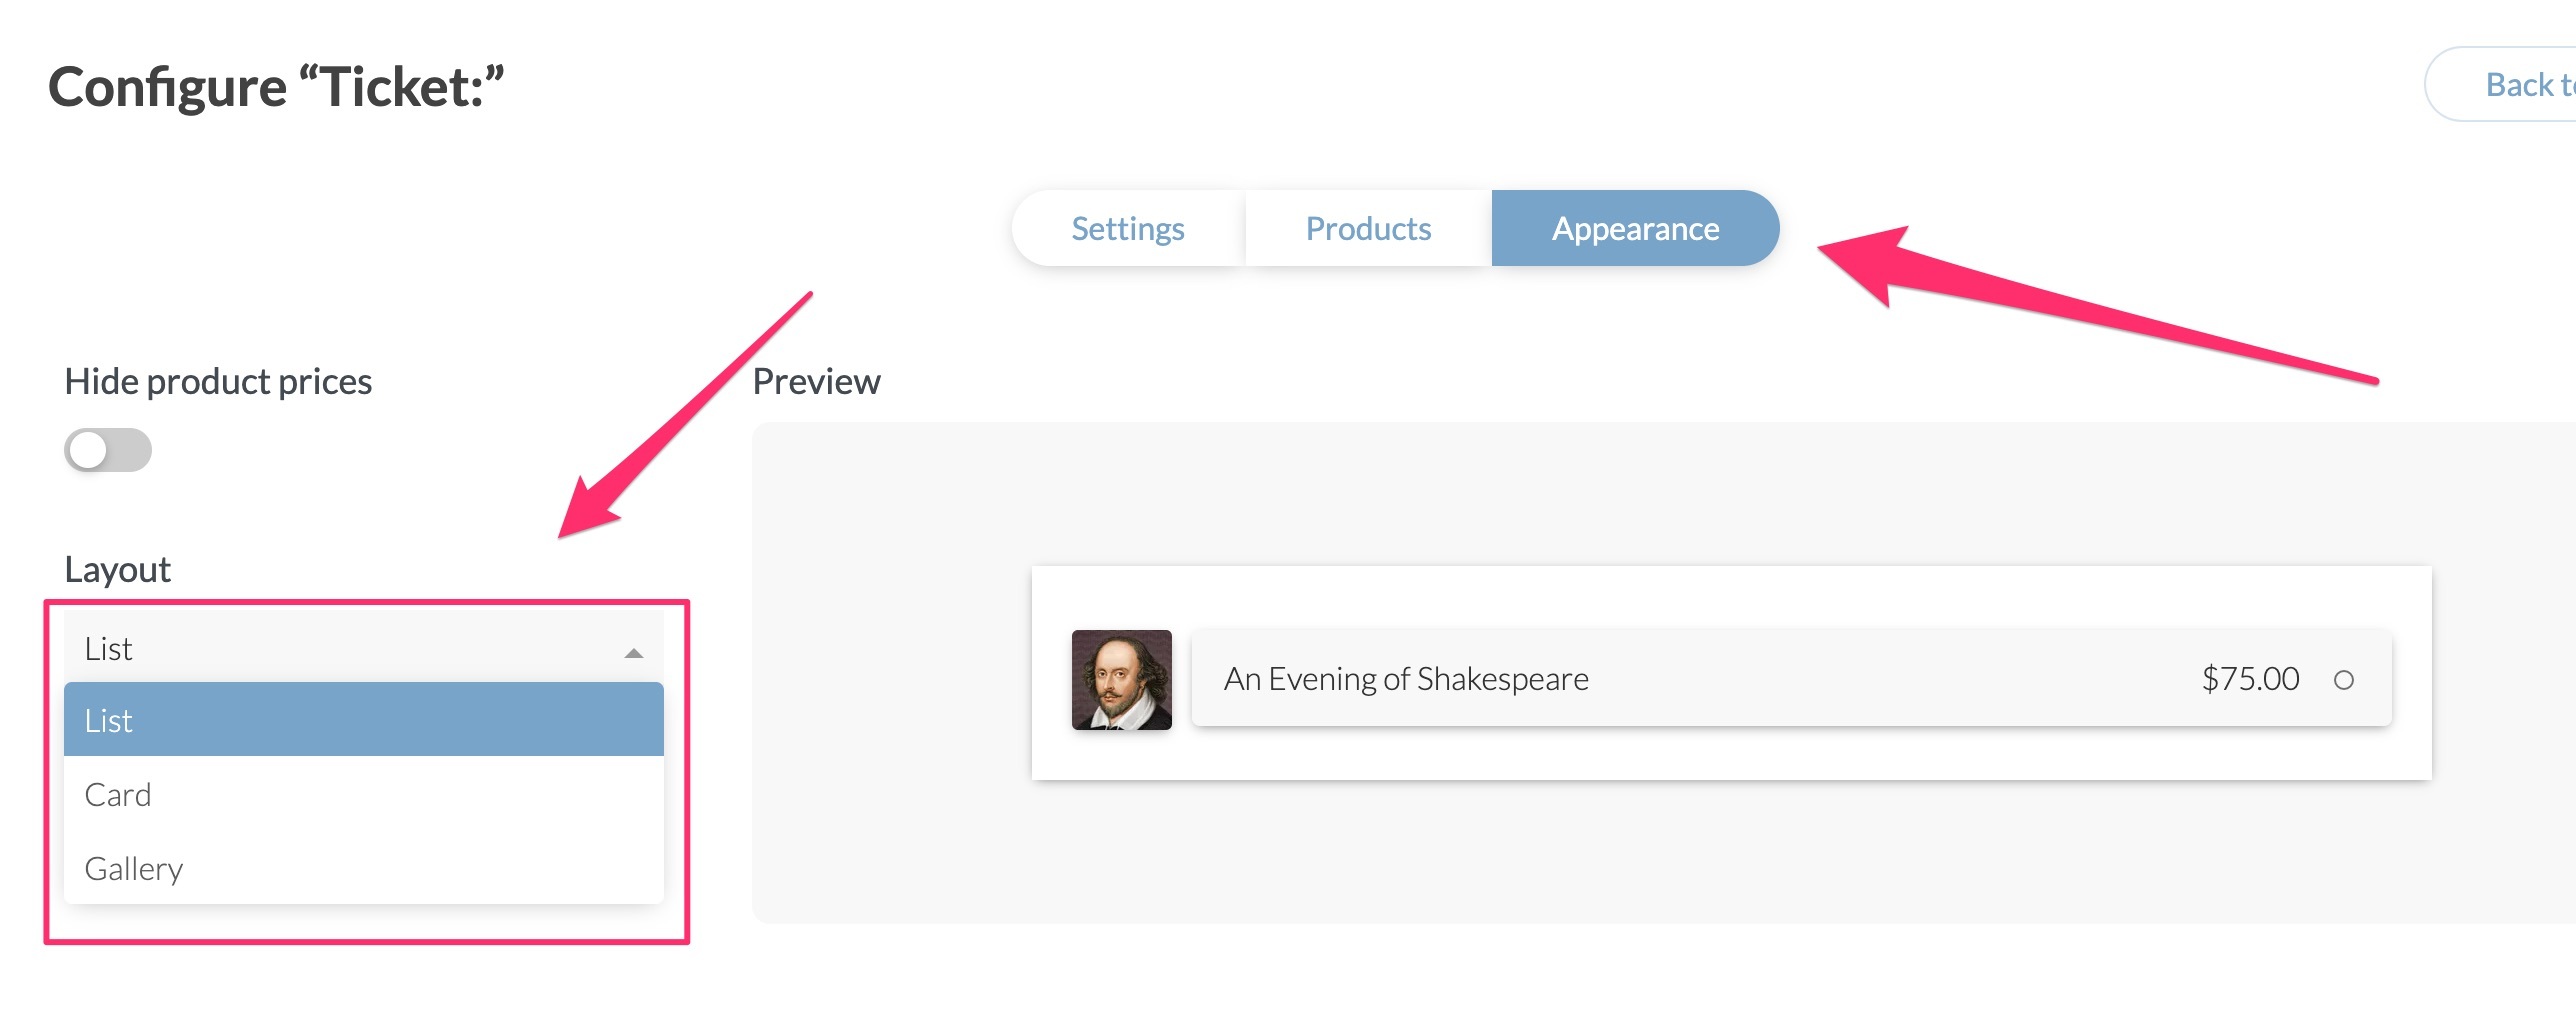
 On the Appearance tab, you can choose from three different layout options for your product(s):
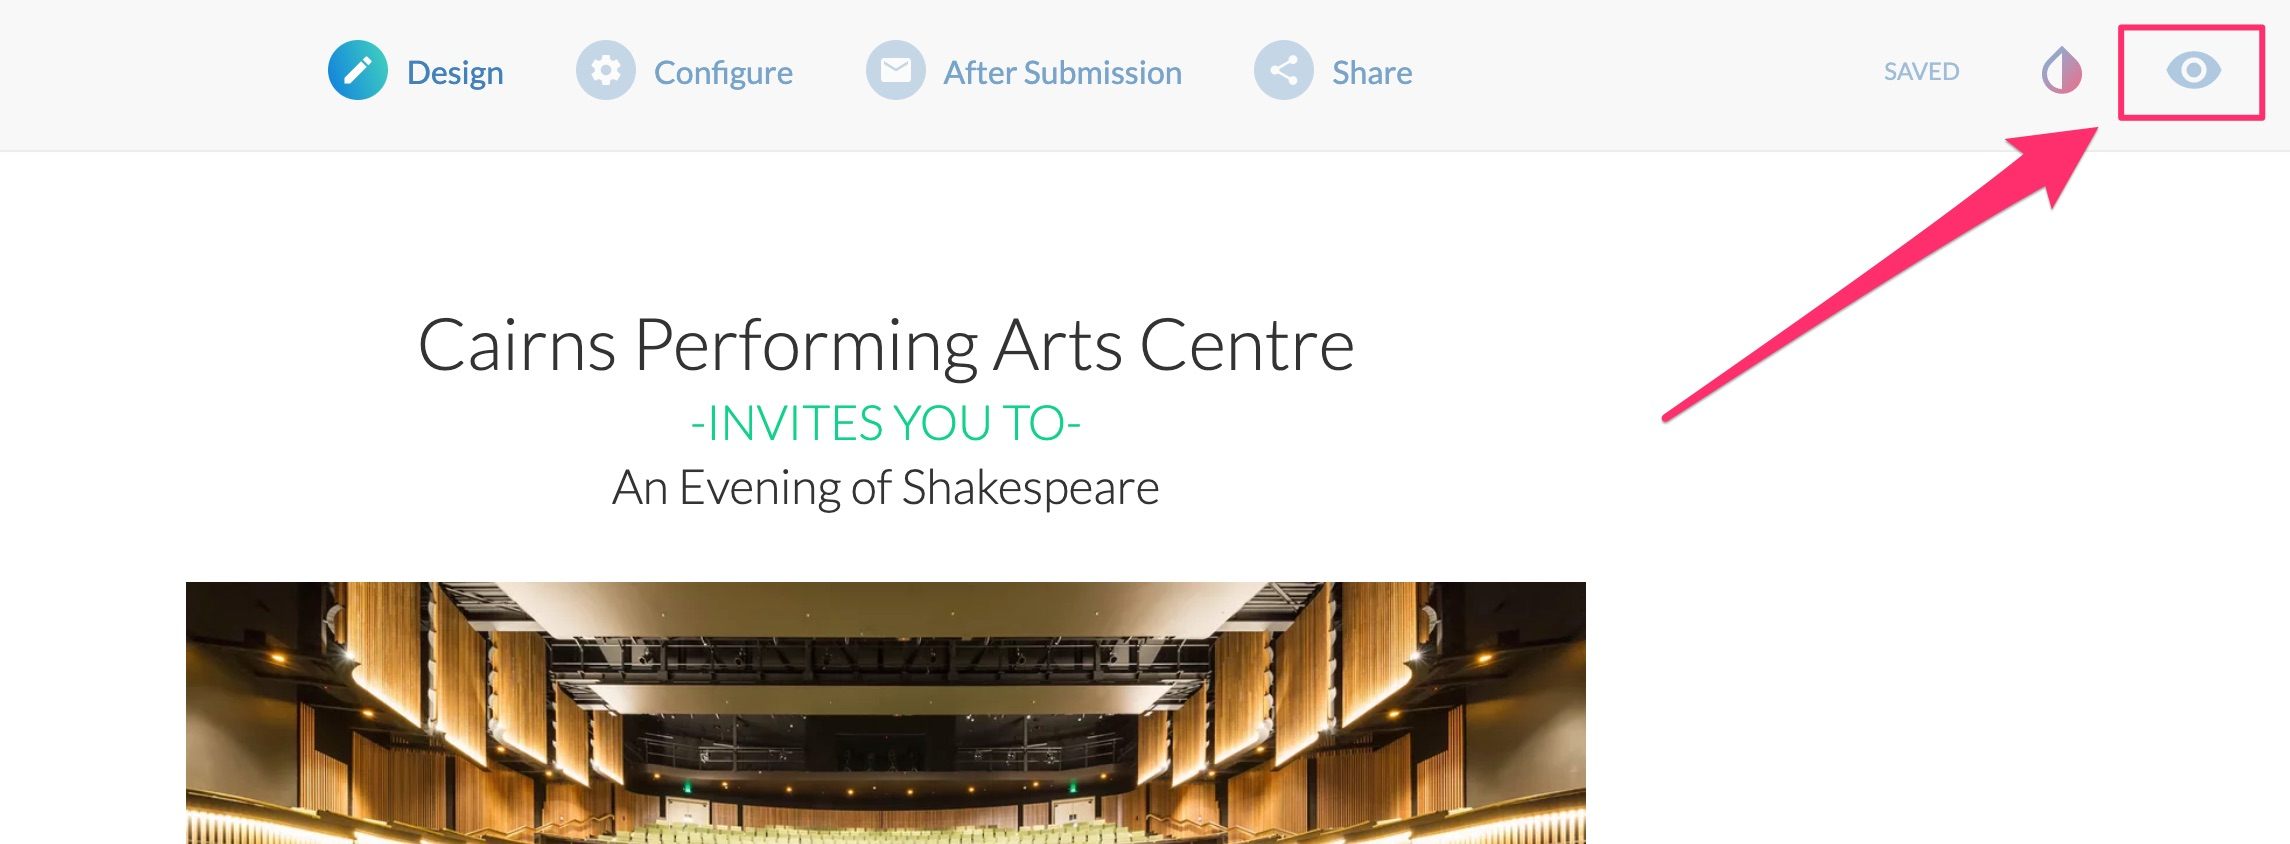
 You can view your form at any time by clicking on the ‘eye’ icon at the far top right of the screen:
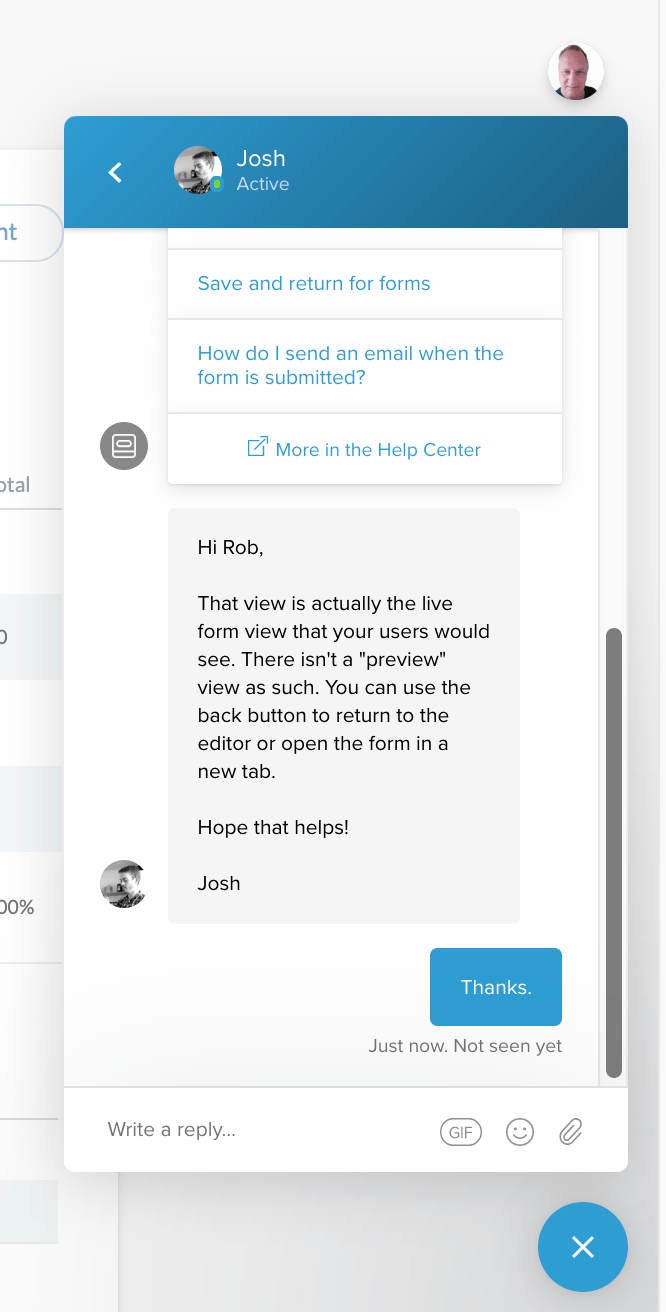
There’s a design flaw in Paperform that you need to be aware of.
As I mentioned, there’s a ‘view’ button in the top right corner of the editing screen. If you click on it, you can preview your form.
The problem is, there’s no way back to the editing mode. In fact, there’s no way out of the preview mode at all. You’re stuck there.
The only way out is to click on a tiny piece of text at the bottom of the screen that says ‘Powered by Paperform’:
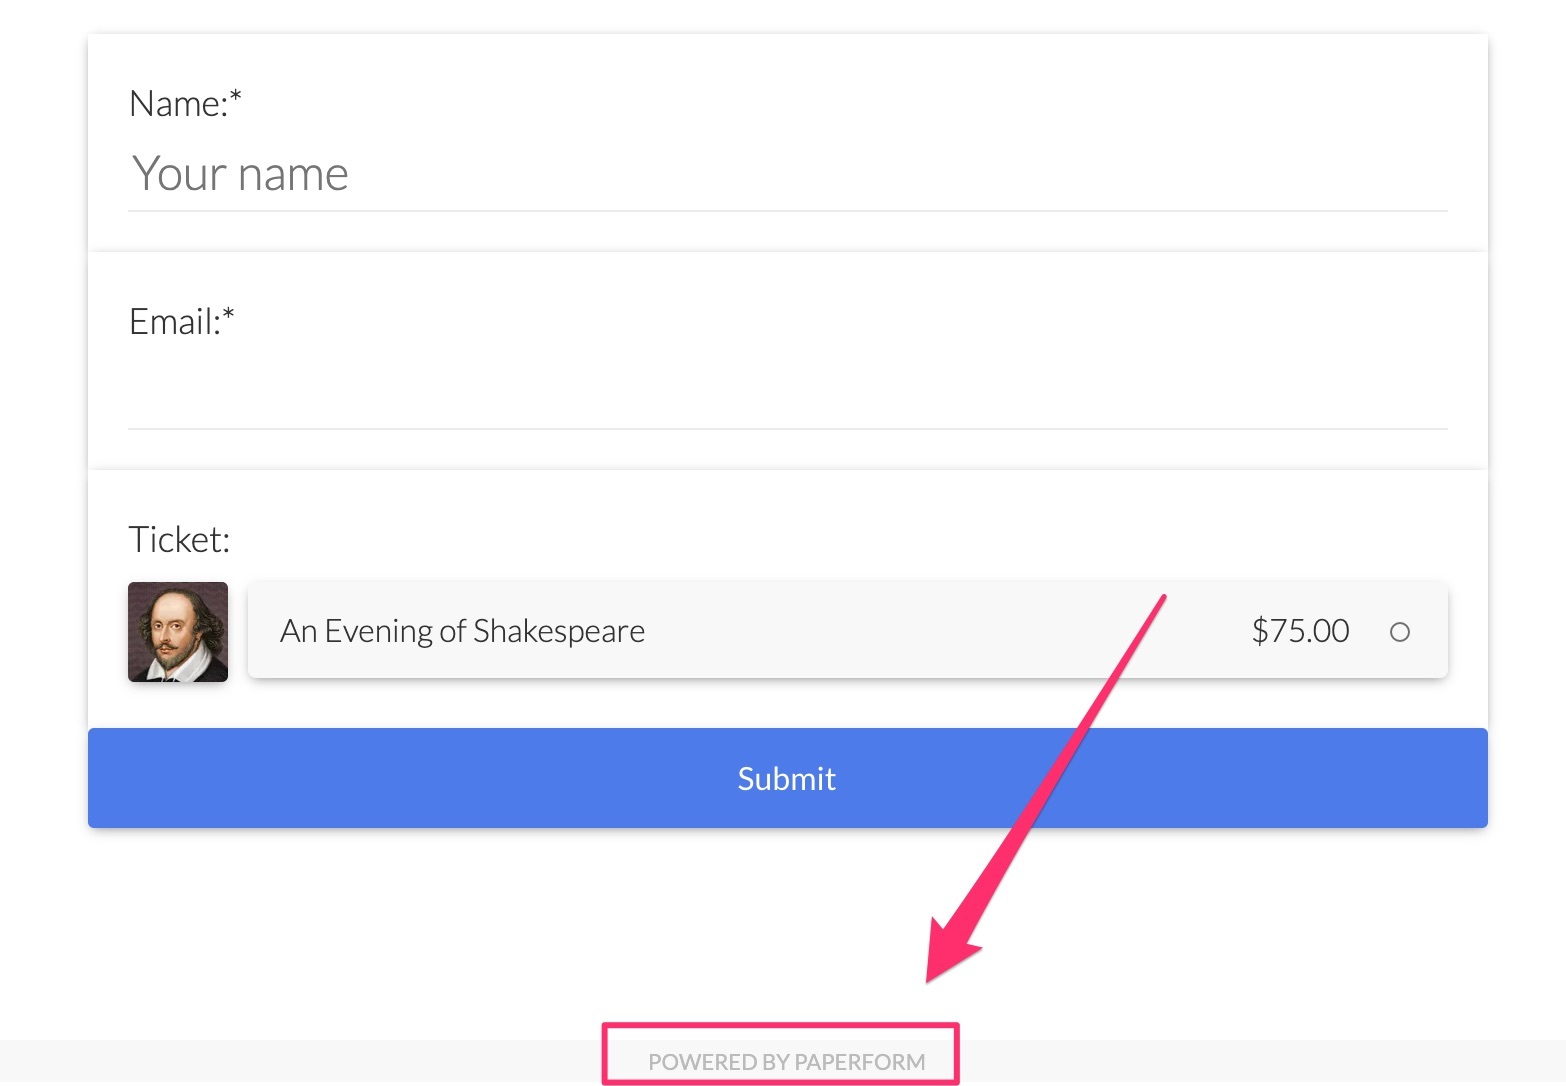
When you click on that link, you’ll get out of the preview mode, but it also signs you out of your account!
You’ll have to go back to the Paperform home page and sign in to your account again. I raised this issue with Paperform. They said it’s not a flaw but is intended to be that way.
However, I found it very frustrating and I’m guessing you will too.
Adding a Payment Method
Adding a payment method to your form is quite simple.
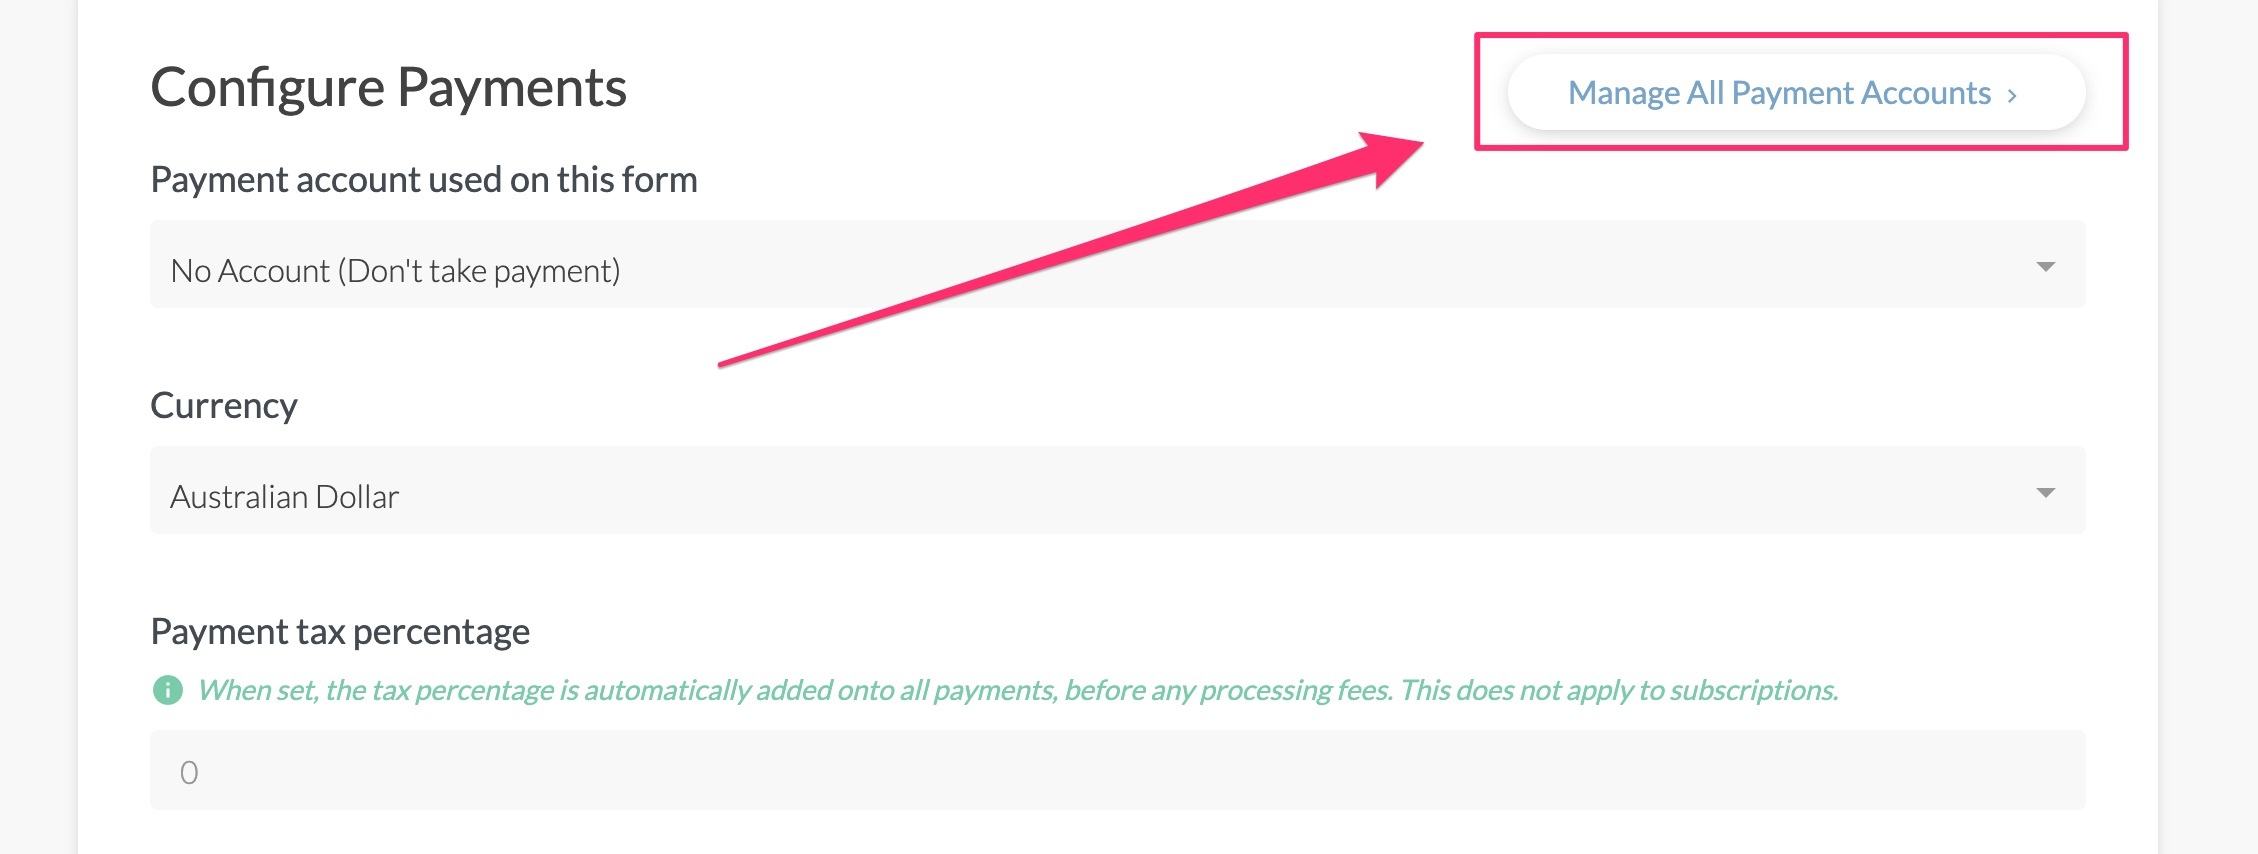
Click on ‘connect a payment account’ within the product field:
 Then click on ‘Manage All Payment Accounts’:
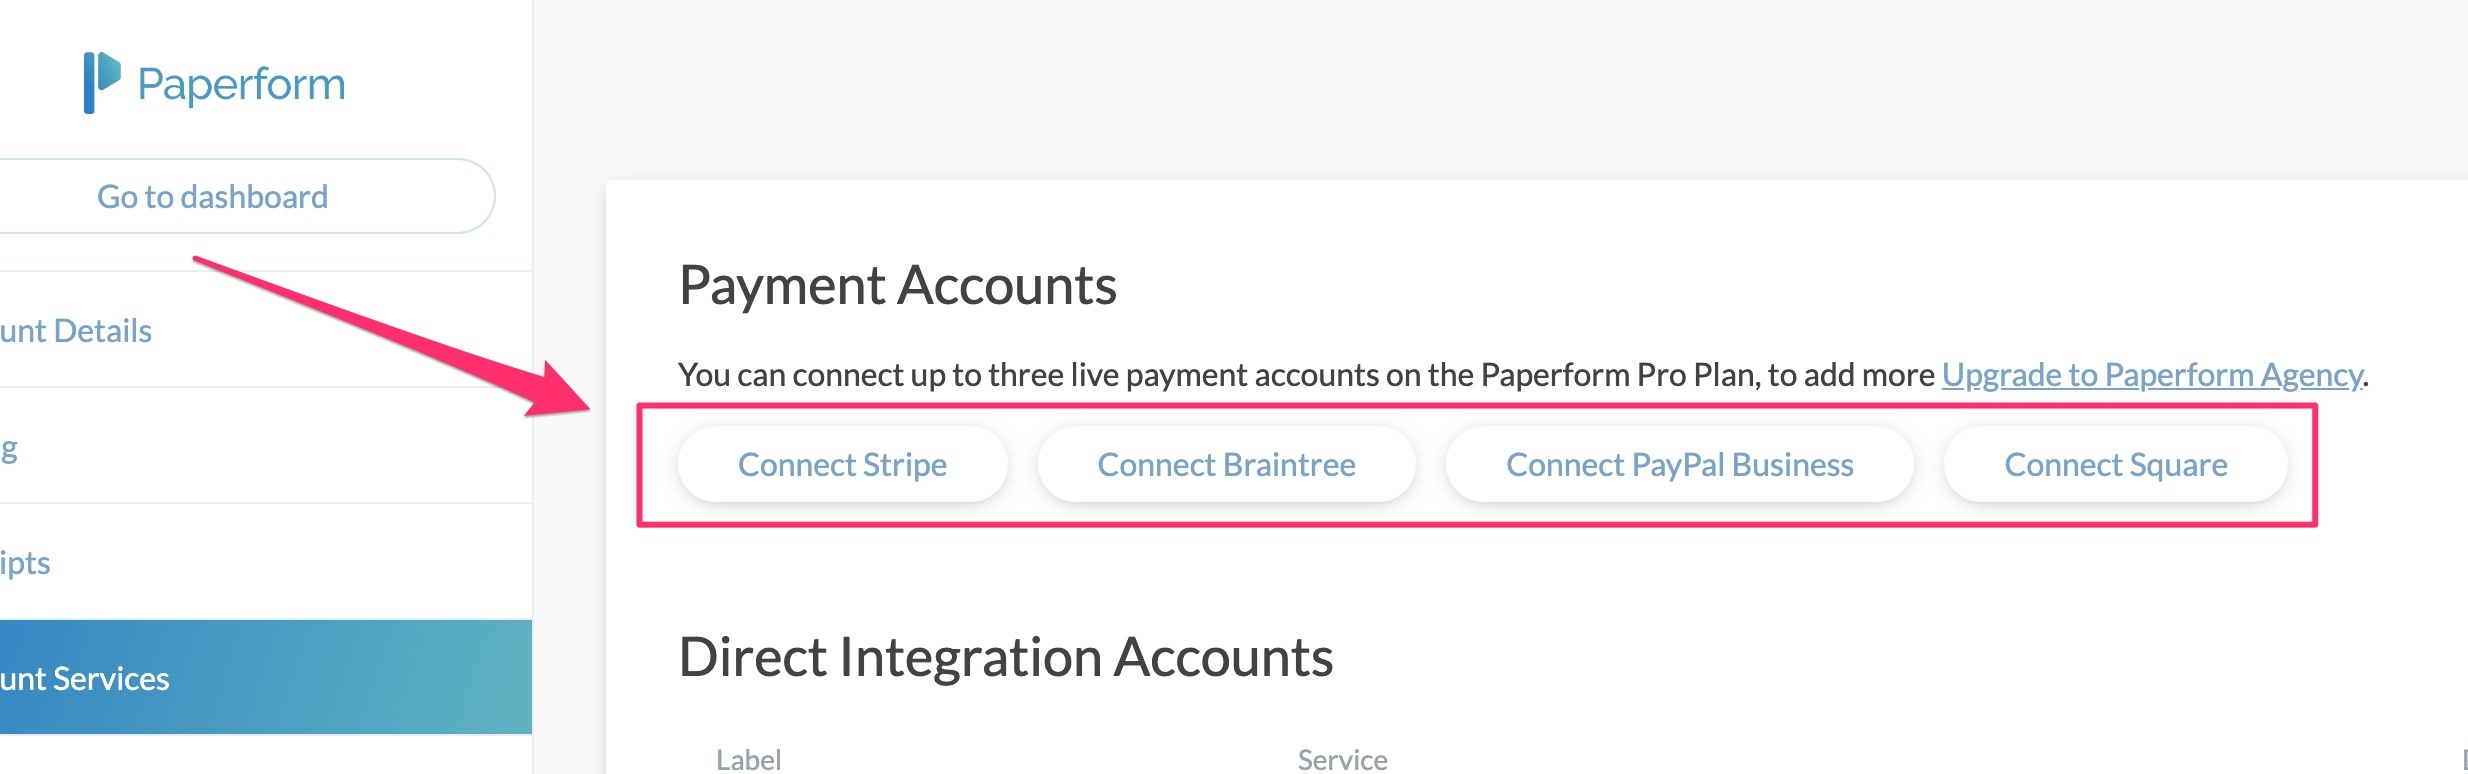
On the next screen, you’ll see four payment methods:
- Stripe
- Braintree
- PayPal Business
- Square
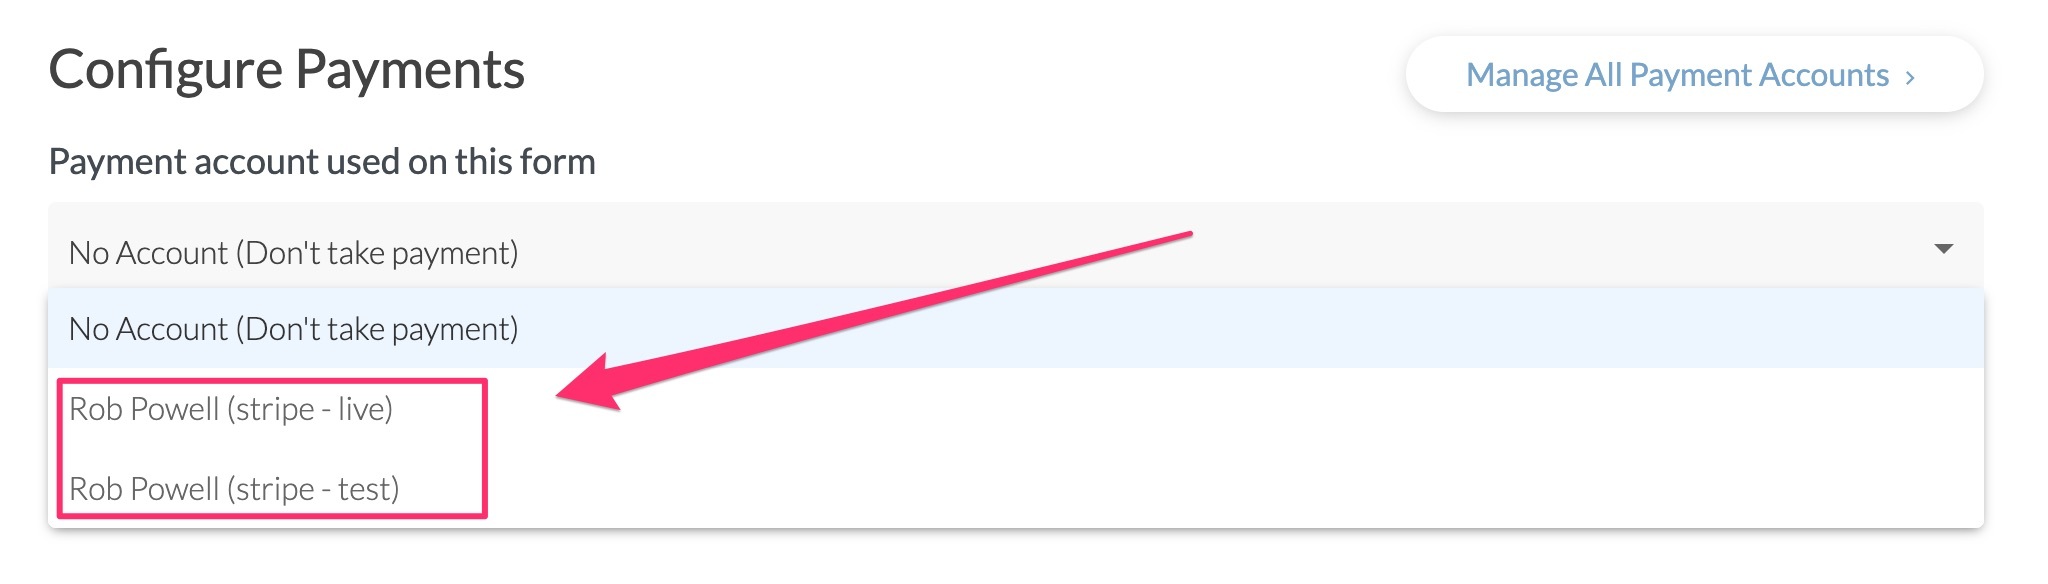
Now go back to the ‘Product’ field and click again on ‘connect a payment account’.
This time you’ll see a payment option that you can select:
Embedding and Sharing Your Form
To embed your form on a website, go to ‘Share’ and then ‘Embed’:
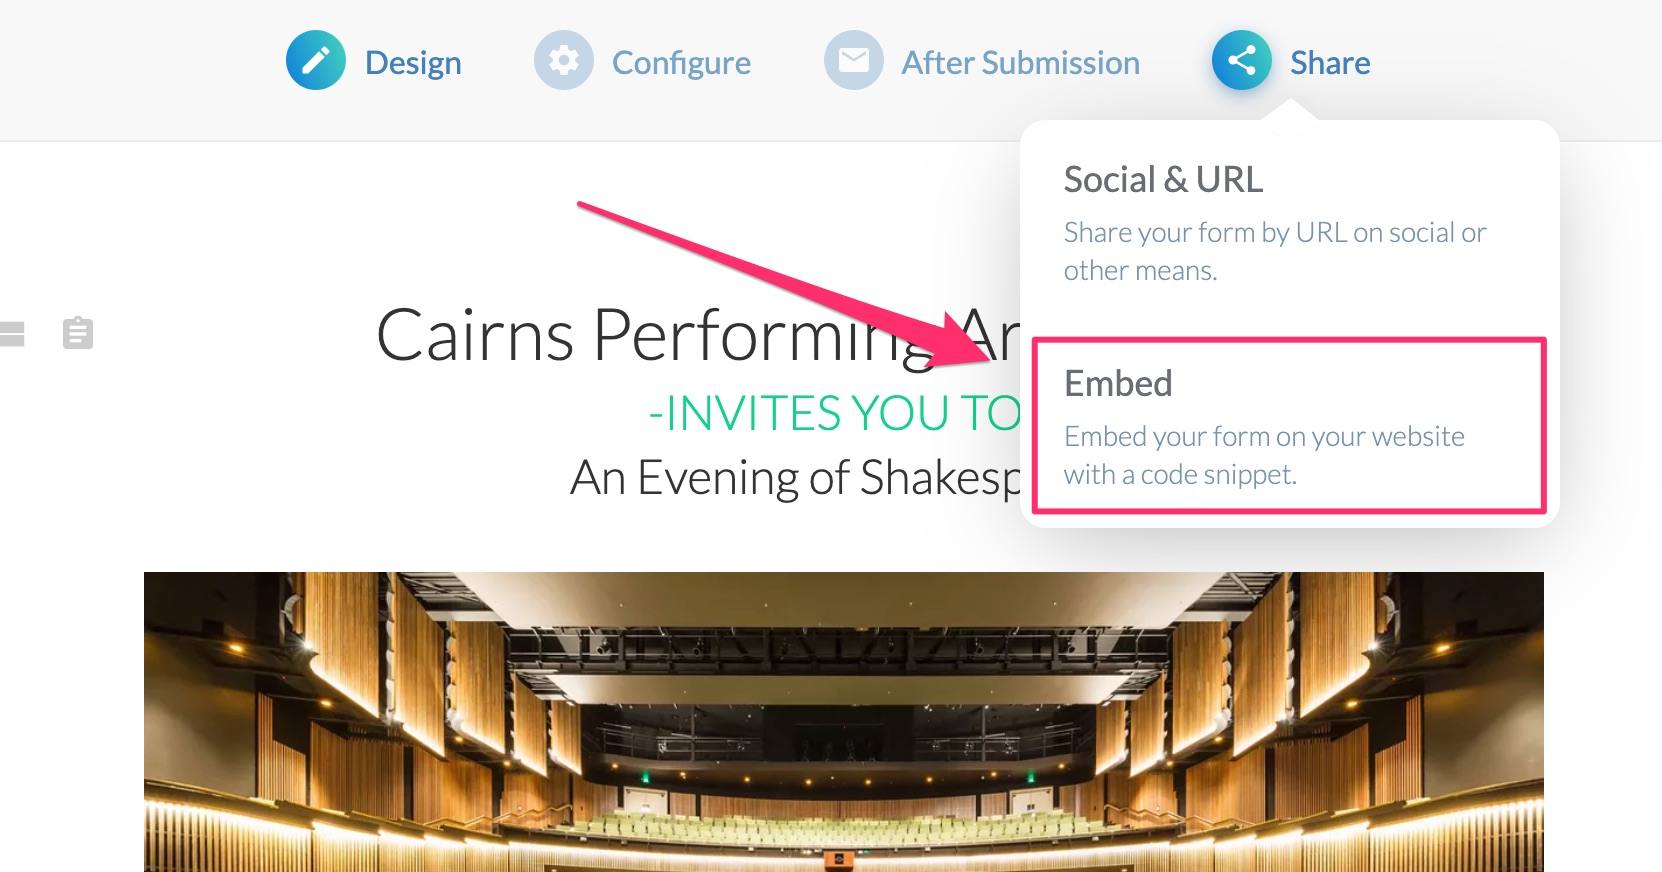
Then just choose one of the three embed options:

To share the form on social media, just go to ‘Share’ and then ‘Social & URL’:
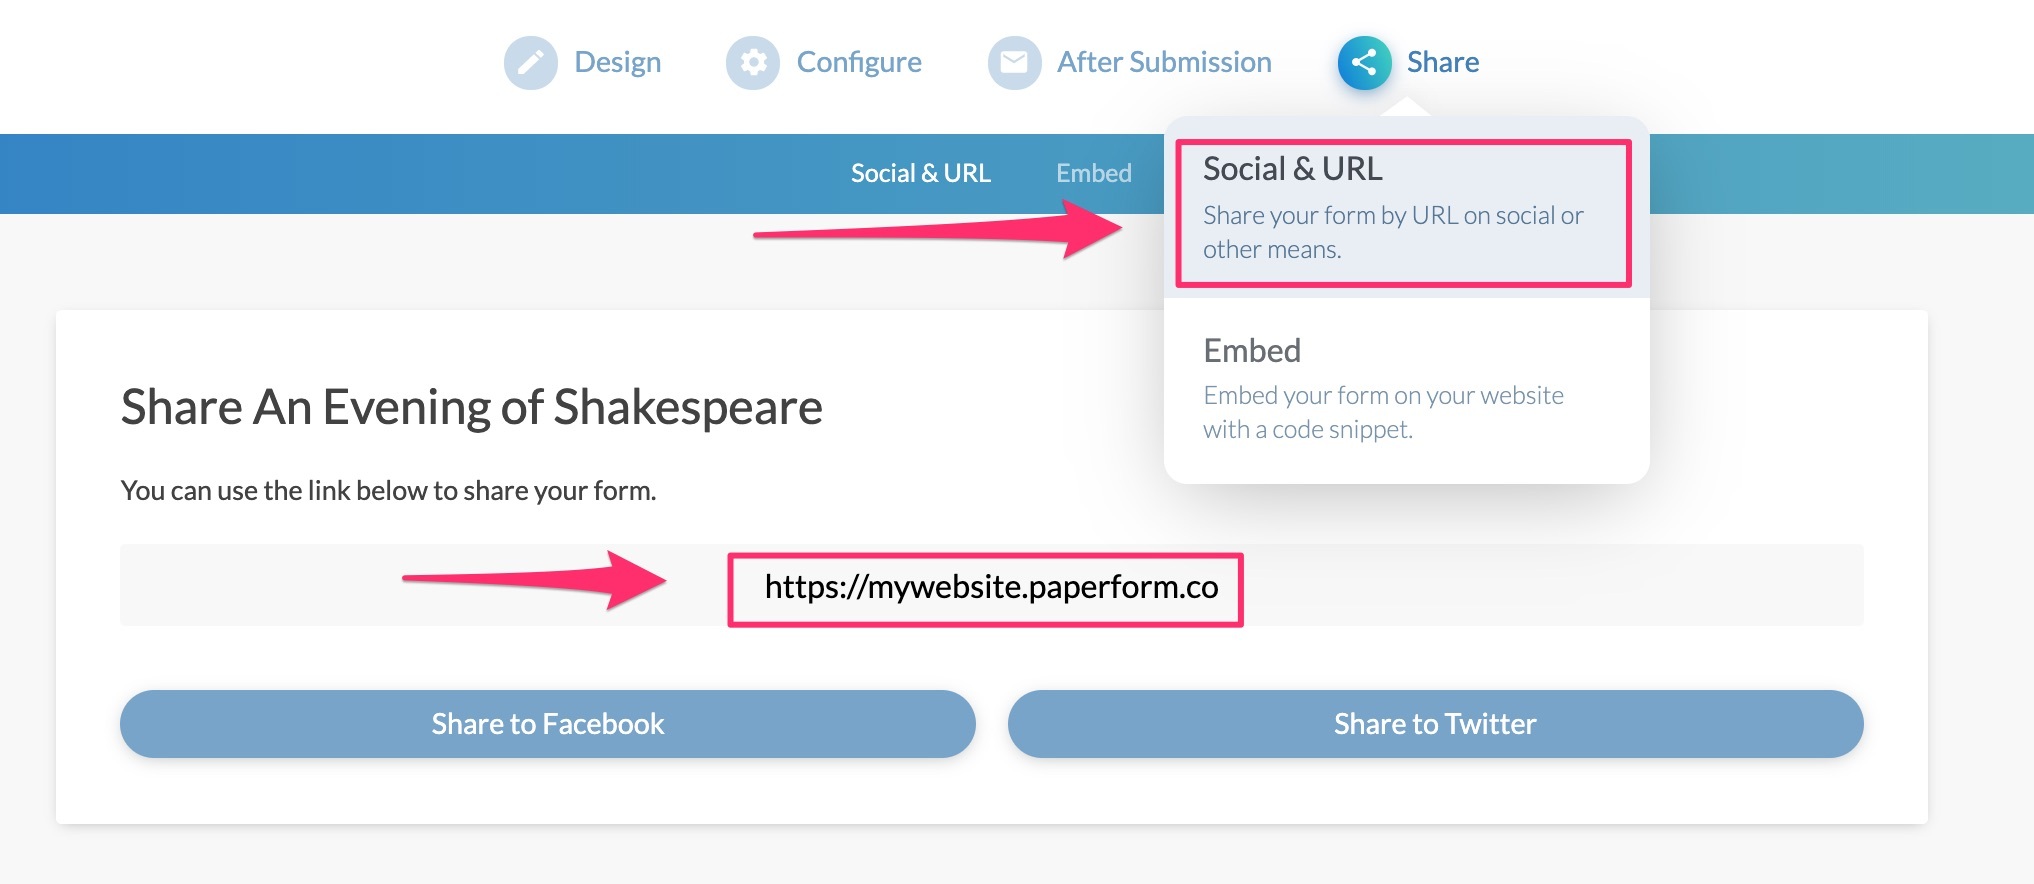
Grab the link to share the form on social media.
Alternatively, you can click on either the Facebook or the Twitter button to share it directly to those platforms.
Controlling Form Behavior
Paperform allows you to create forms that use conditional logic and scoring.
These two aspects of form behaviour allow you to create forms that do calculations, such as quizzes and forms that generate quotes and estimates.
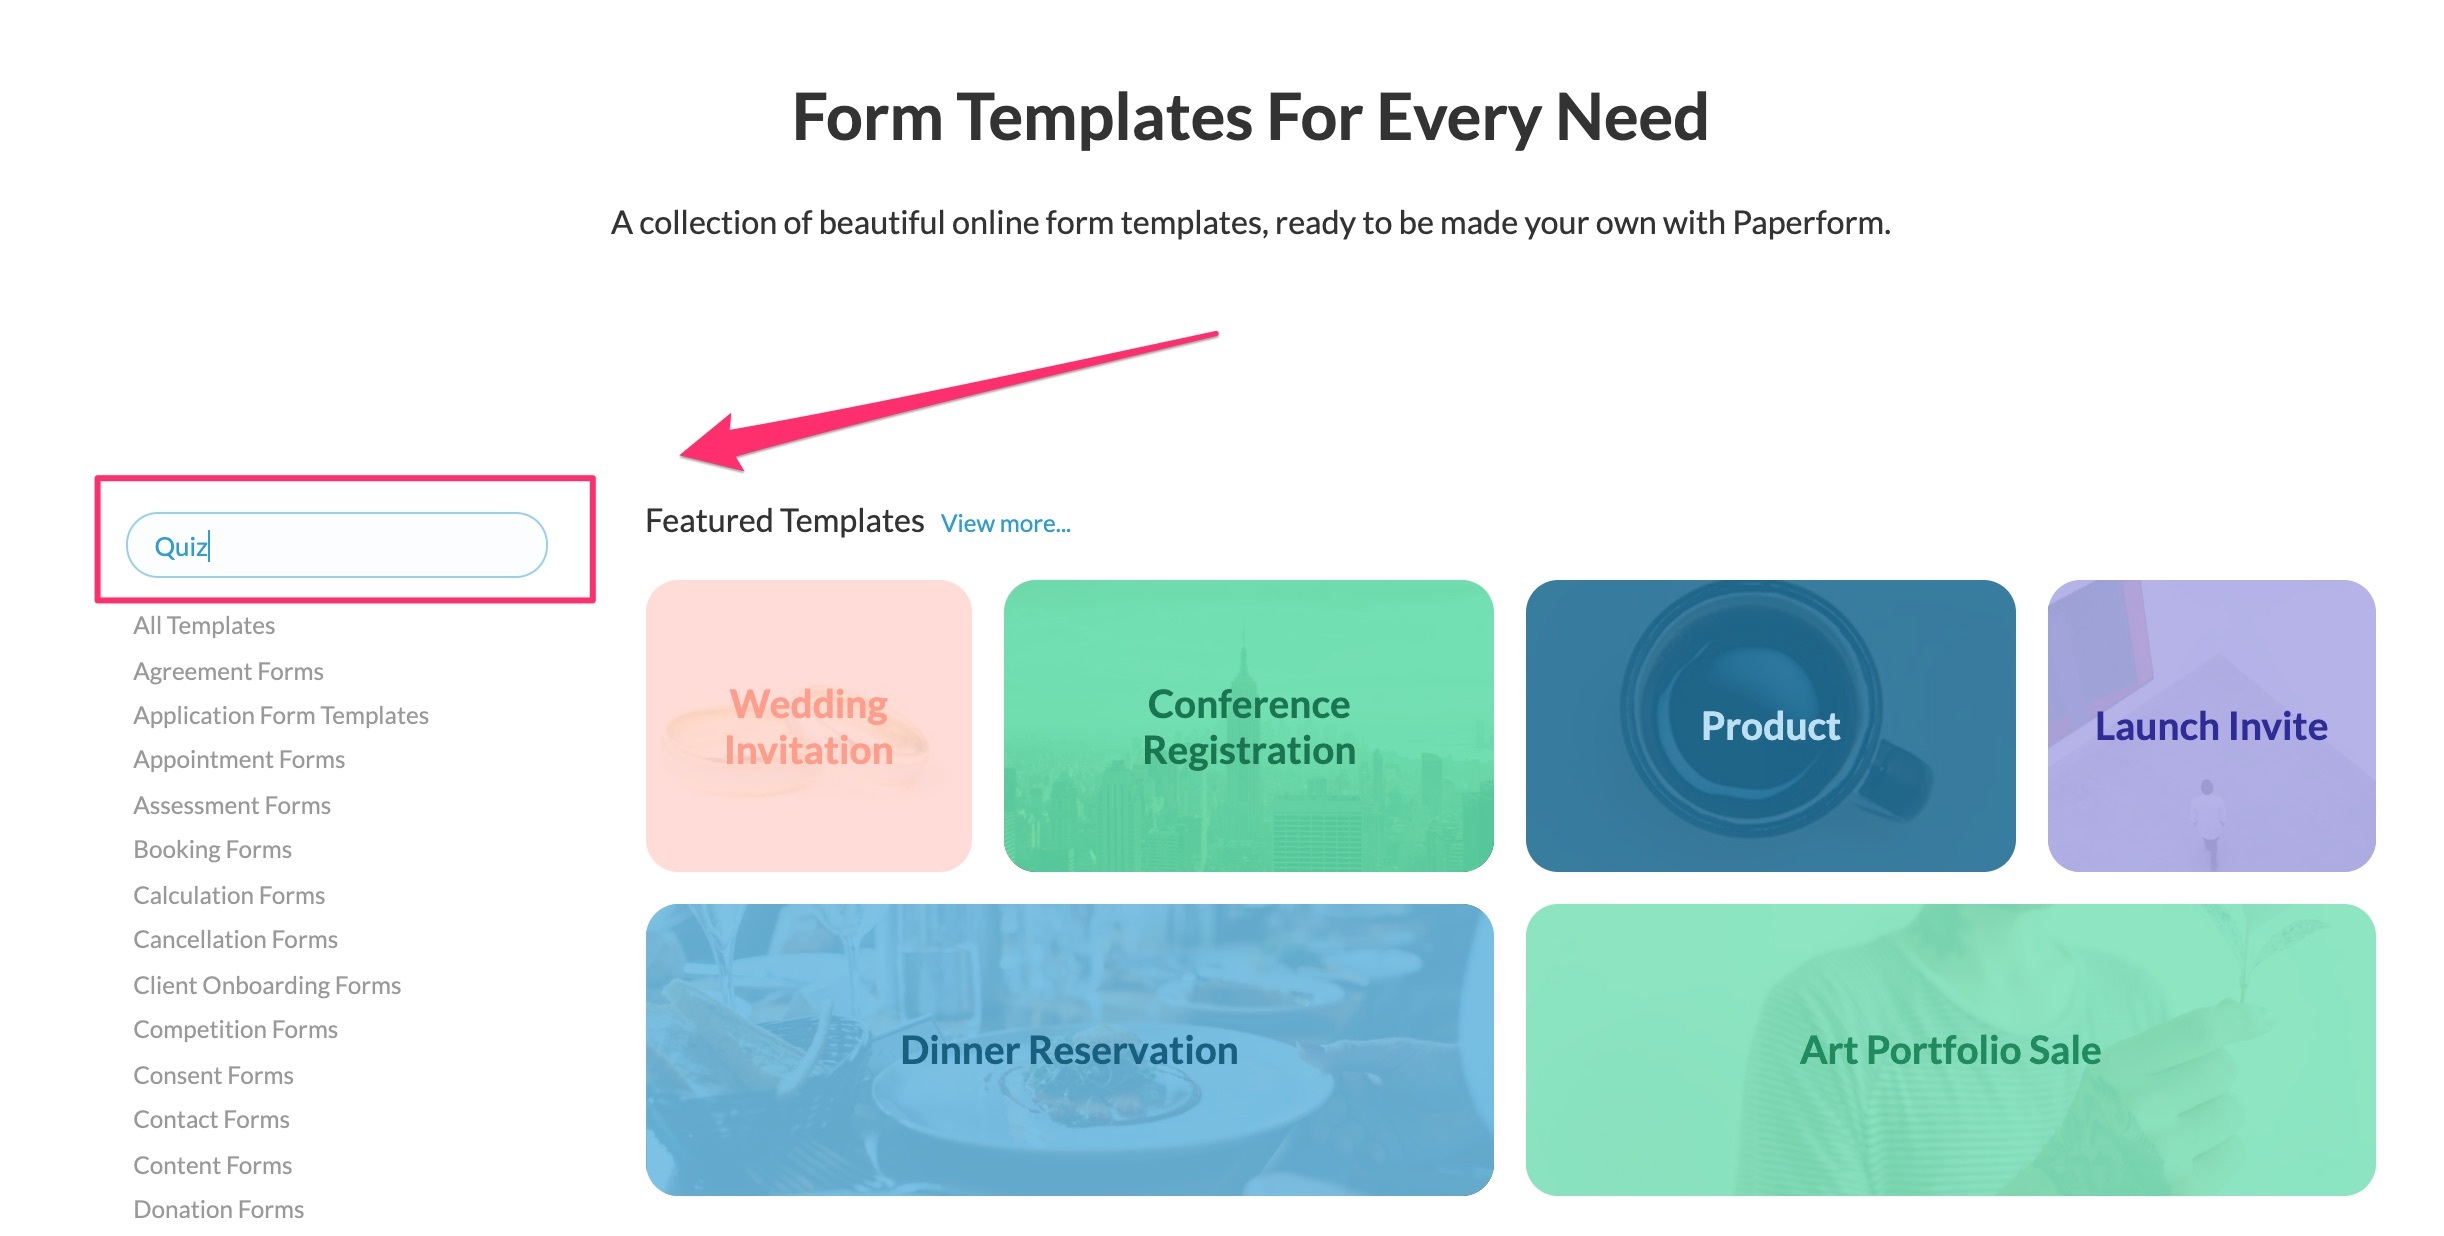
To create a multiple-choice quiz in Paperform, move the slider on the dashboard to the far right:
Then click on the ‘View More’ card:

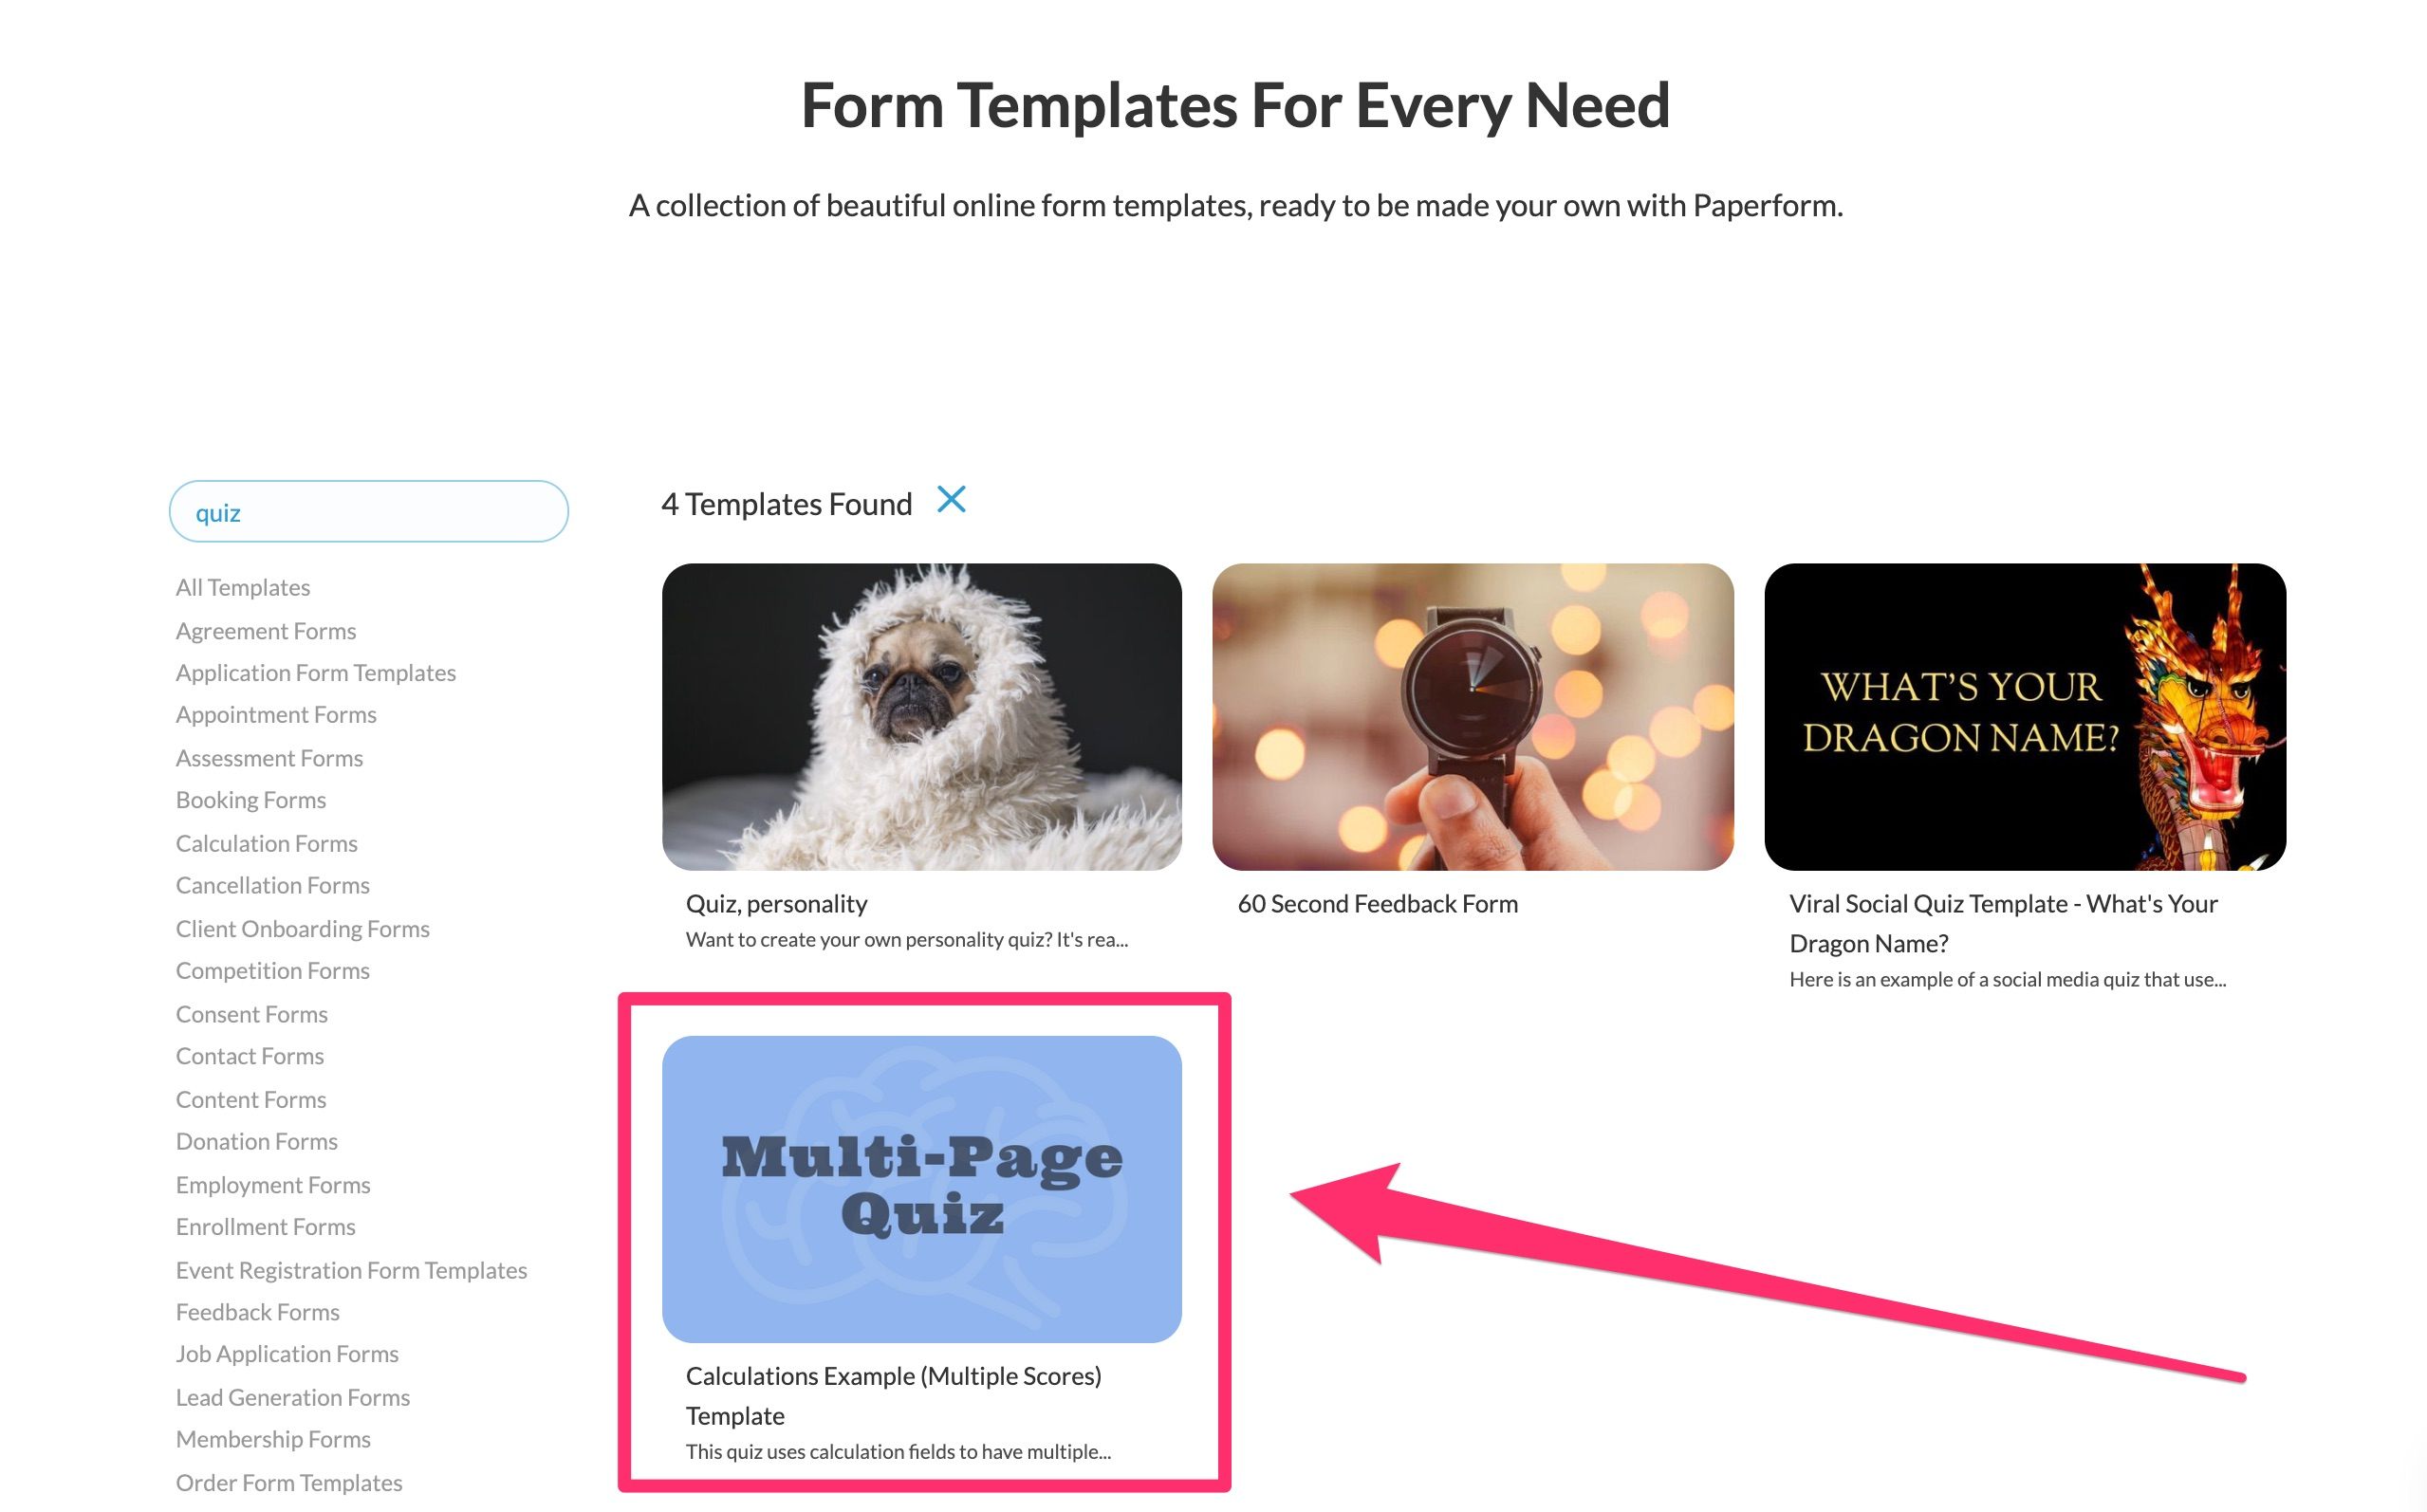
On the next screen, type ‘Quiz’ into the search box and hit ‘return’:
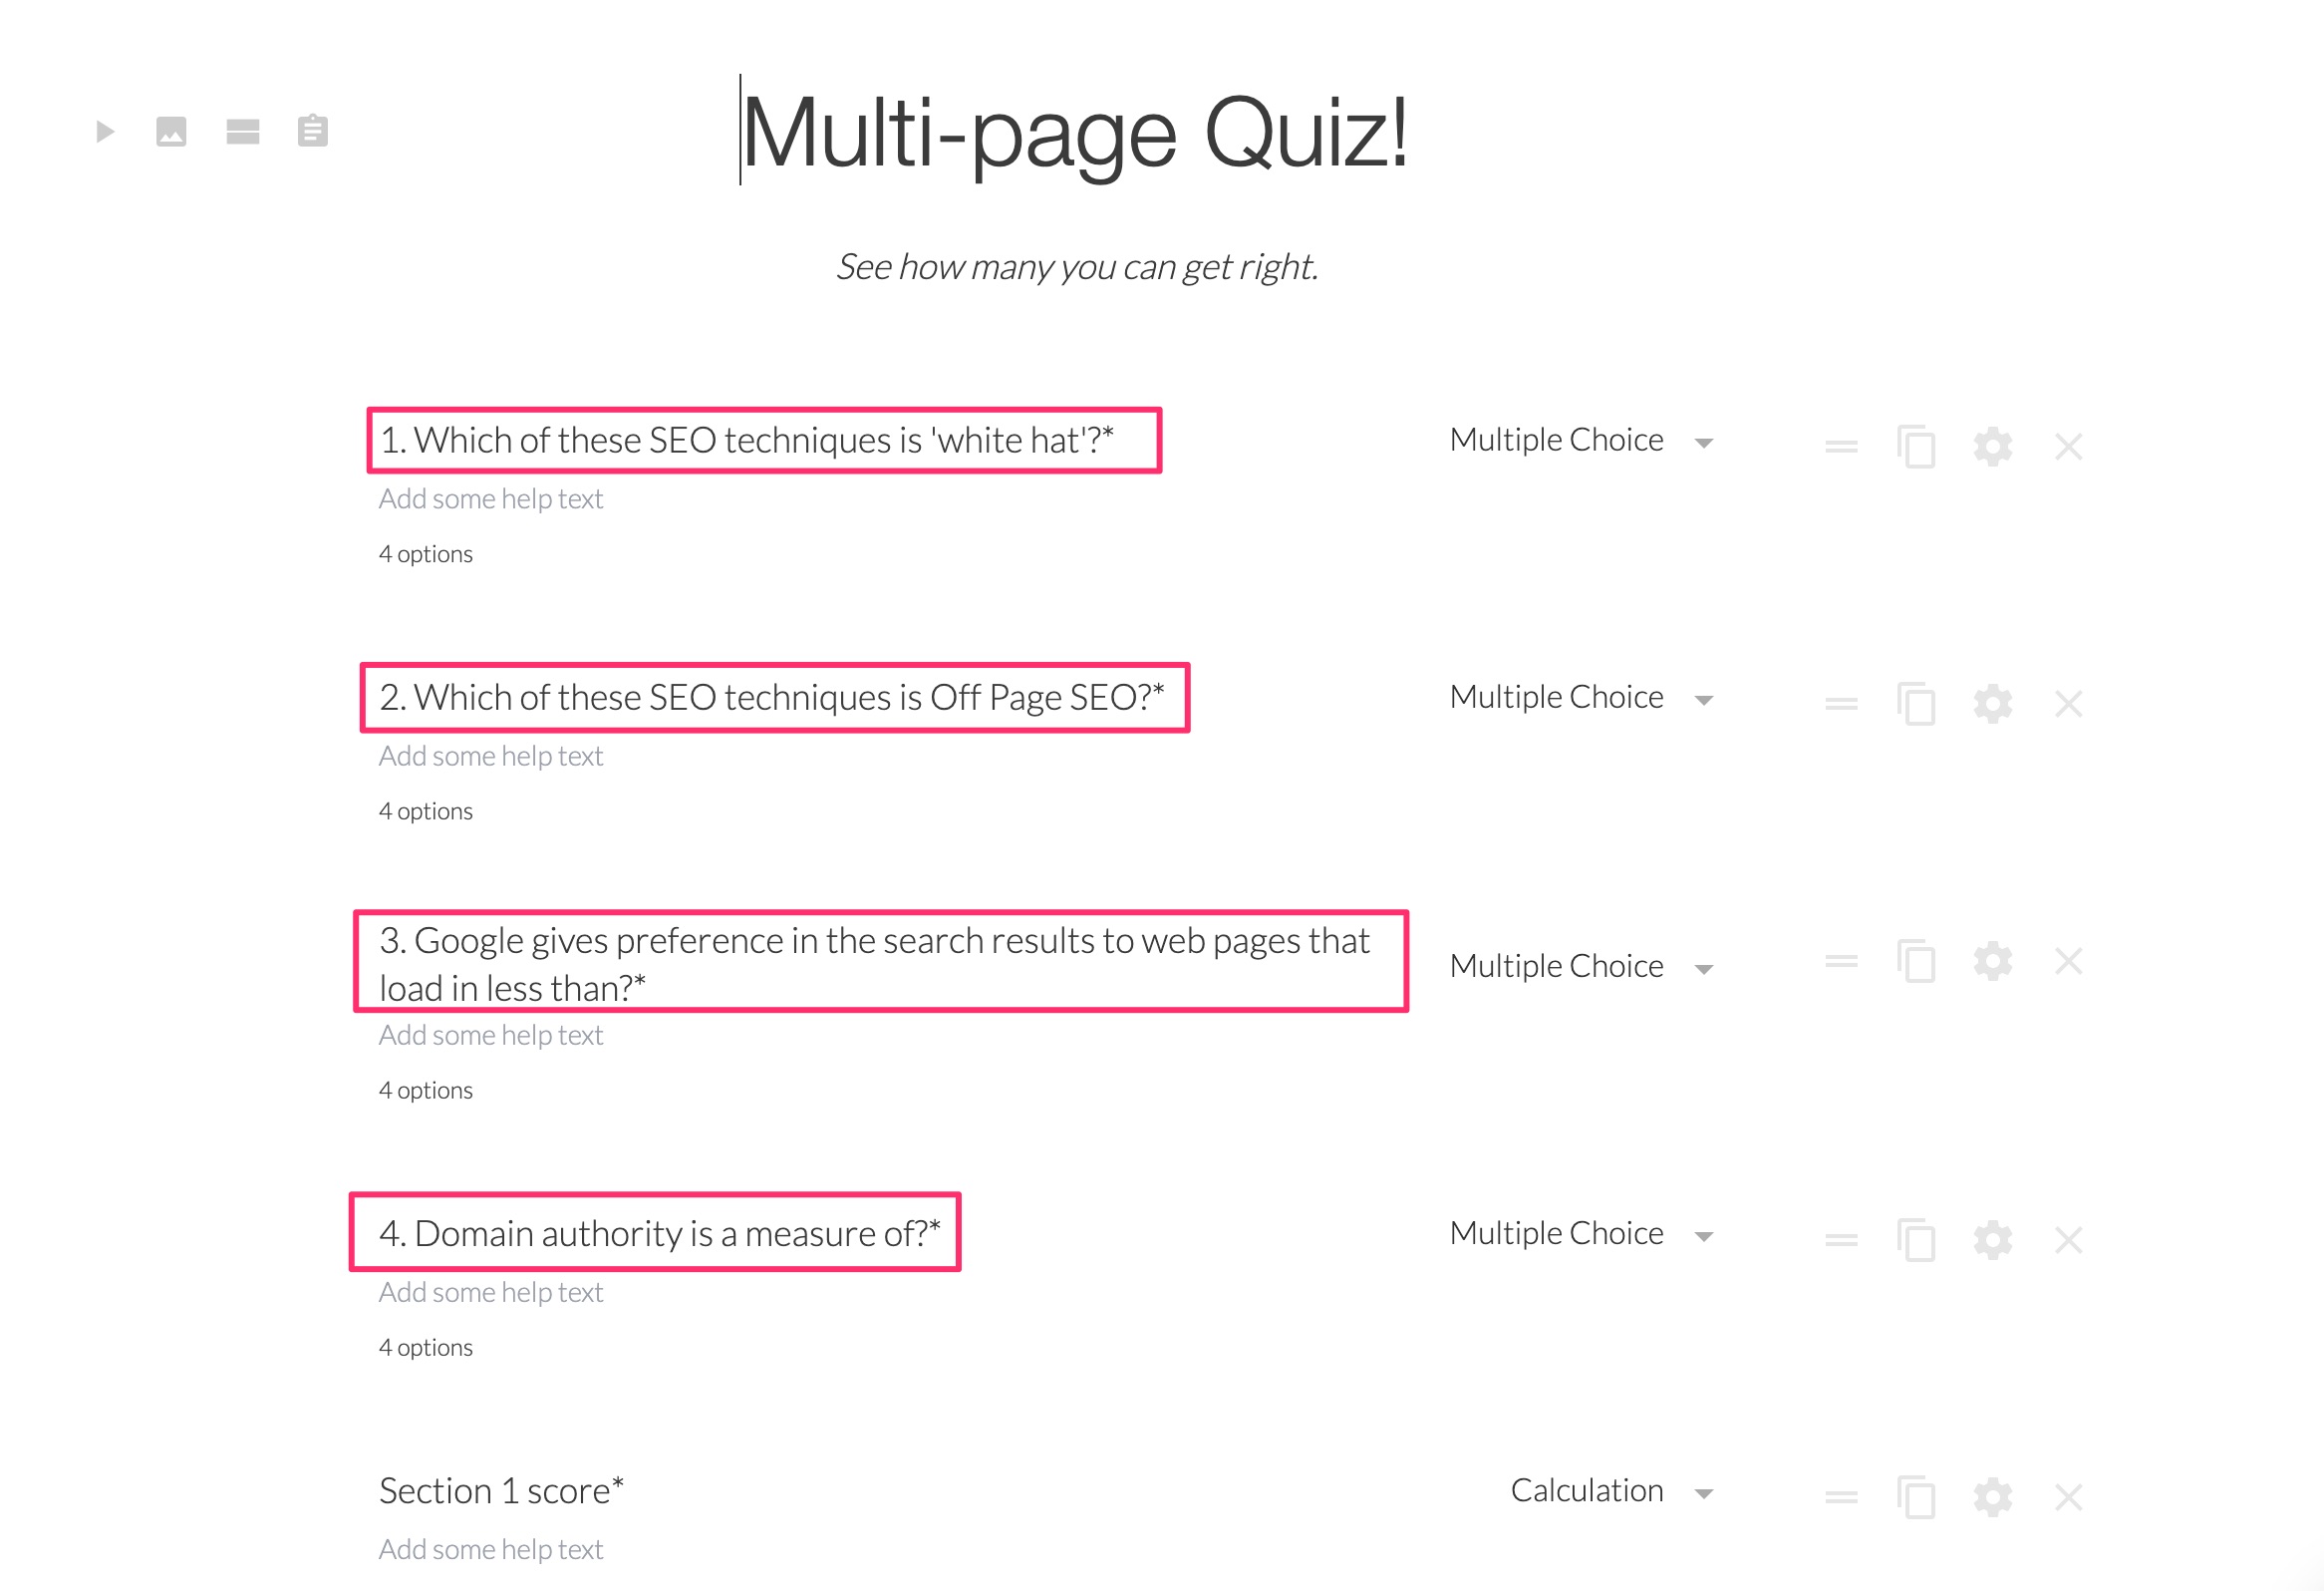
In the results, choose ‘Multi-Page Quiz’:
In this quiz template, one answer in each set of questions is correct:
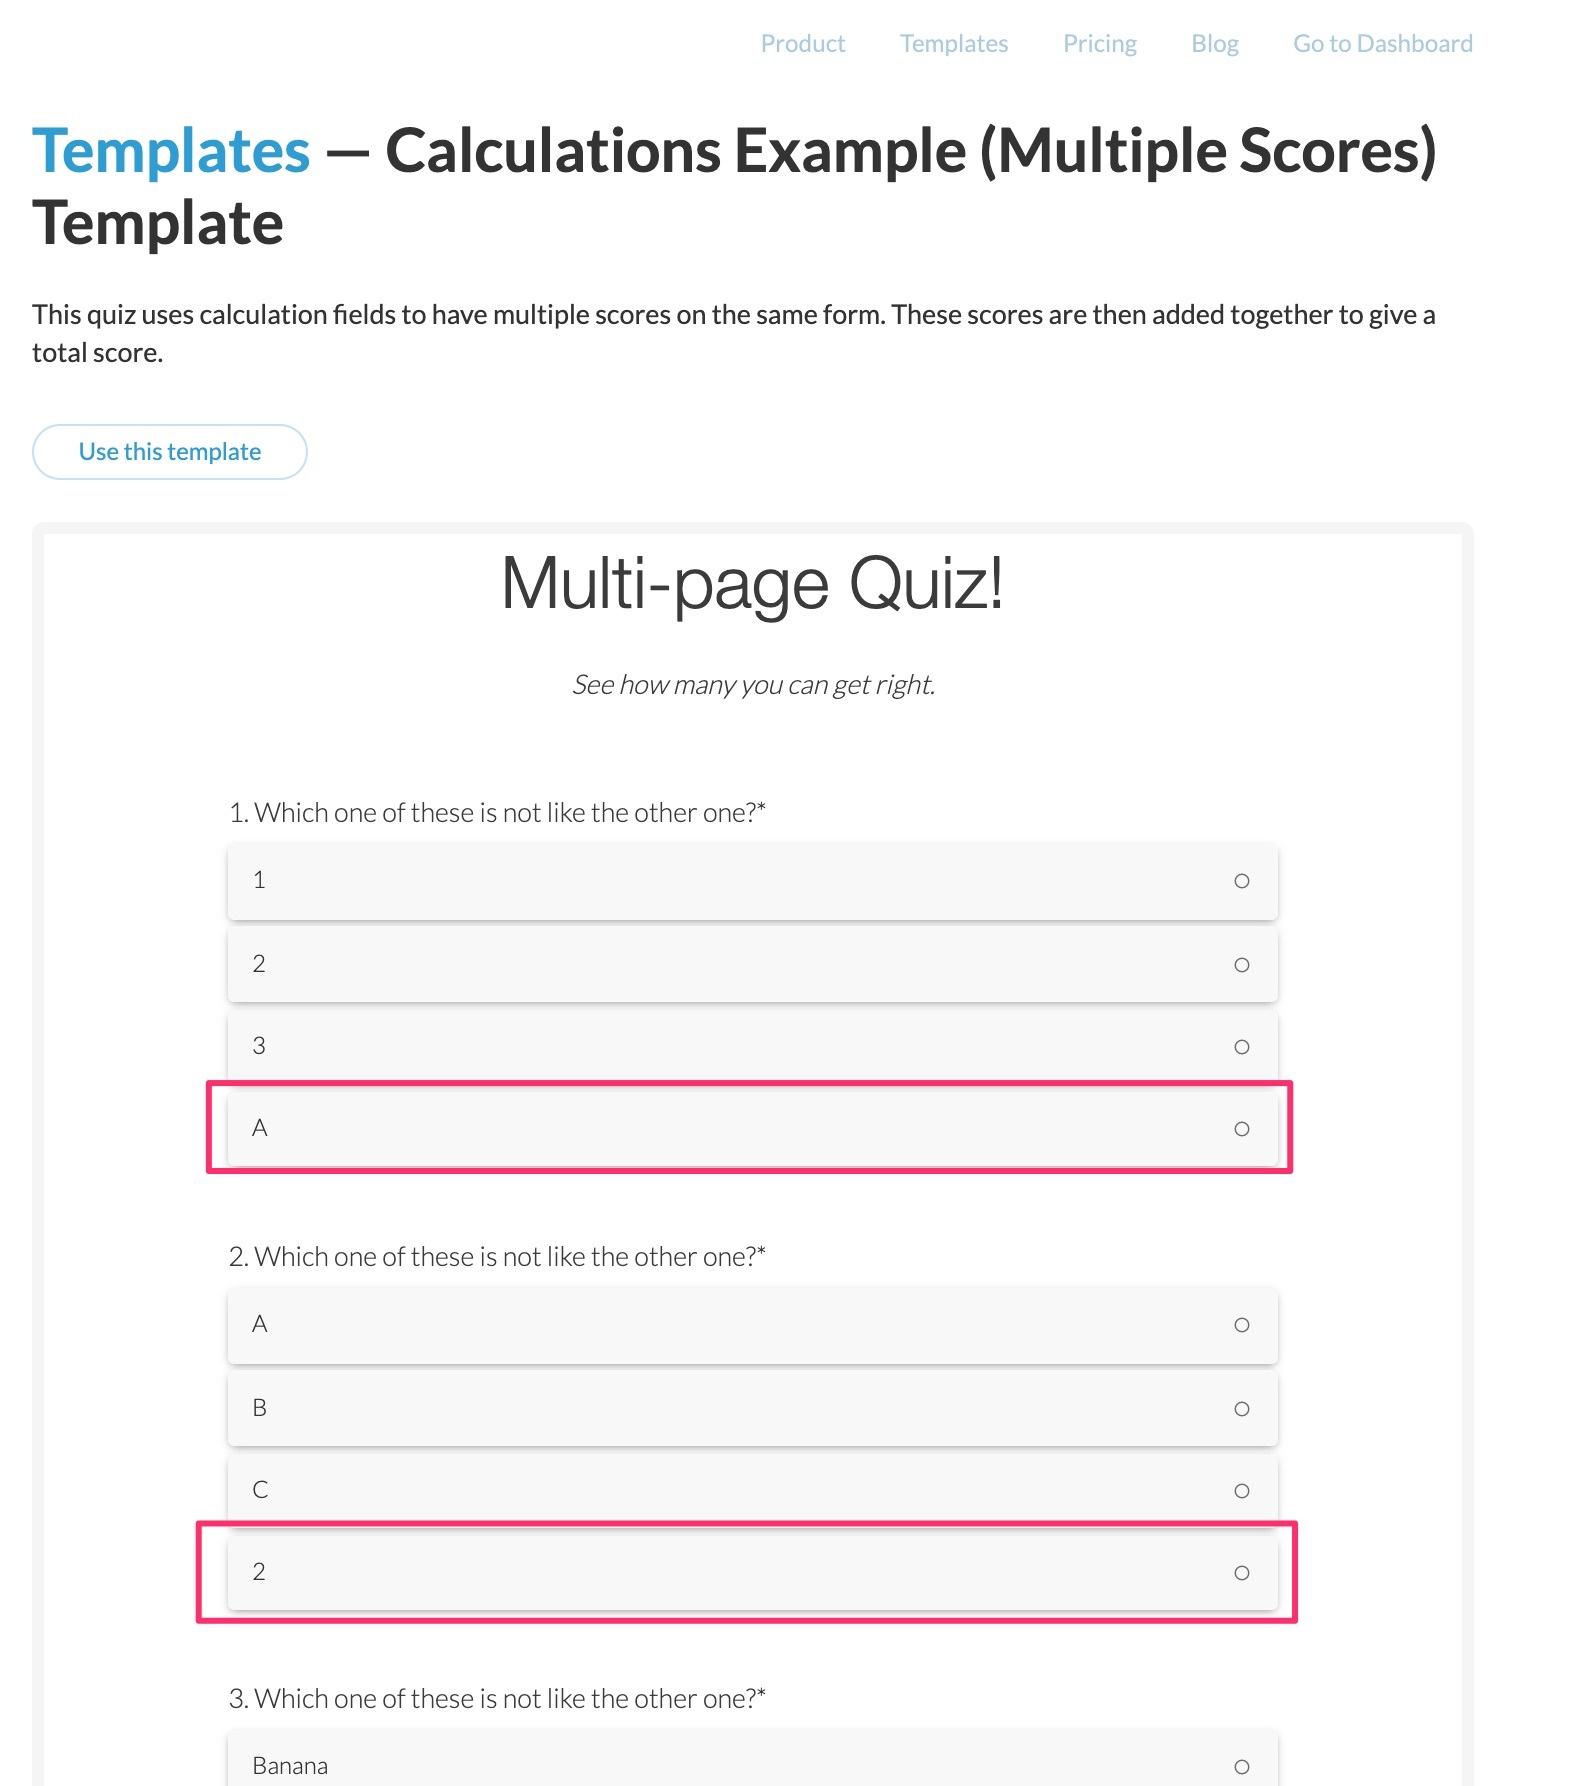
To create your own knowledge quiz, all you need to do is replace ‘which one of these is not like the other one’ with your question.
Then replace the existing options with your multiple-choice answers (only one of which will be correct).
Next, tell the software which of the multiple-choice answers is the correct one.
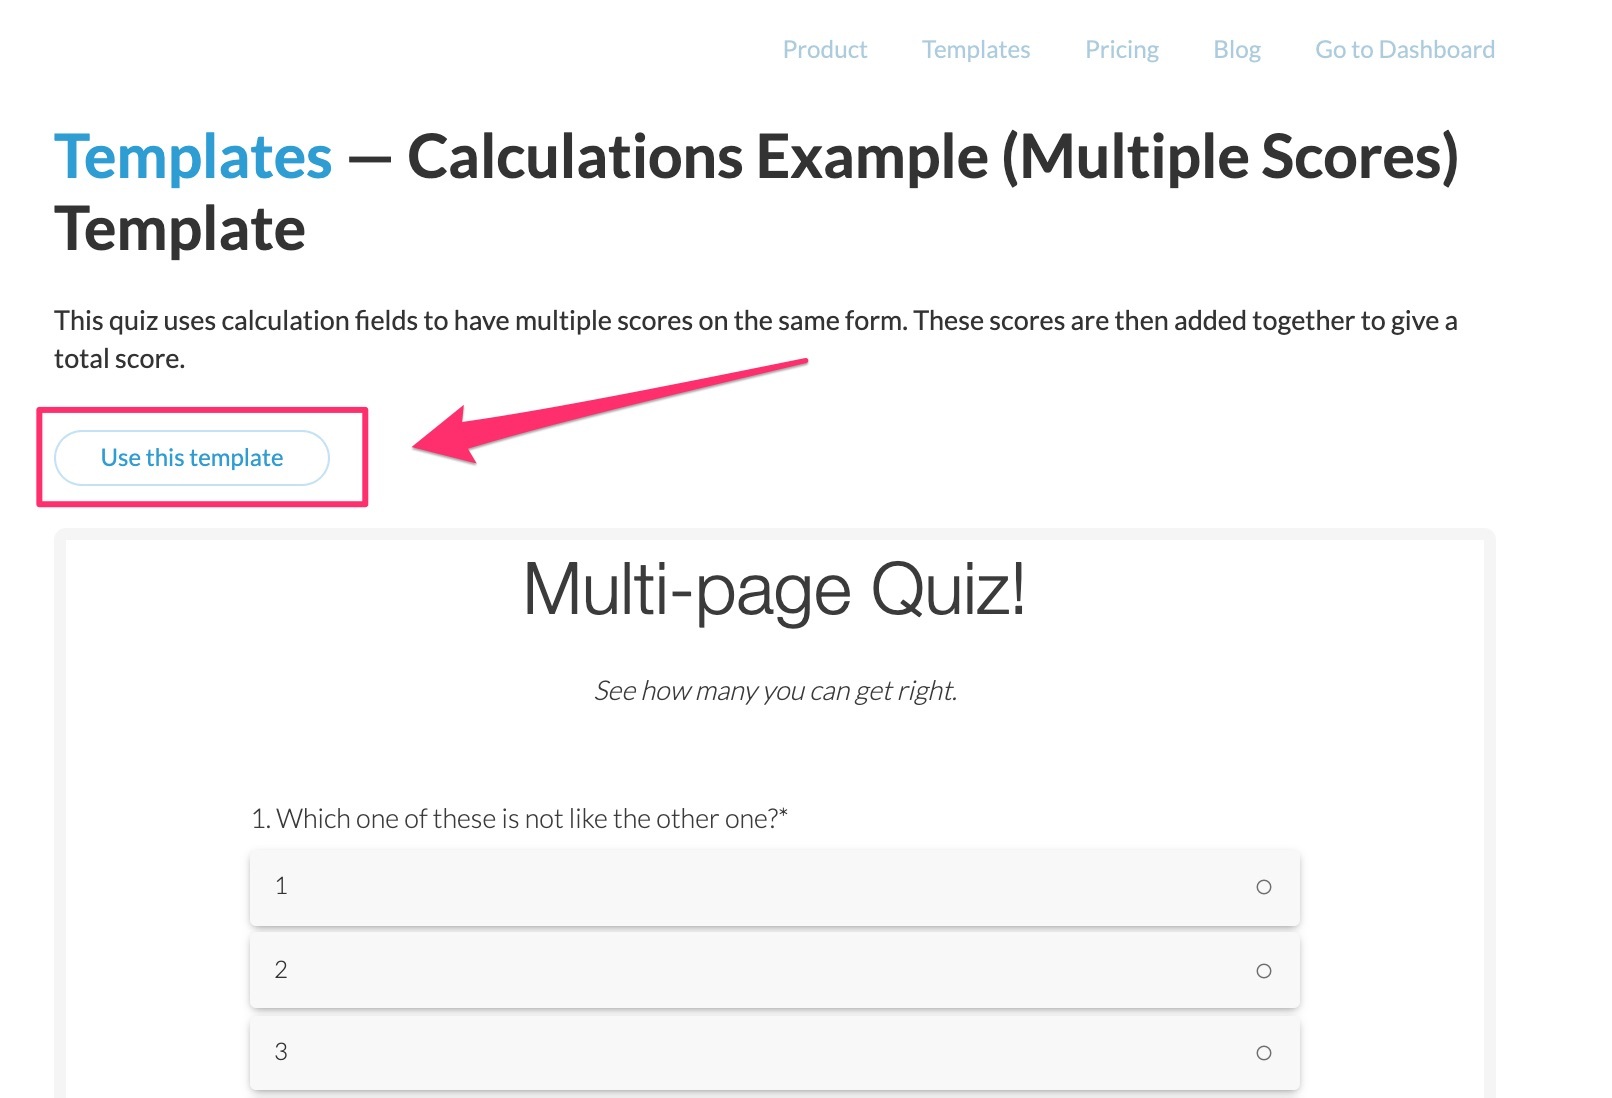
To get started, you first need to click on the button that says ‘Use this template’:
Enter your quiz questions
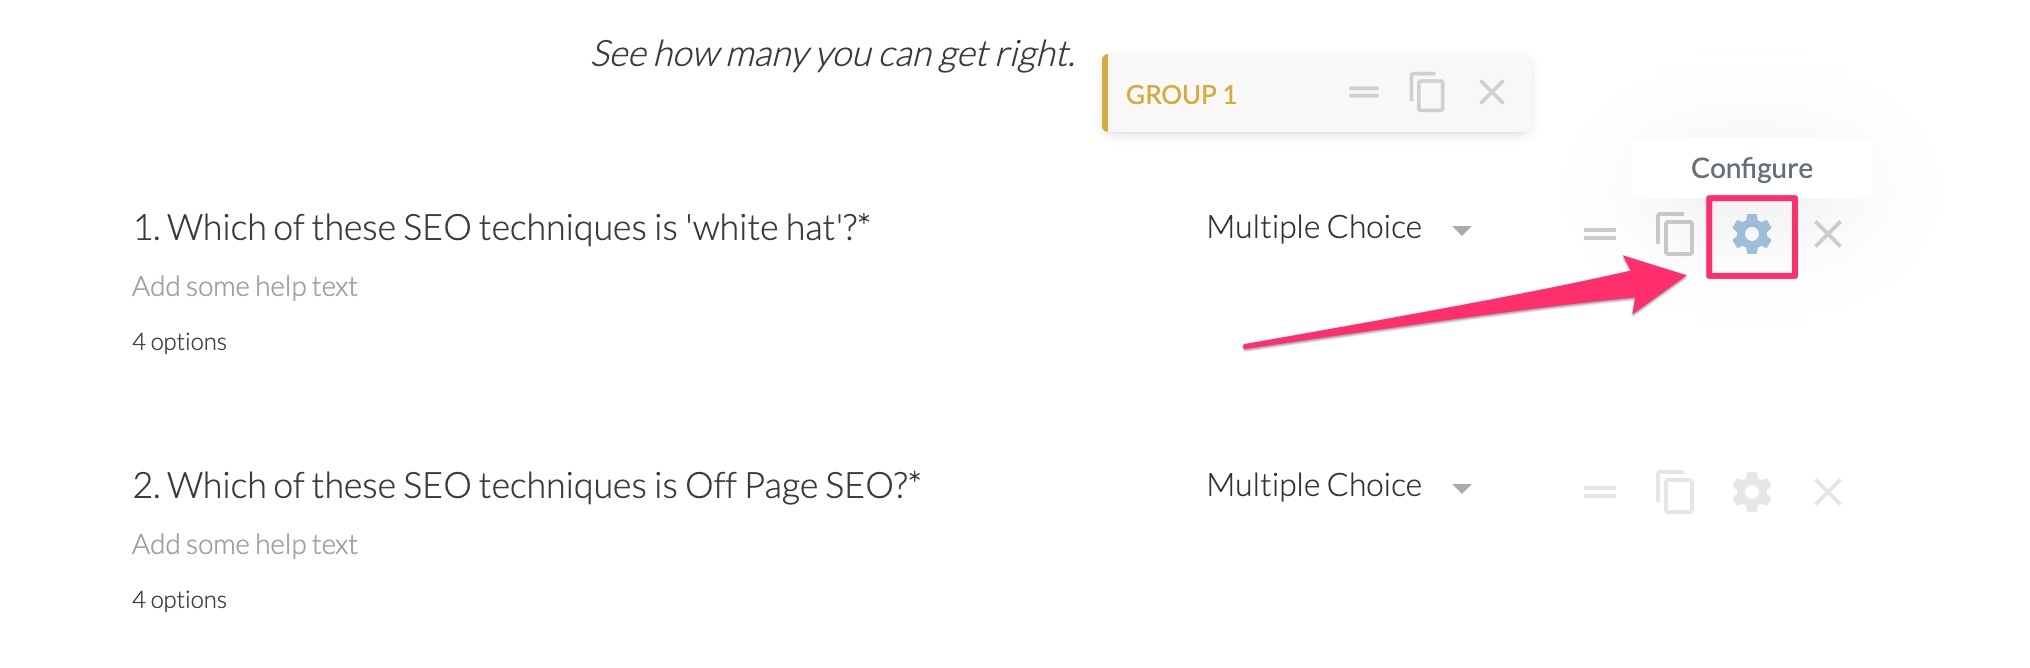
To customize the template, click on ‘Edit’ and substitute your questions for the ones in the template:
For each question, click on the ‘Configure’ icon:
Next, paste in the multiple-choice answers:
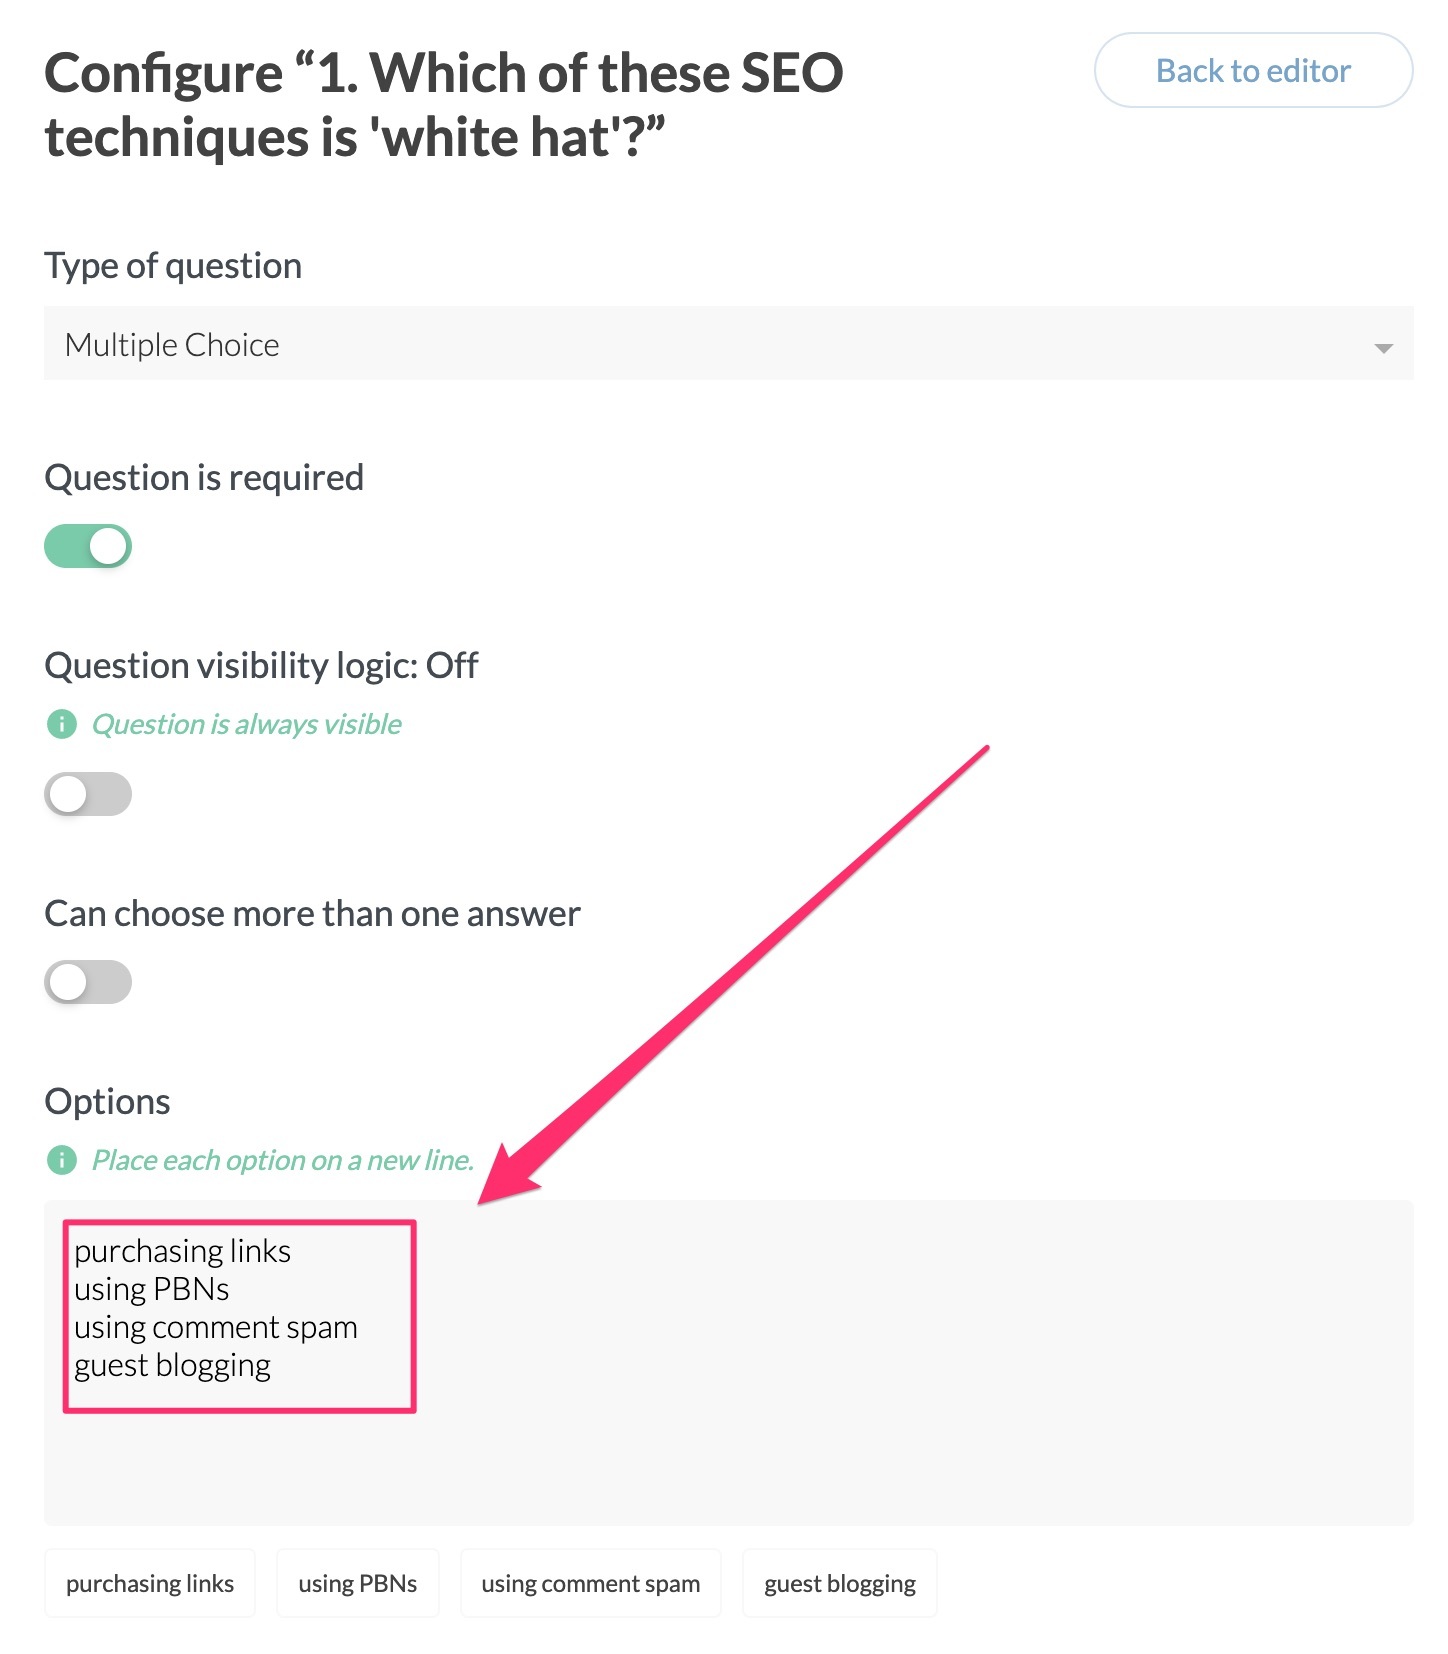
It doesn’t matter which order they are in because in the next step you’ll be telling the software which of the multiple-choice answers is the correct one.
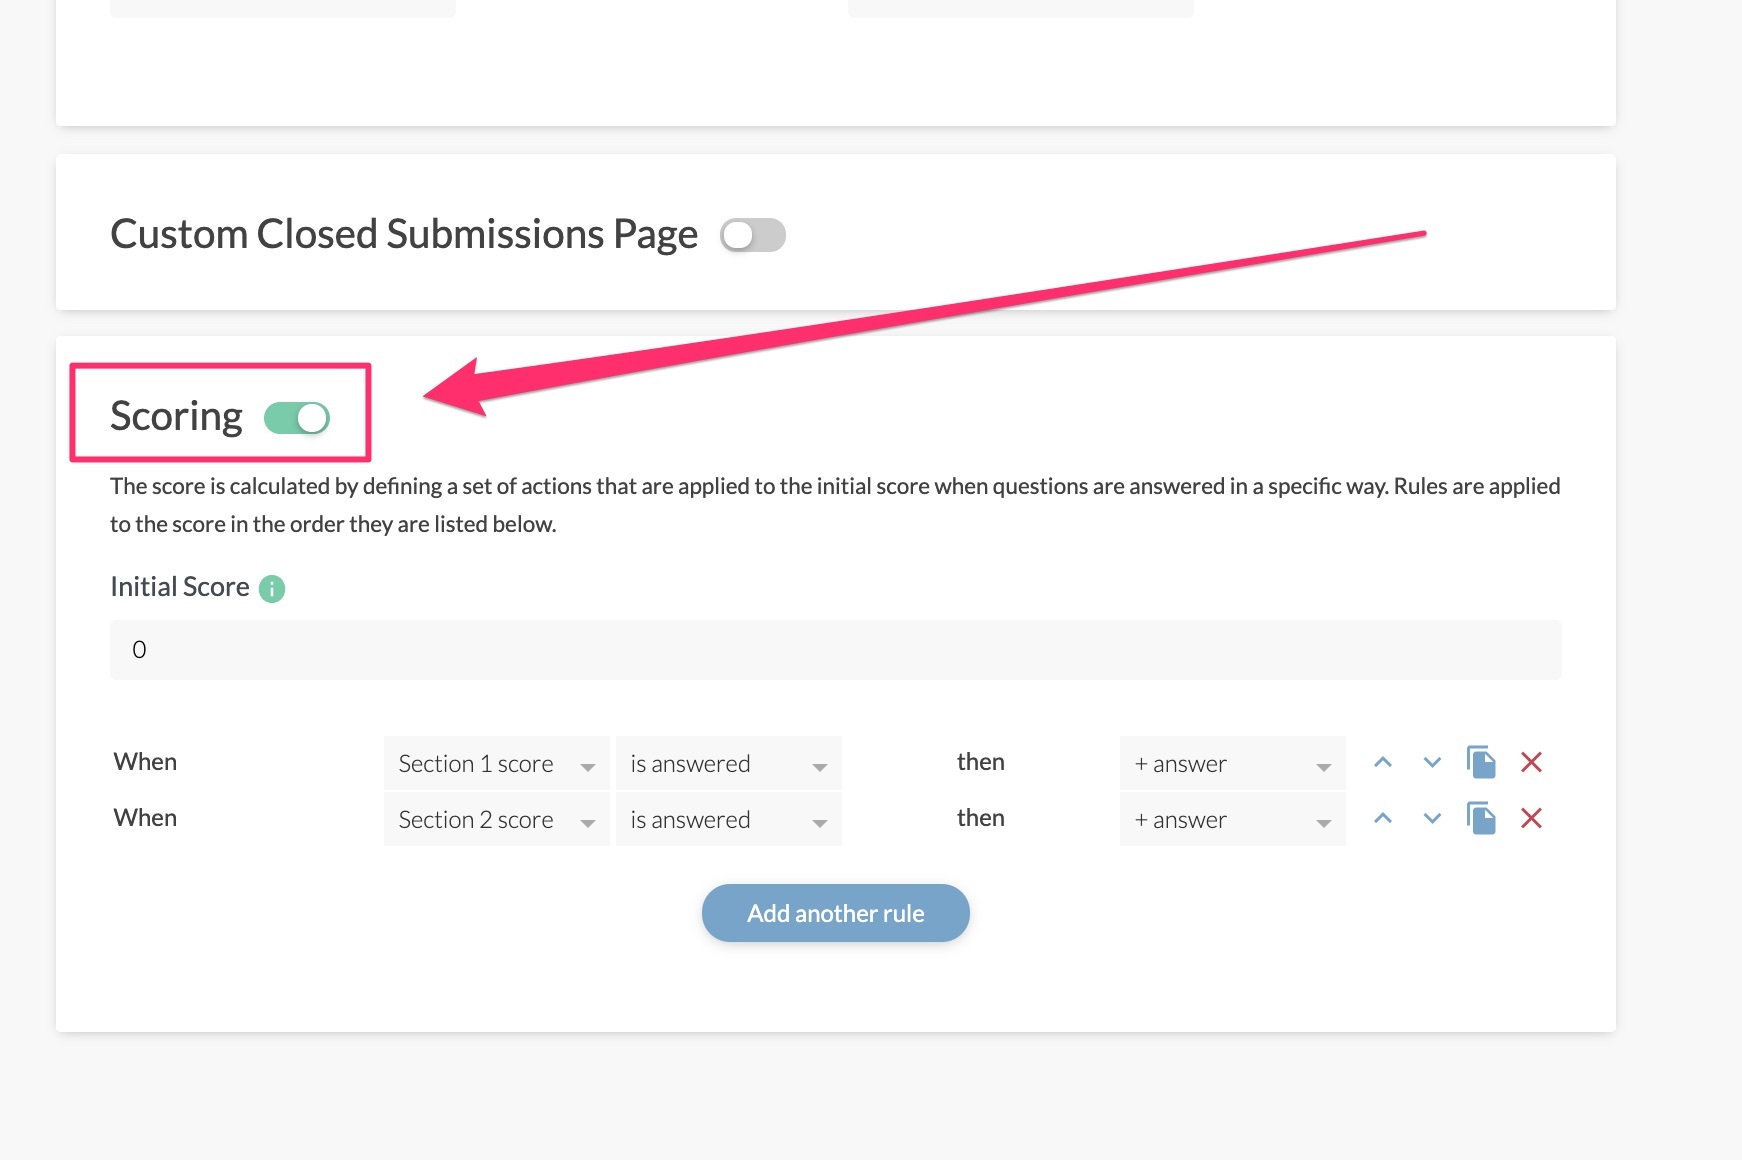
Turn on ‘scoring’
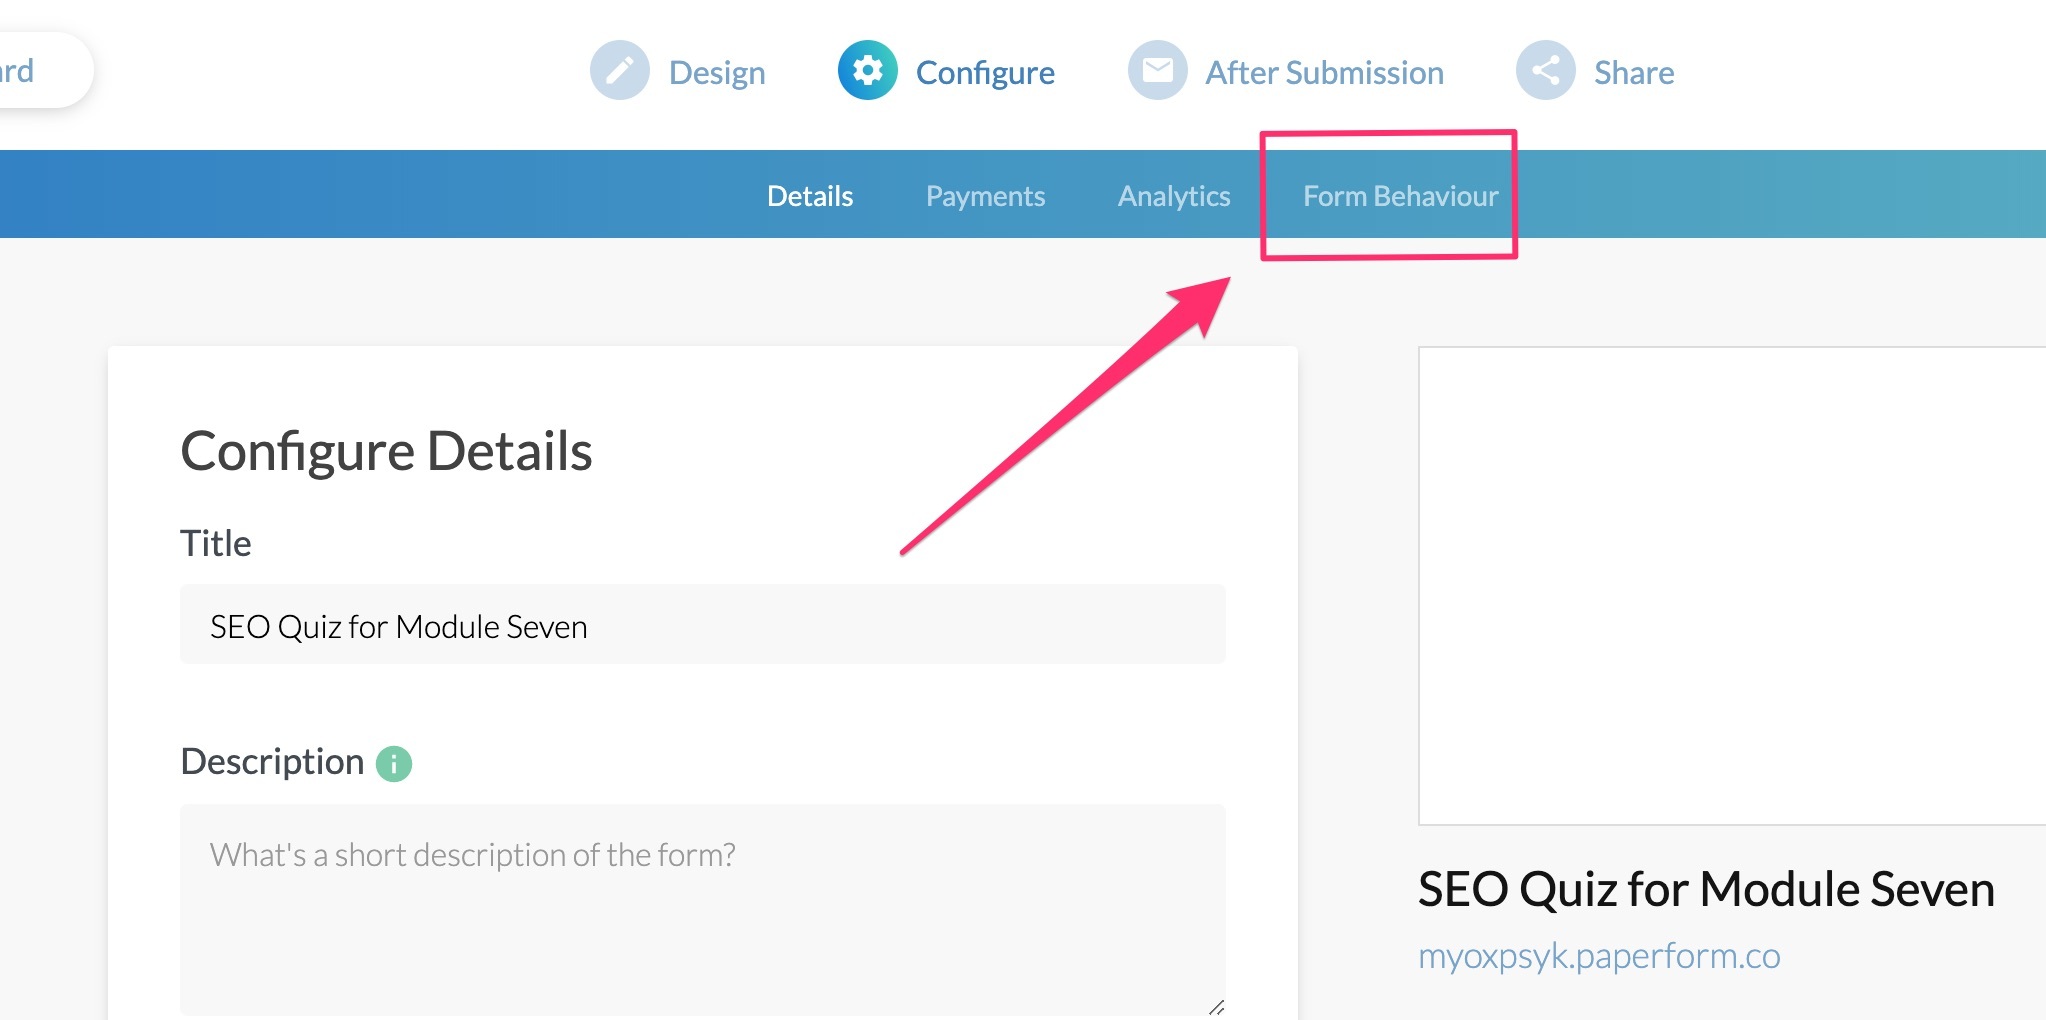
Once you have entered all your questions, together with all the multiple-choice answers, go to ‘Configure’ and then ‘Form Behavior’:
Scroll down to the foot of the ‘Form Behavior’ screen and make sure ‘Scoring’ is toggled to the ‘On’ position:
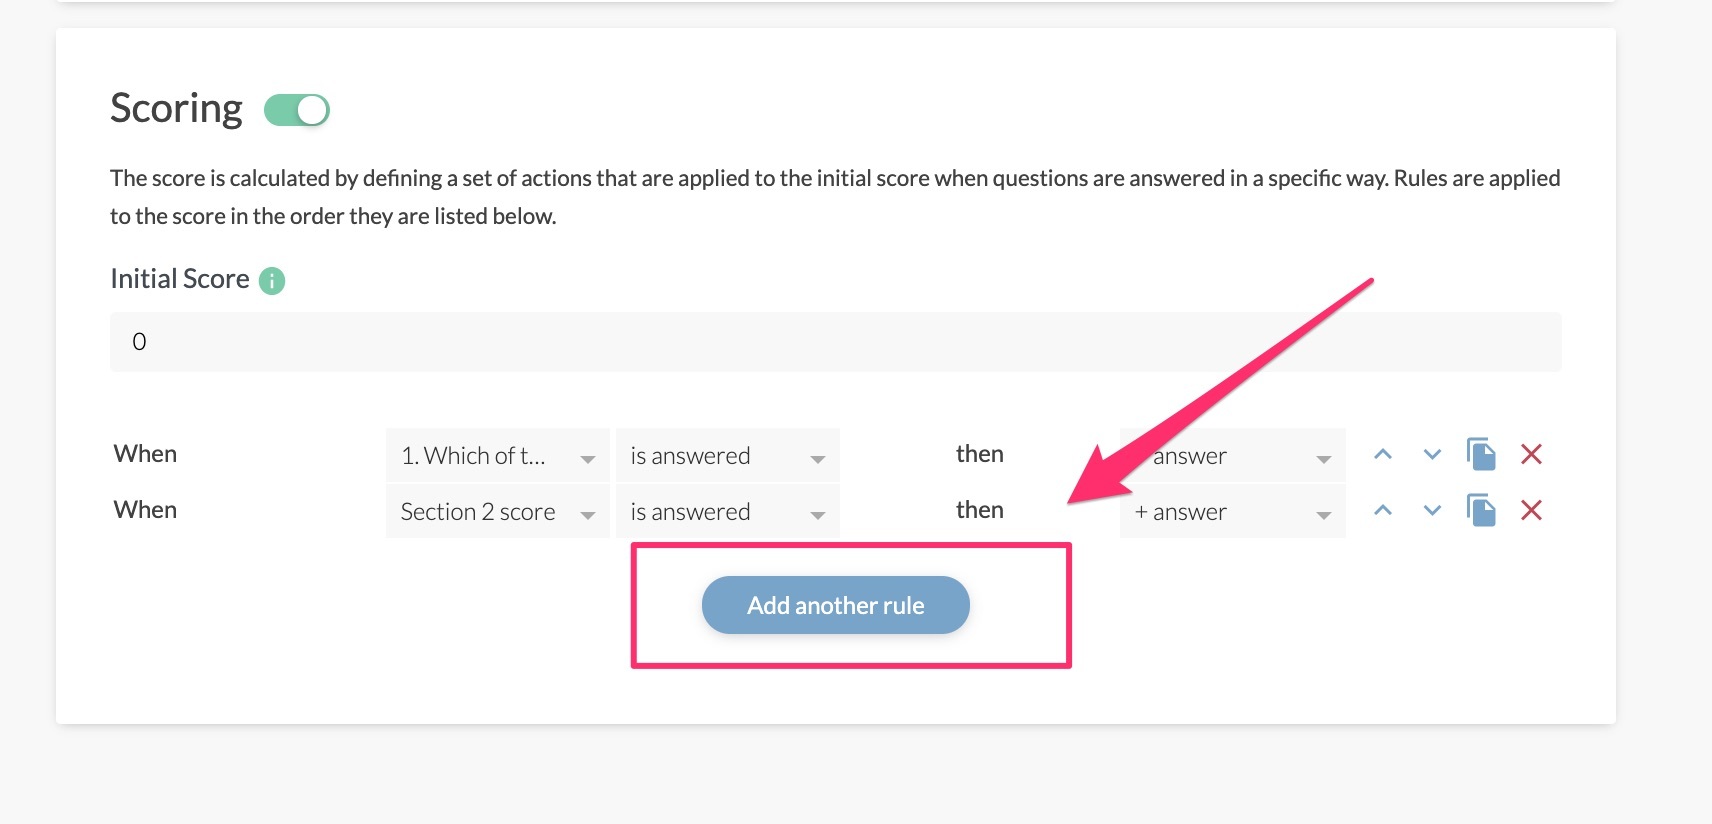
Set the answers
Now click ‘Add another rule’:
Then click on ‘Choose question’ and select the first of your quiz questions:
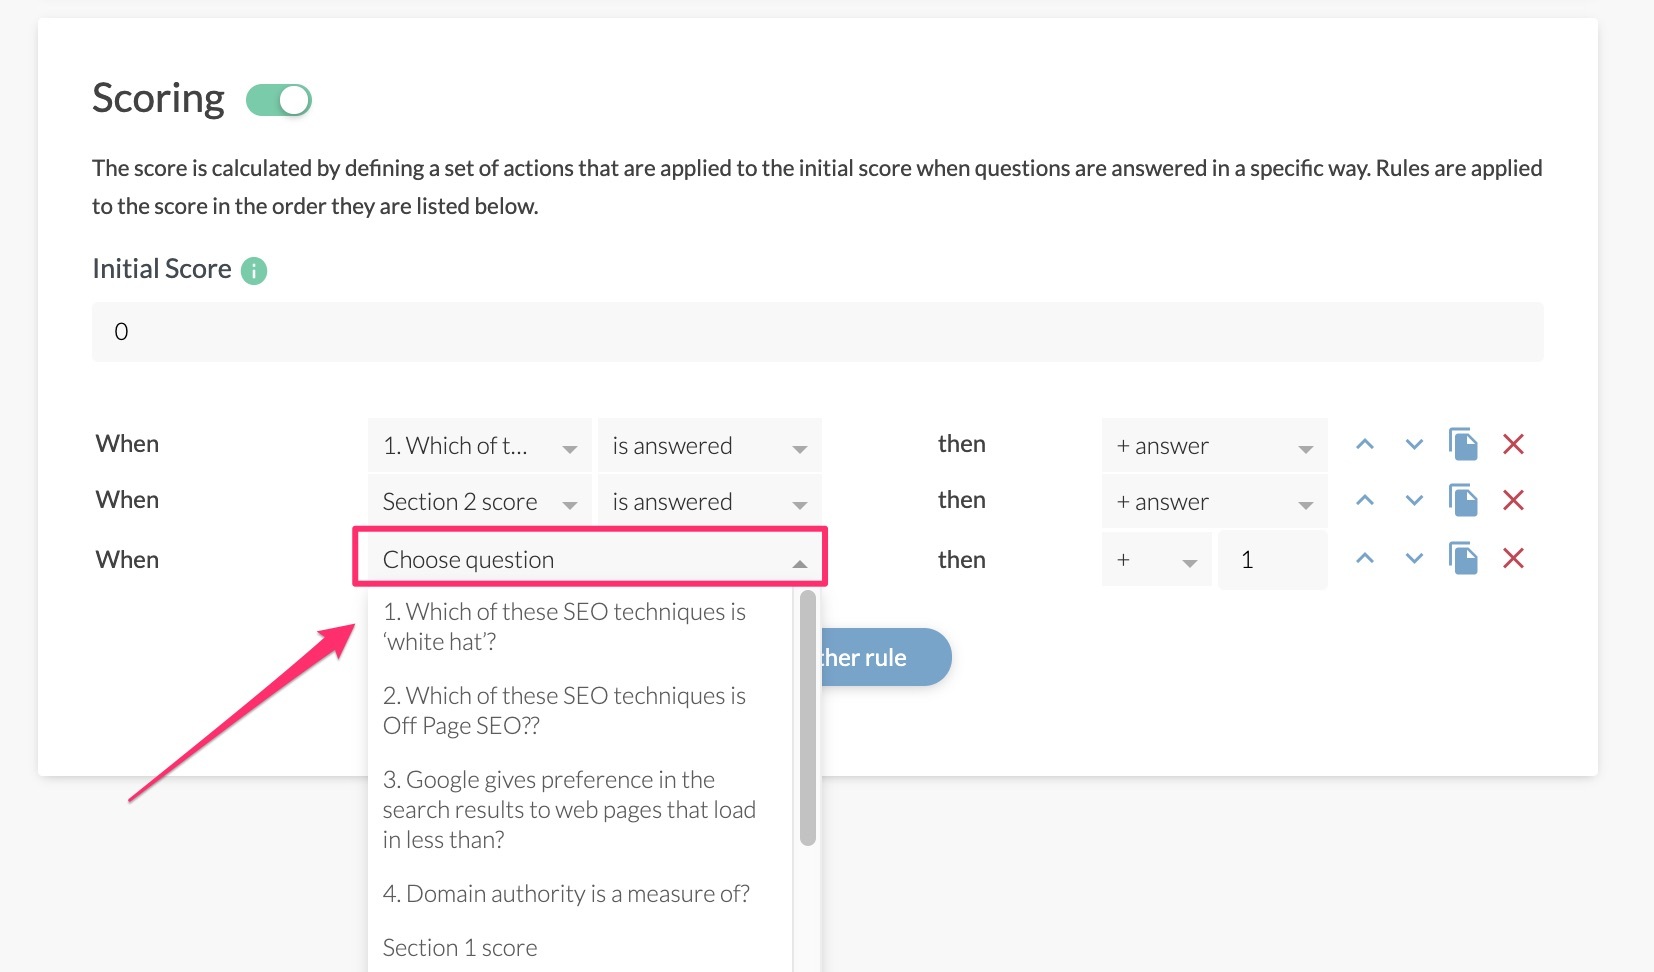
Then click on the ‘answer’ box and choose the correct answer:
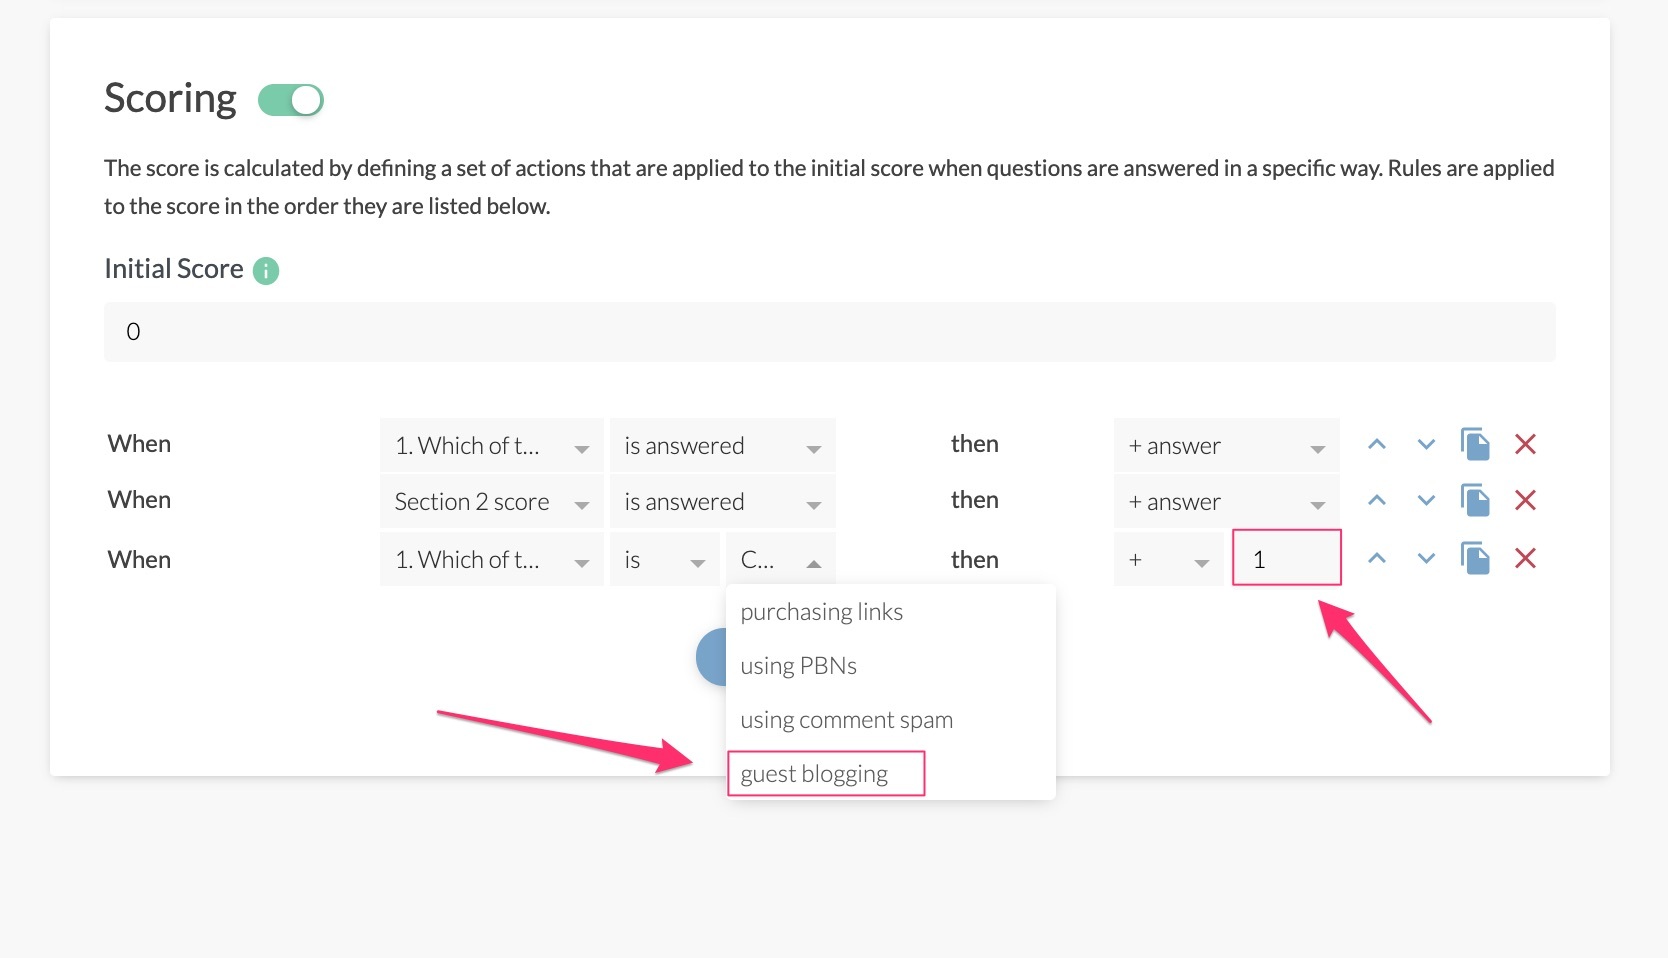
The software will now score one point for choosing that particular answer to the question.
Keep clicking on ‘Add another rule’ and follow the above procedure until you have completed all the questions and answers in your quiz.
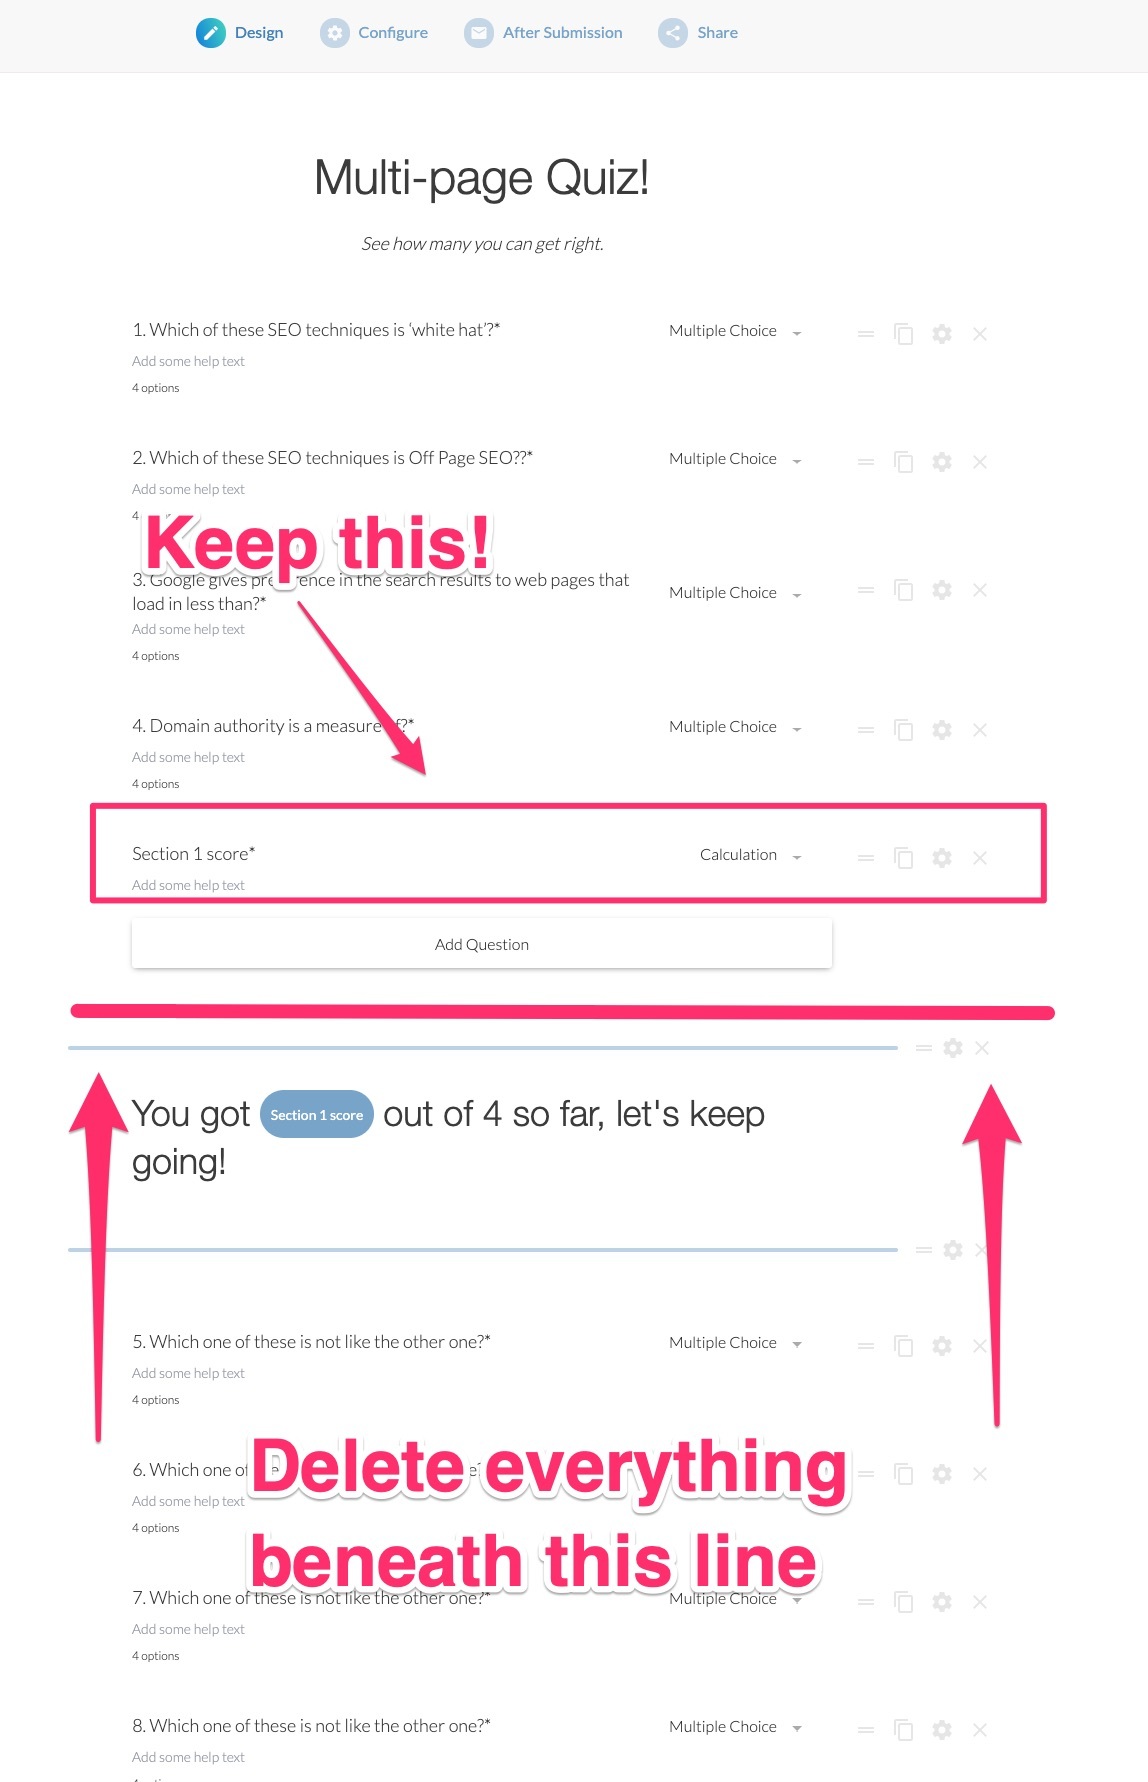
If you have fewer questions than the template contains, then you can just highlight everything beneath your last question and hit delete.
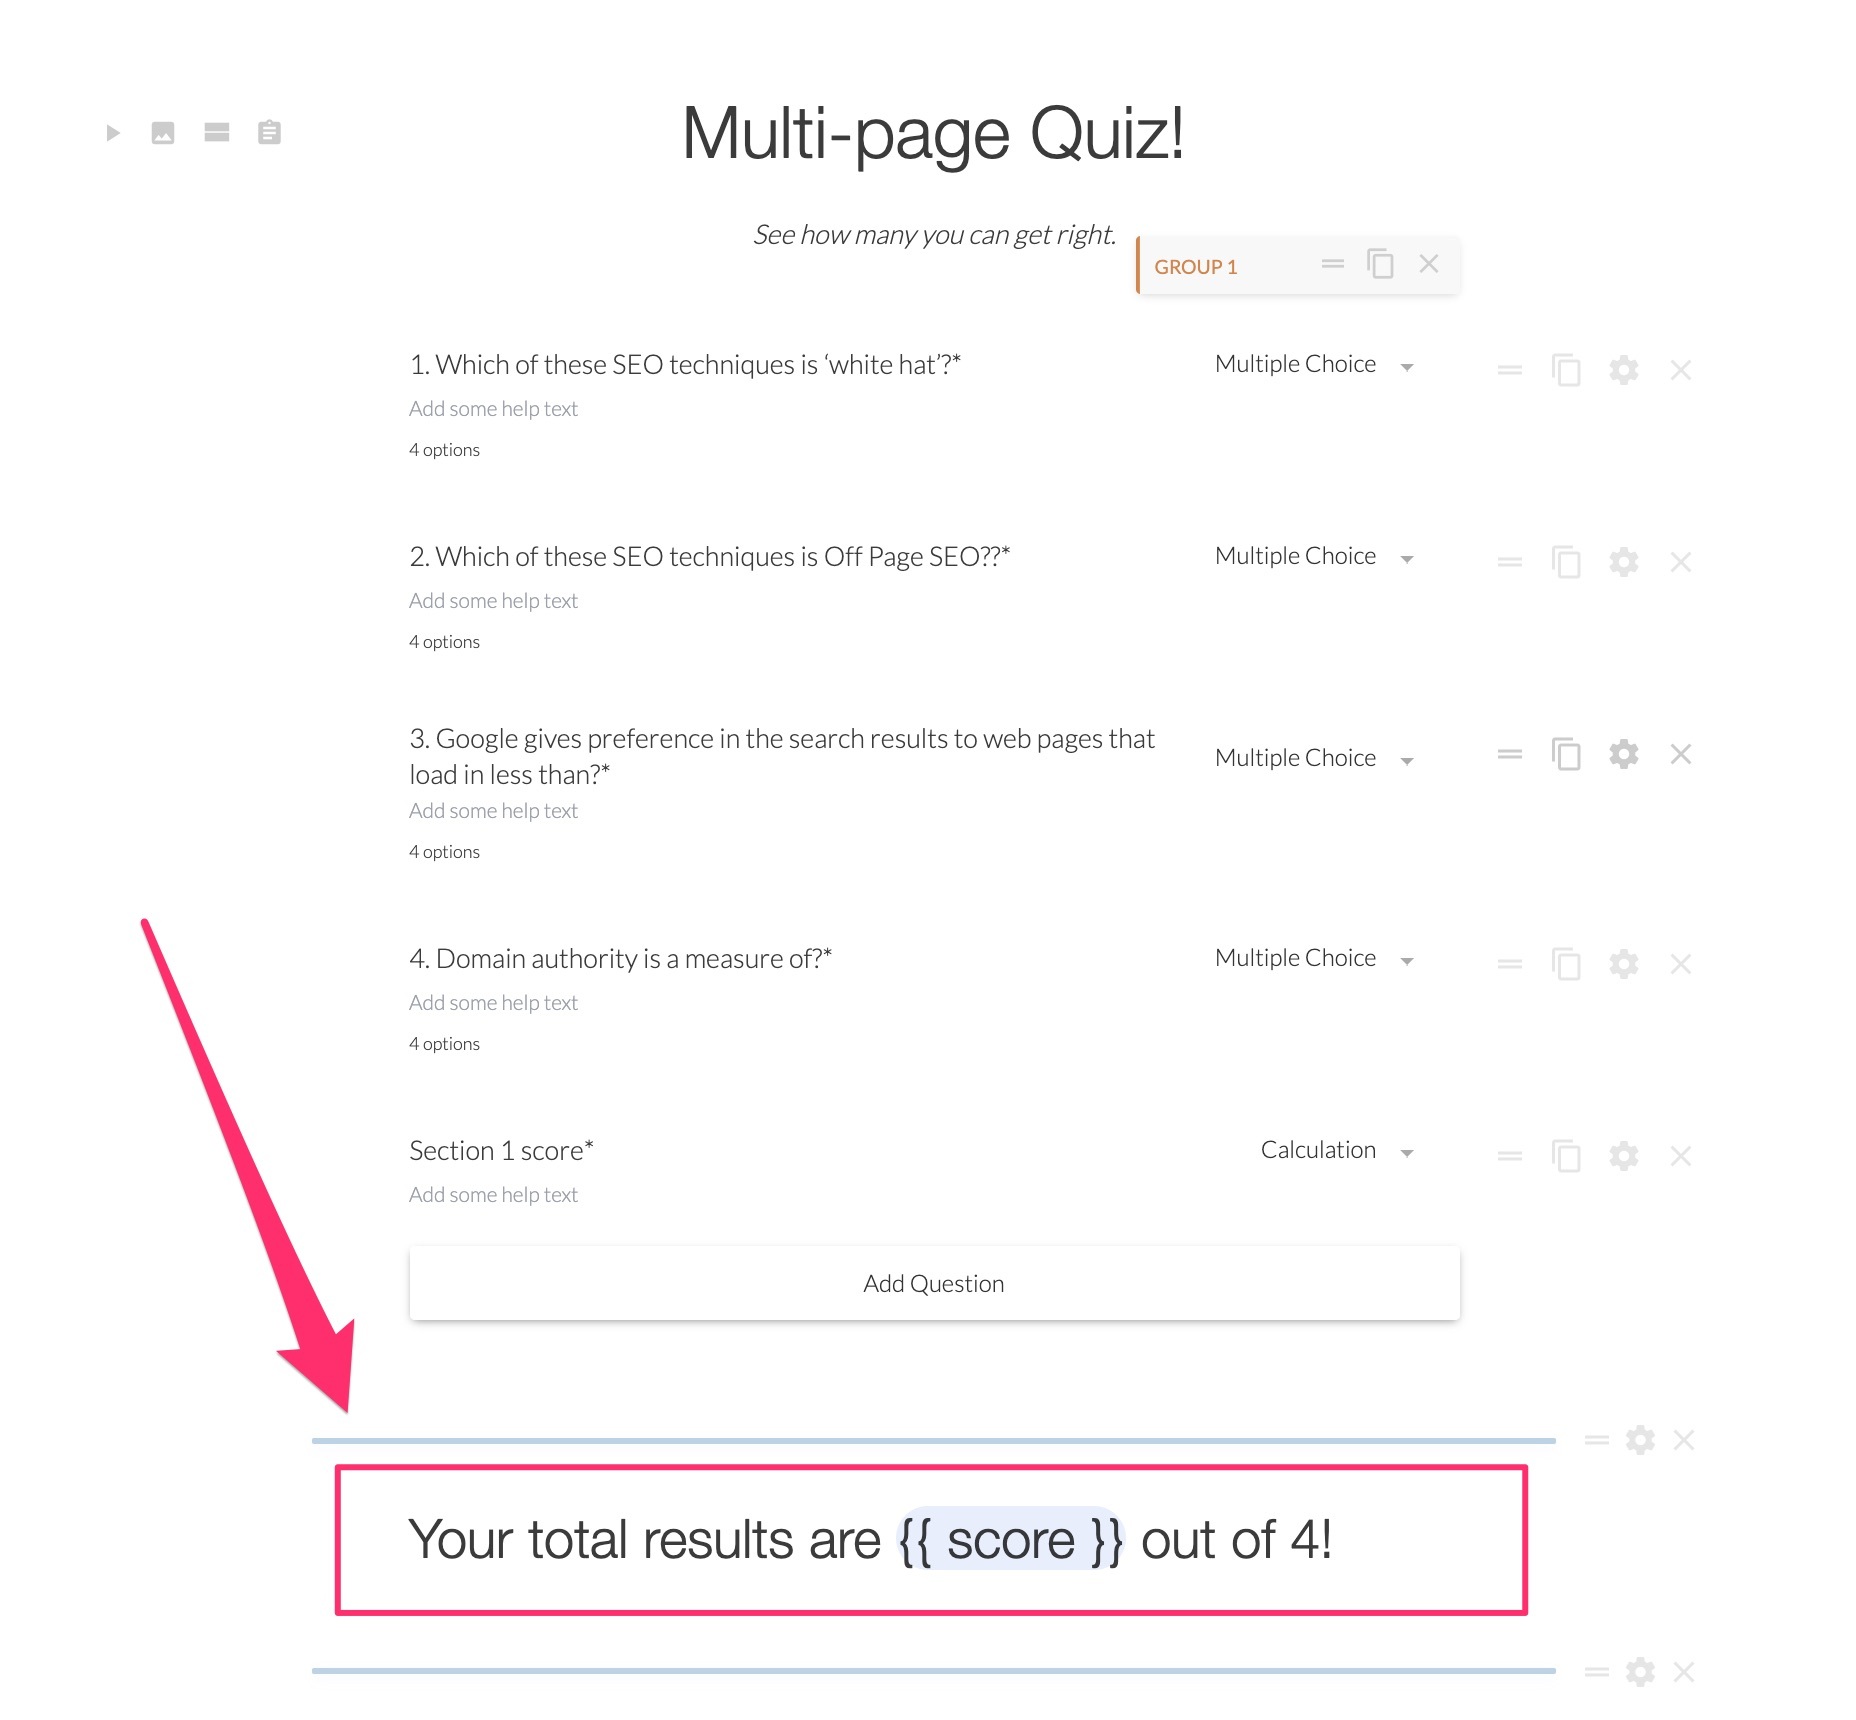
But make sure to retain the calculation element:
Finally, to make sure your quiz works, you need to type in this code (making sure to use double squiggly brackets):
Website Integrations

This section explains how to:
- Set up automatic Paperform email notifications to both you and the form submitter
- Connect Paperform with third party services such as Google Sheets or an email service provider.
In the ‘After Submission and Integrations’ tab you can arrange for a confirmation email to be sent to your customer once they have made a purchase.
To do this, click on ‘After Submission’, then ‘Emails’:

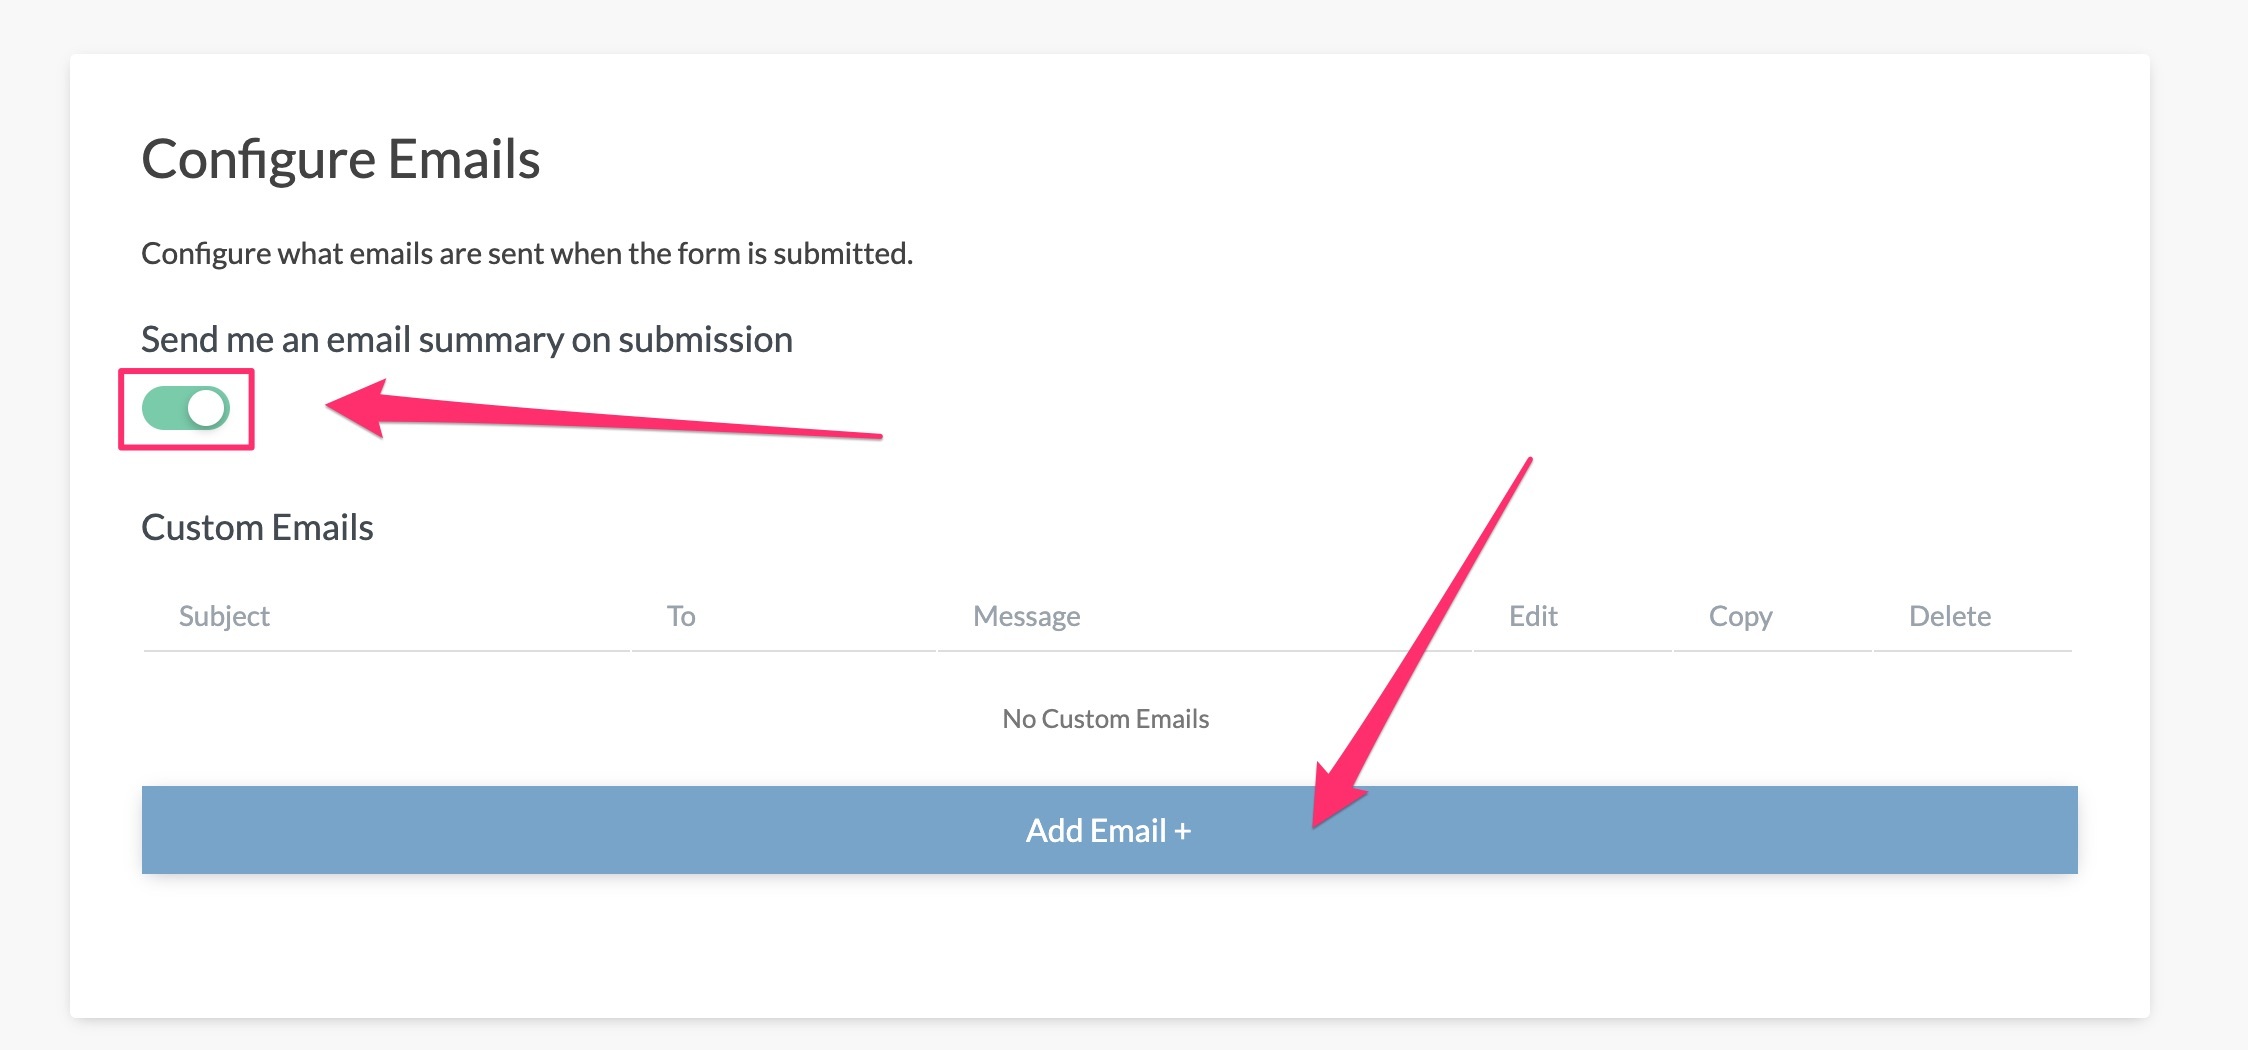
On the next screen, toggle the ‘send email’ button to the ‘On’ position and then click ‘Add email’:
Next, click the plus sign in the ‘To’ field to have the submitter’s email address piped in from the form.
Enter the required details as shown below and then click the ‘Update email’ button:
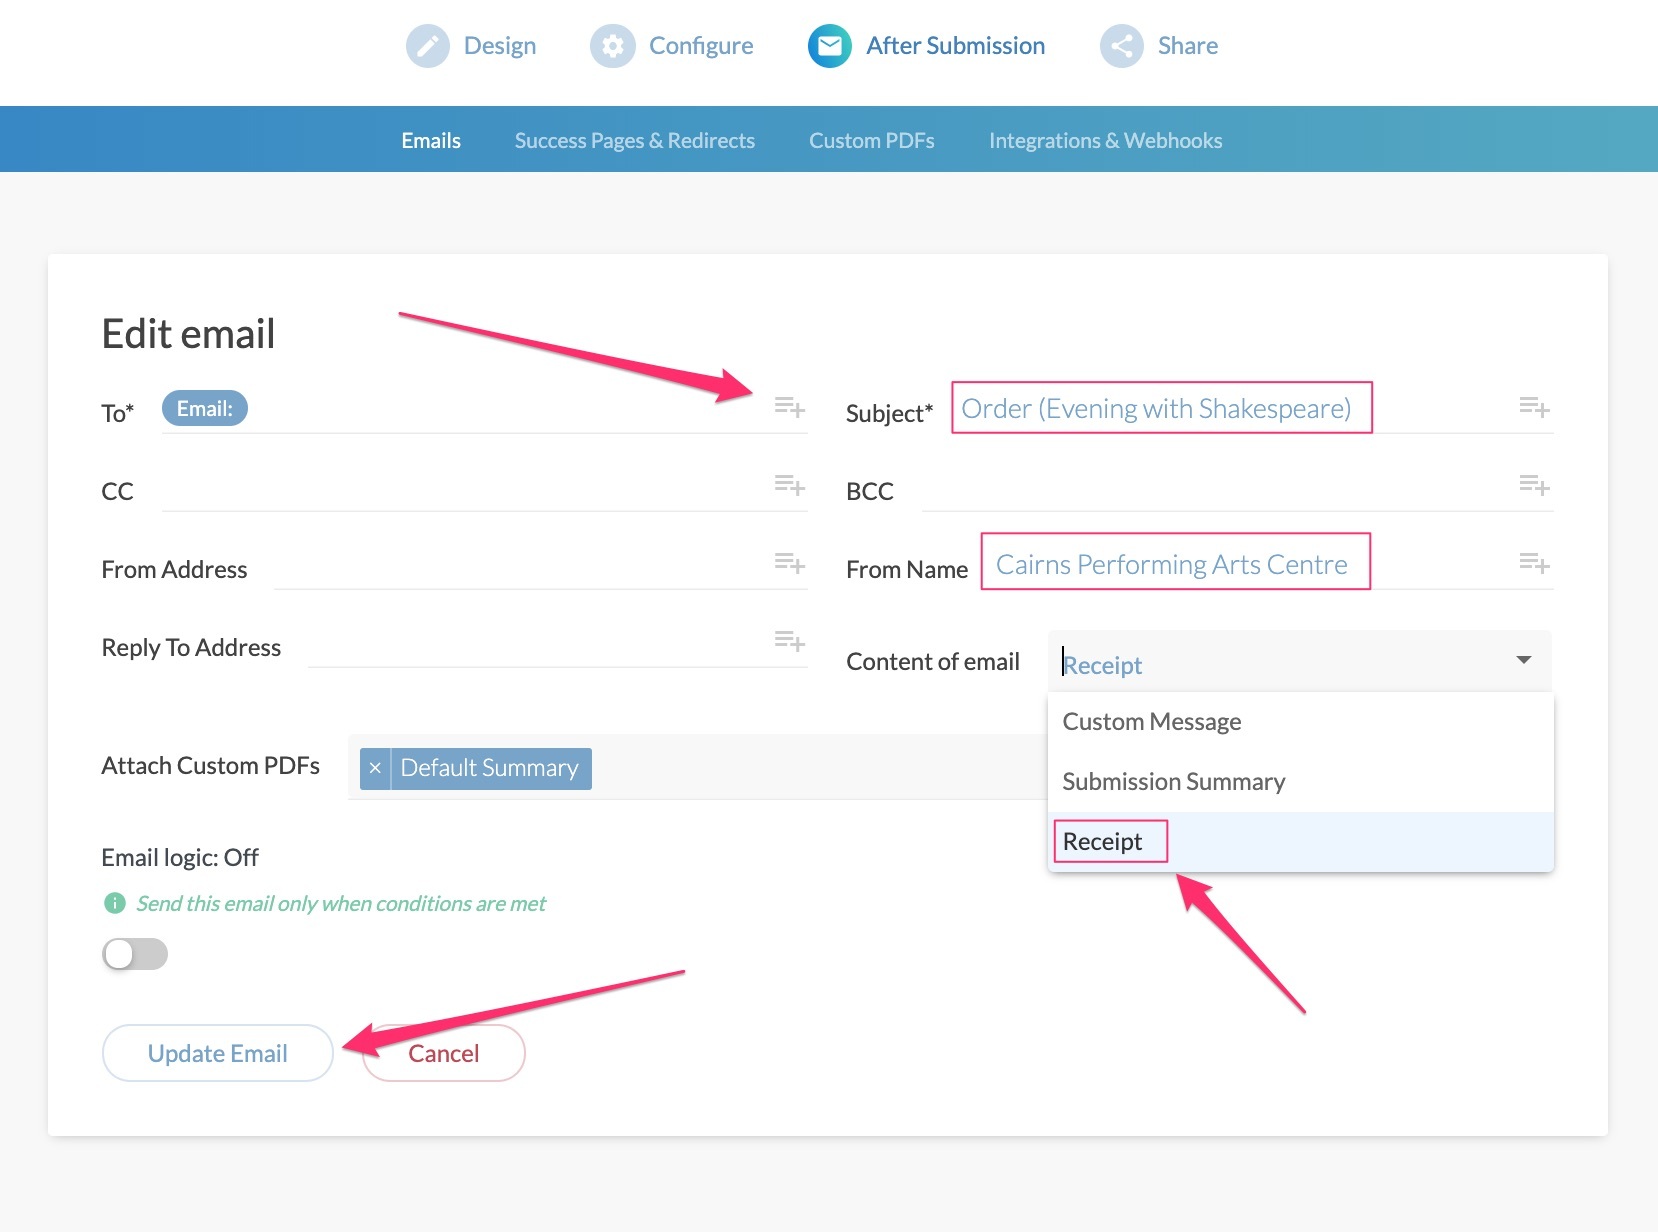
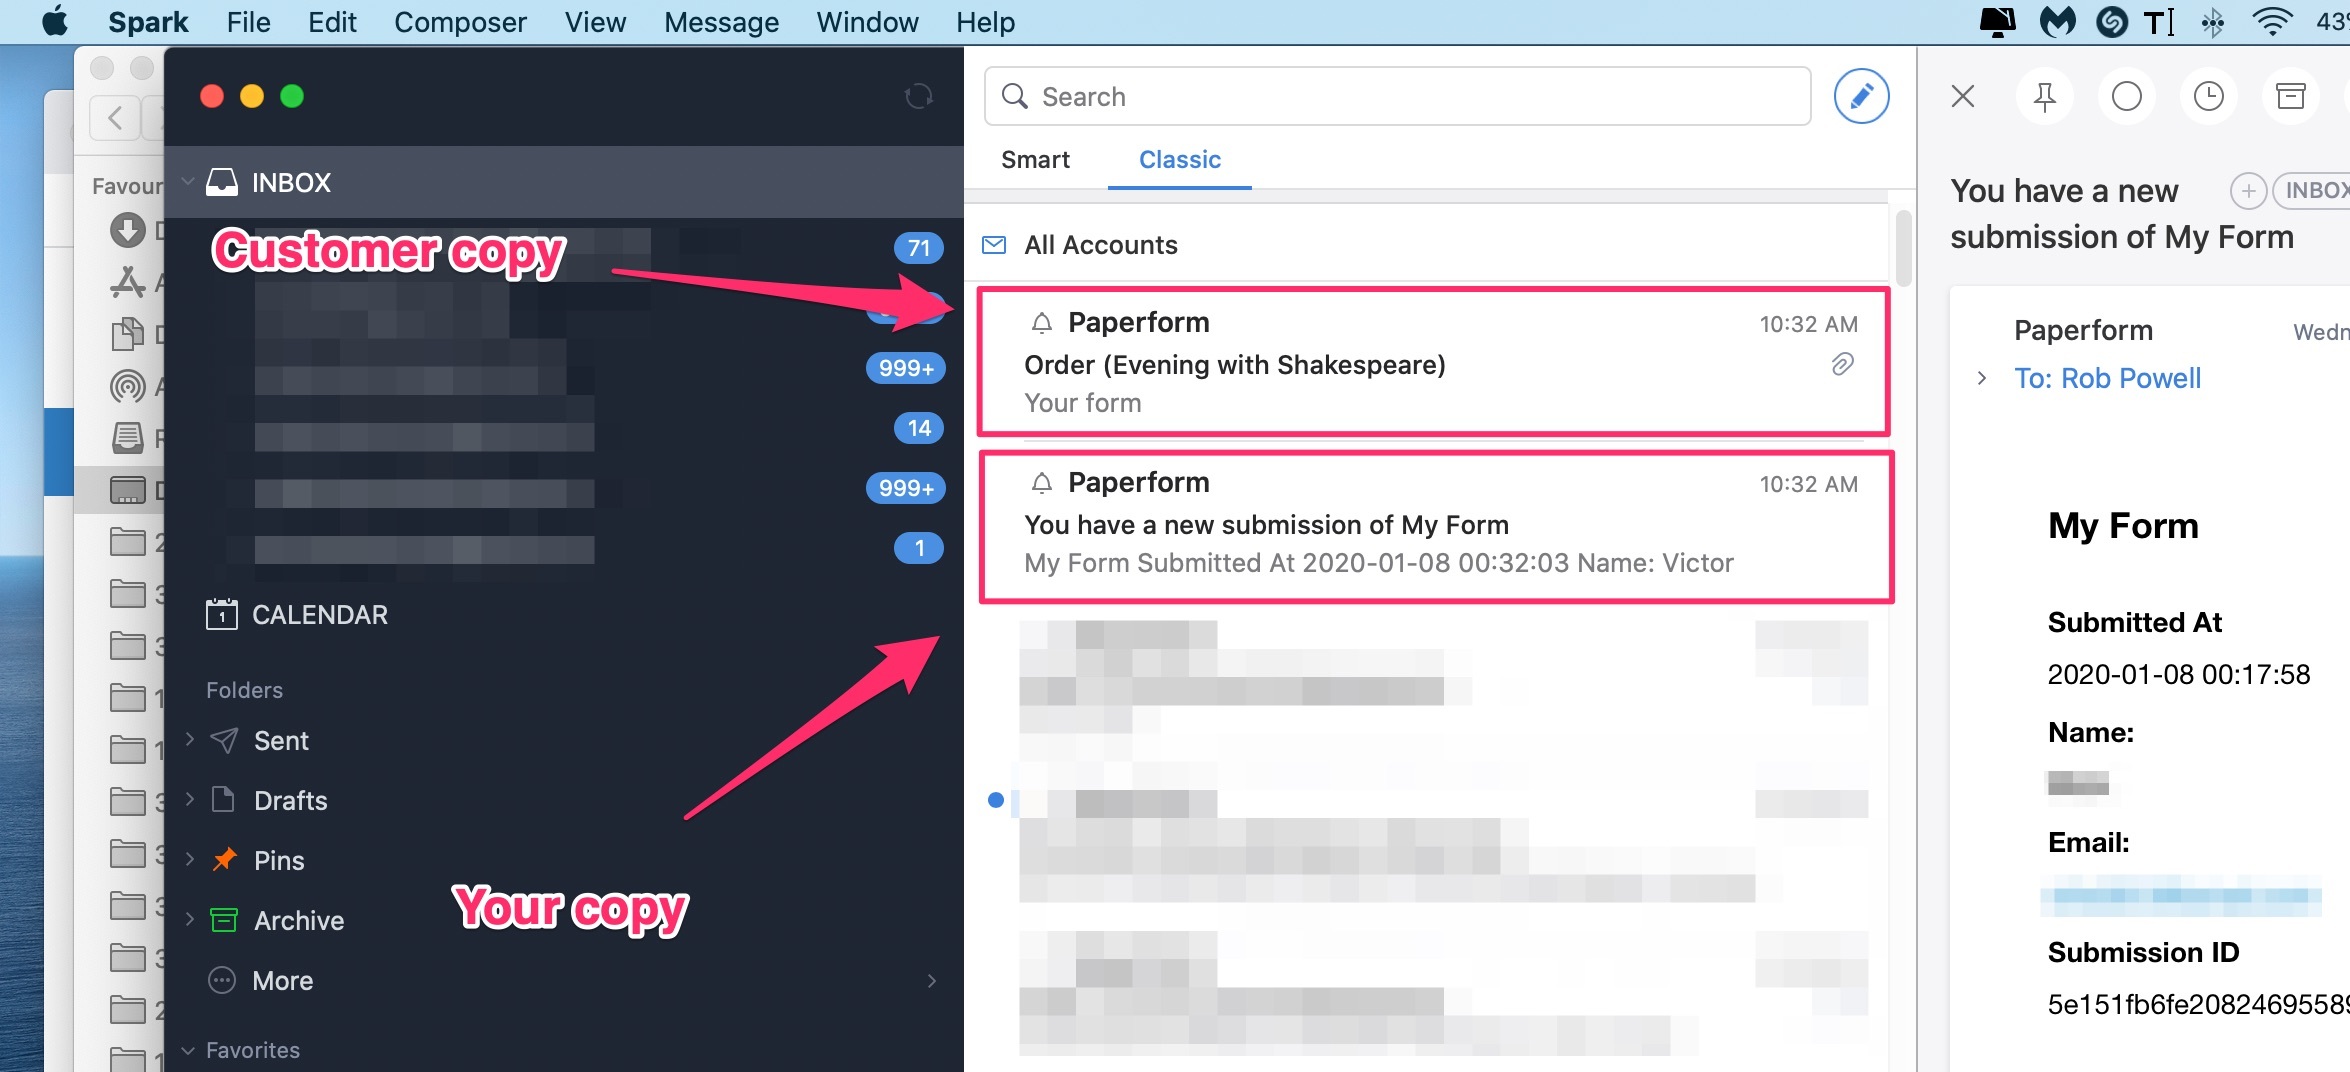
Now, whenever someone submits your form, Paperform will now send two emails: one to the customer, with a receipt for their transaction and one to you with a record of the form submission:
If you need more advanced list management, you can integrate your Paperform account with most of the major email marketing services and other apps, including:
- Mailchimp
- Active Campaign
- MailerLite
- ConvertKit
- Mailshake
- Campaign Monitor
- ClickSend
- Keap (Infusionsoft)
- Drip
- Moosend
- Intercom
- ZohoCRM
- Slack
- Trello
- Google Sheets
- Asana
- Dropbox
- Hubspot CRM
- Help Scout
- Meistertask
- Freshdesk
- GoToWebinar
- Zendesk
Connecting with these third party services allows you to do things like tagging people who purchase a product from your form, adding them to a list, and so on.
Tracking and reporting
![]()
Paperform provides full analytics and reporting on each form you create.
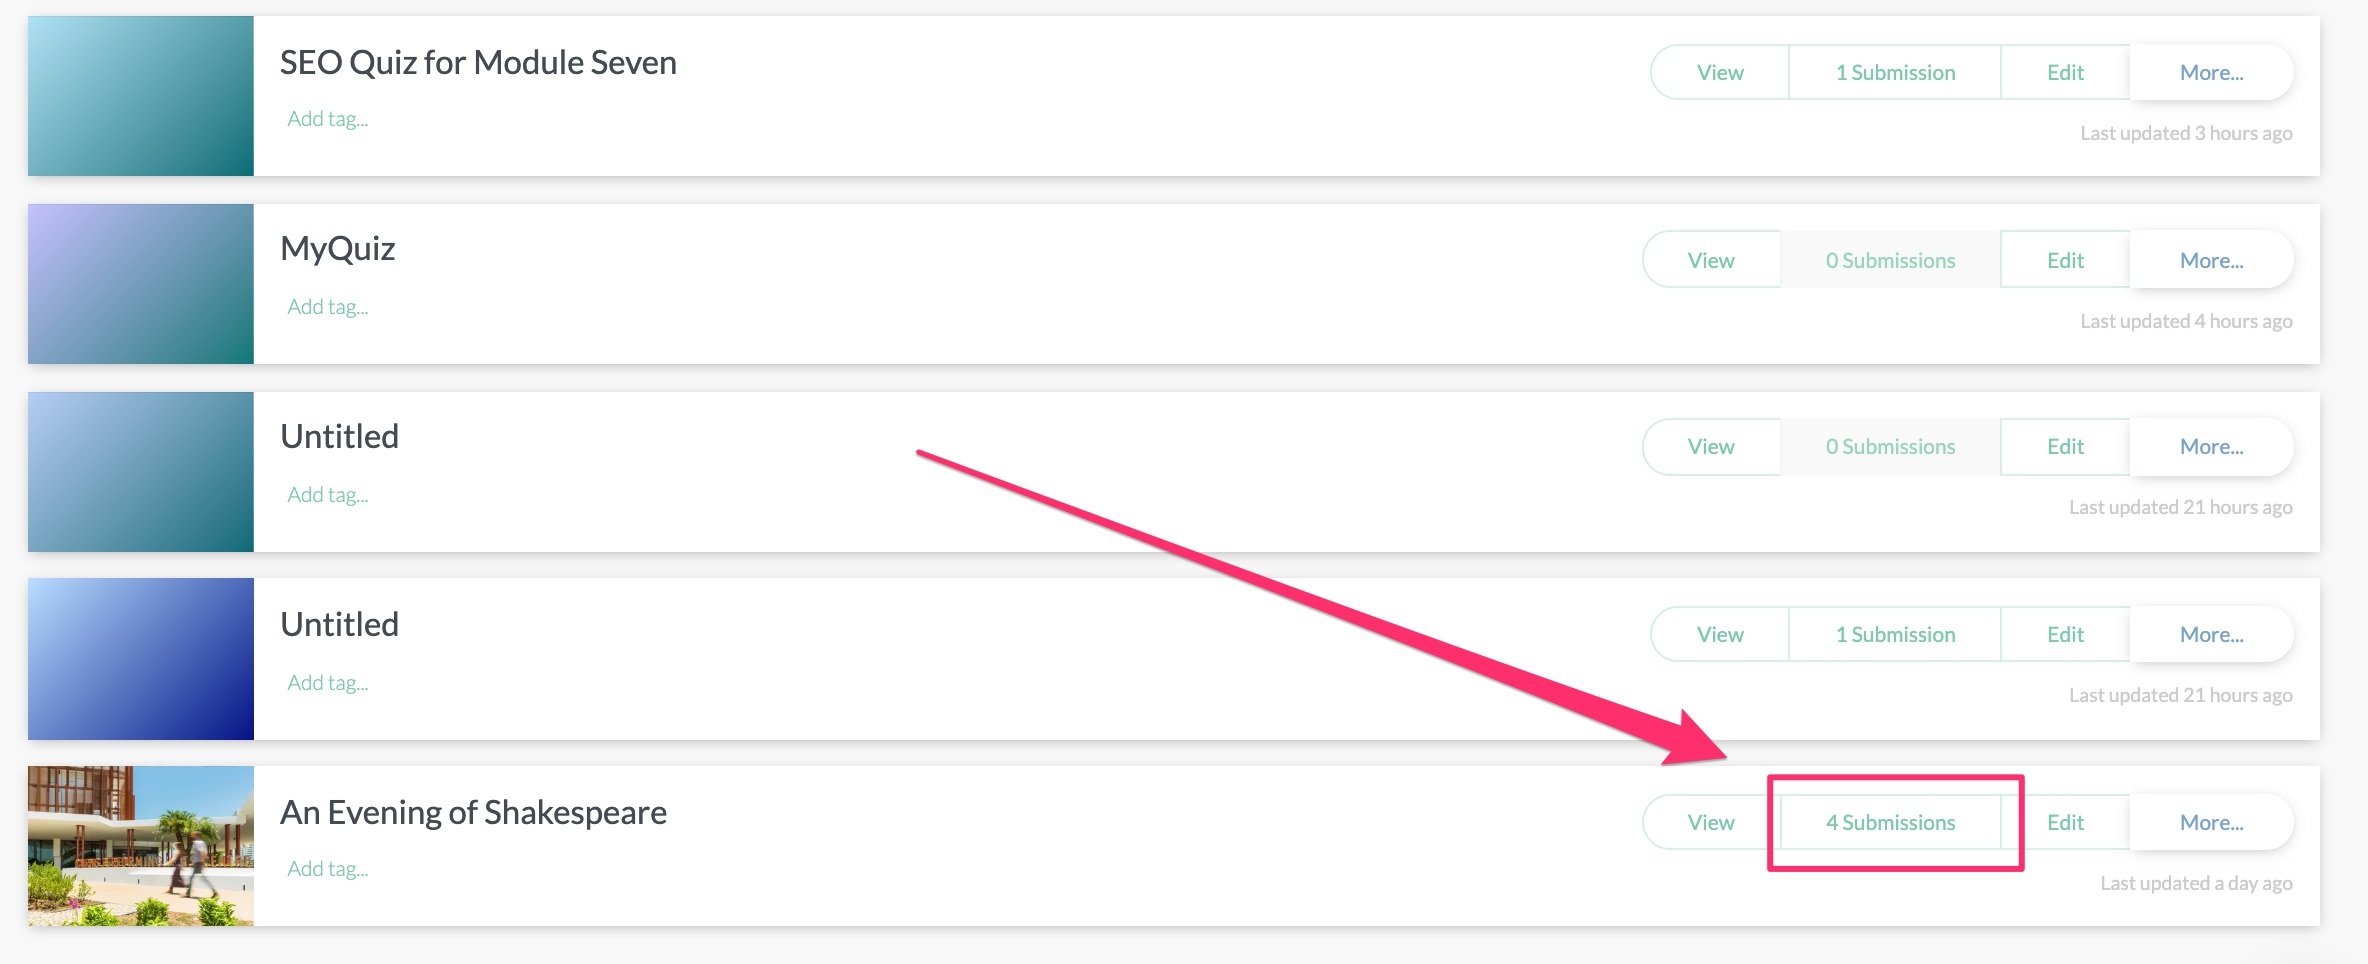
To access analytics and reporting, click on the ‘submissions’ tab on the relevant form:
On the next screen you’ll see five different kinds of reports:
- Submissions
- Partial submissions
- Products
- Report
- Analytics
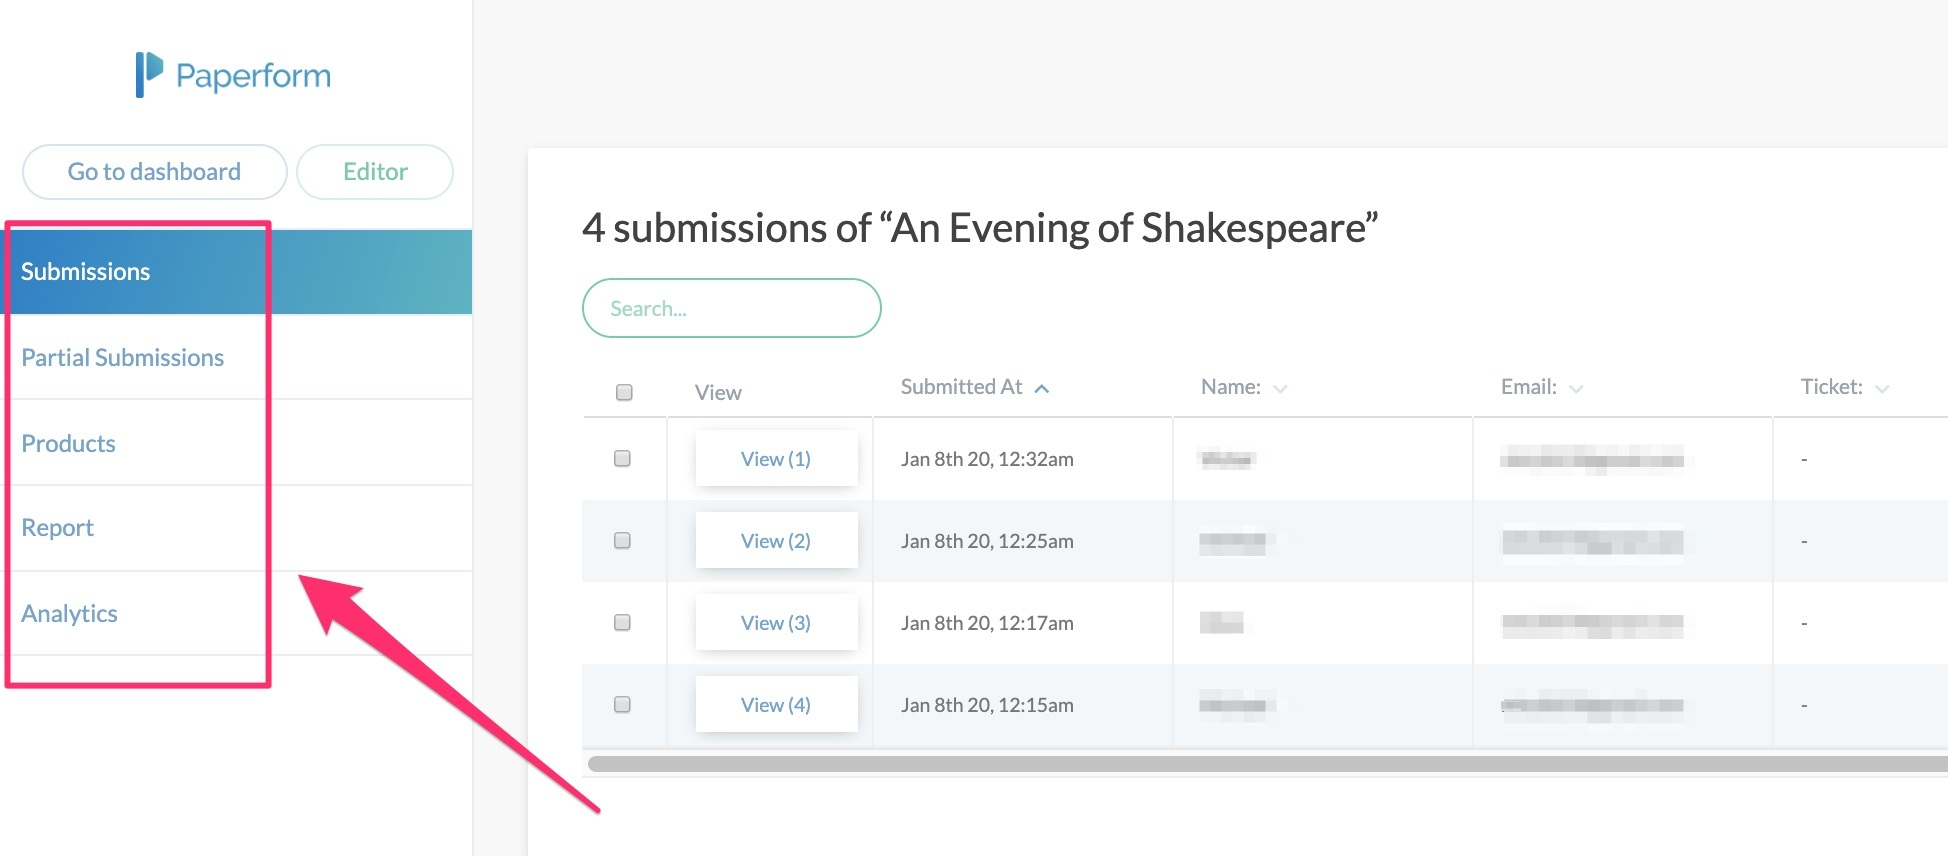
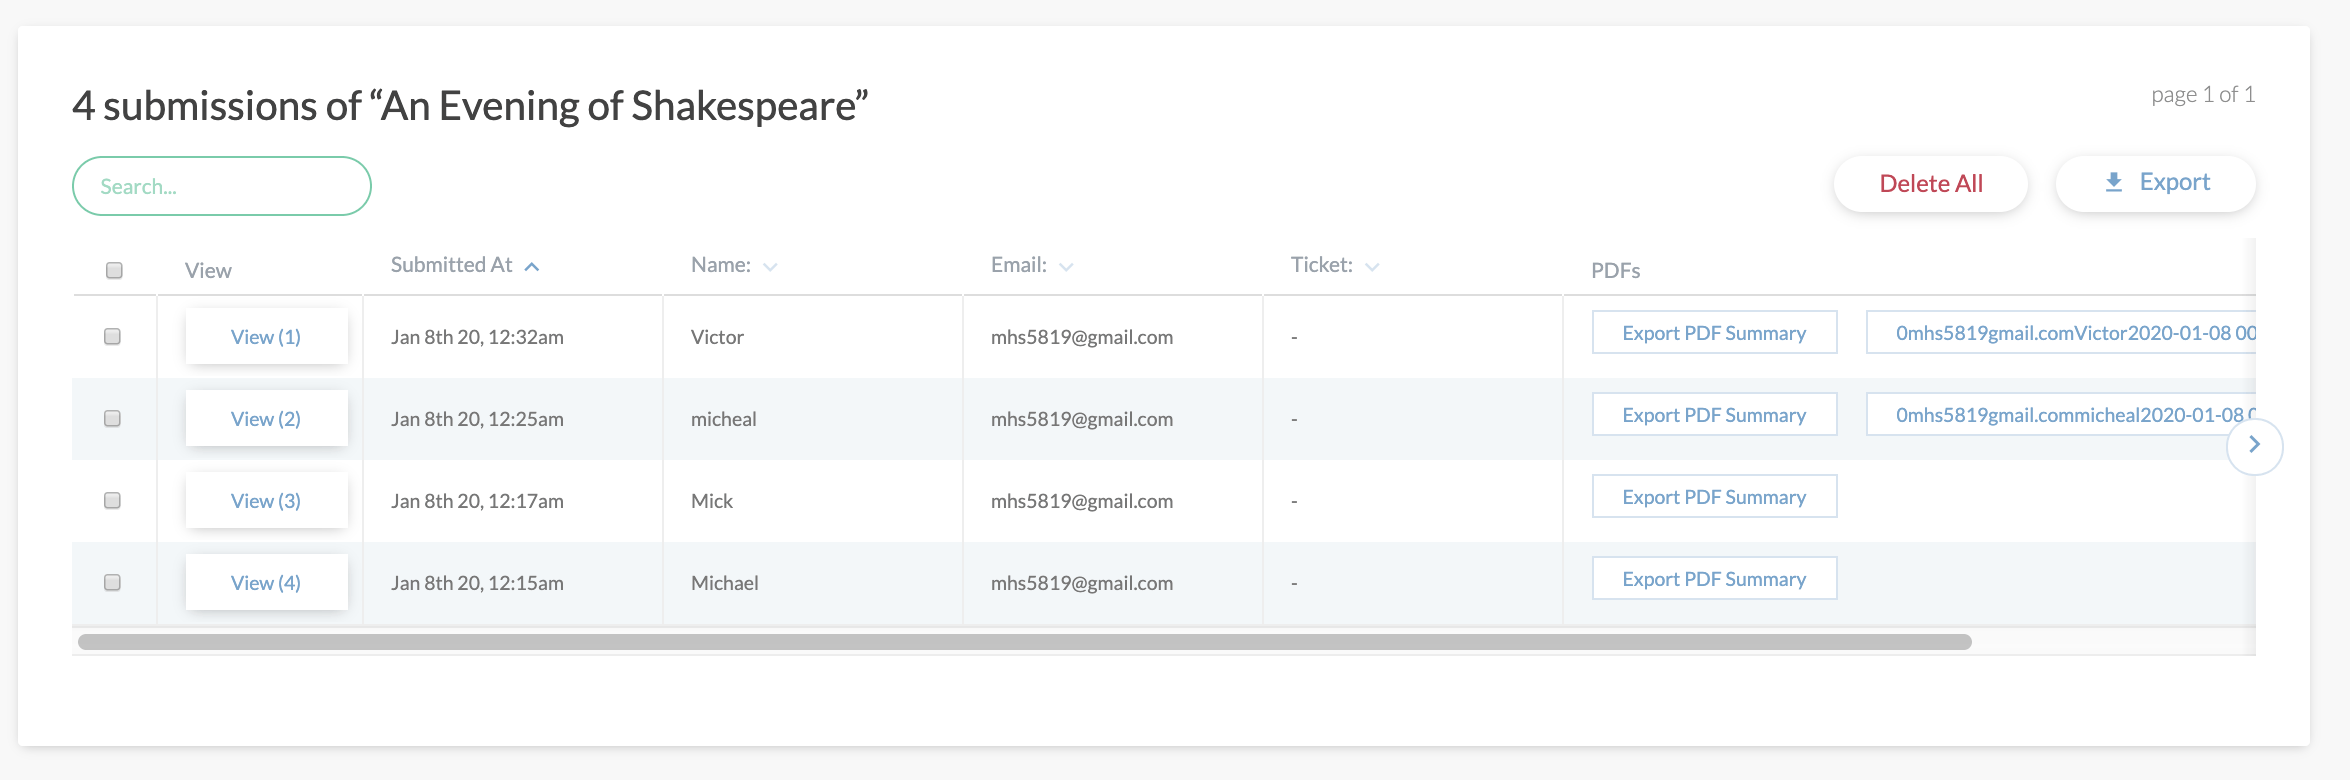
‘Submissions’ gives you the following information:
- When the form was submitted
- Name of the submitter
- Email of the submitter
- Number of products they purchased (in this case a ticket)
- PDF summary of each form submission
‘Partial submissions’ shows you the drop-off question. This is the point at which submitter abandoned the form before completion – useful for identifying questions that are causing abandonment.
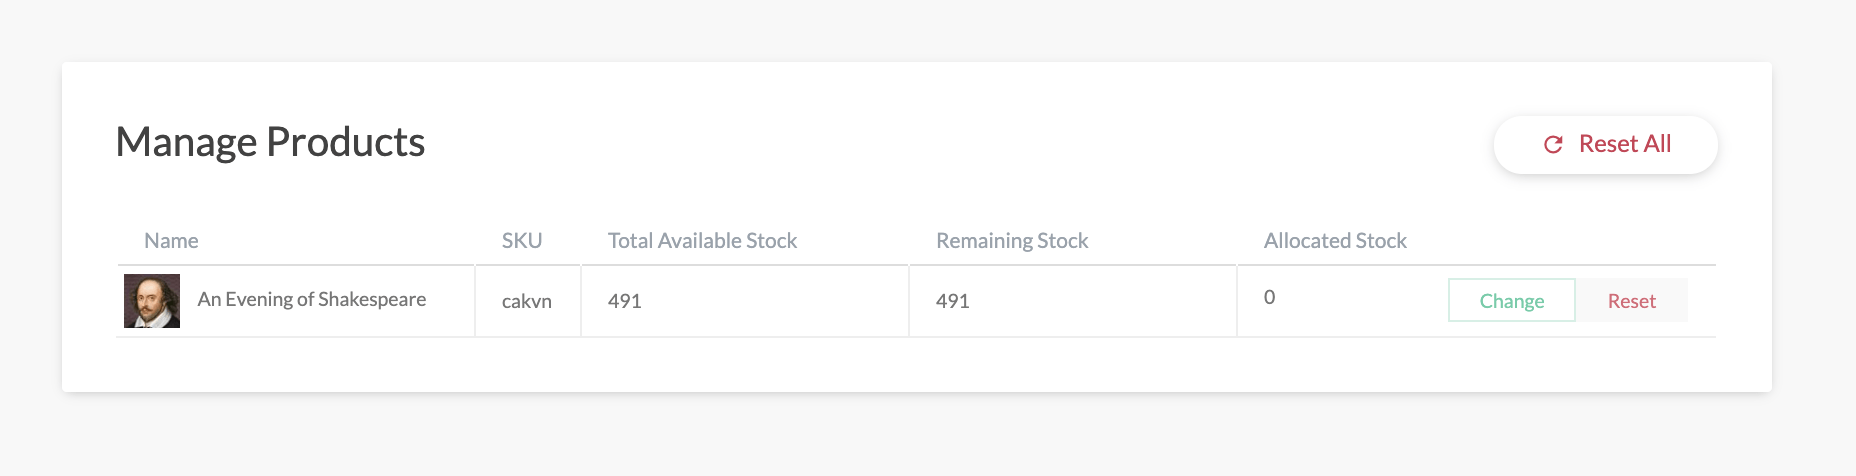
‘Products’ gives you a summary of each product in including the available stock and the remaining stock:
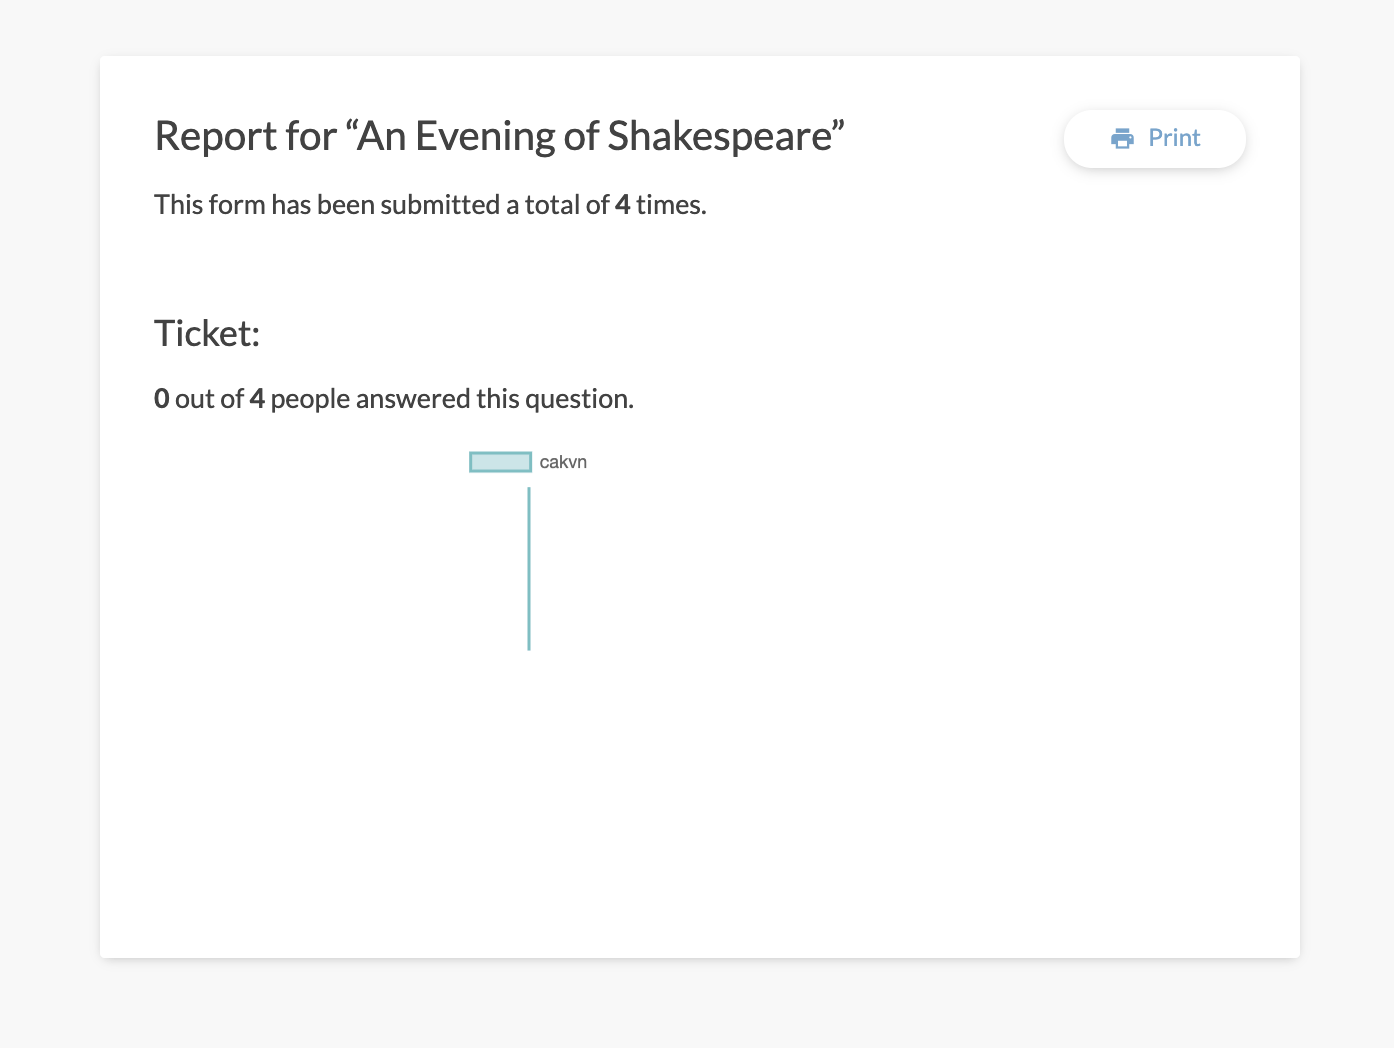
‘Report’ gives you a summary of the number of times a form has been submitted:
‘Analytics’ gives you an overview of the key metrics for each form:
- Number of viewers
- Number of views
- Number of people who started submitting the form
- Number of people who completed form submission
- Form completion rate
- Sales figures
- List of dropoff questions (i.e. questions where people abandoned the form)
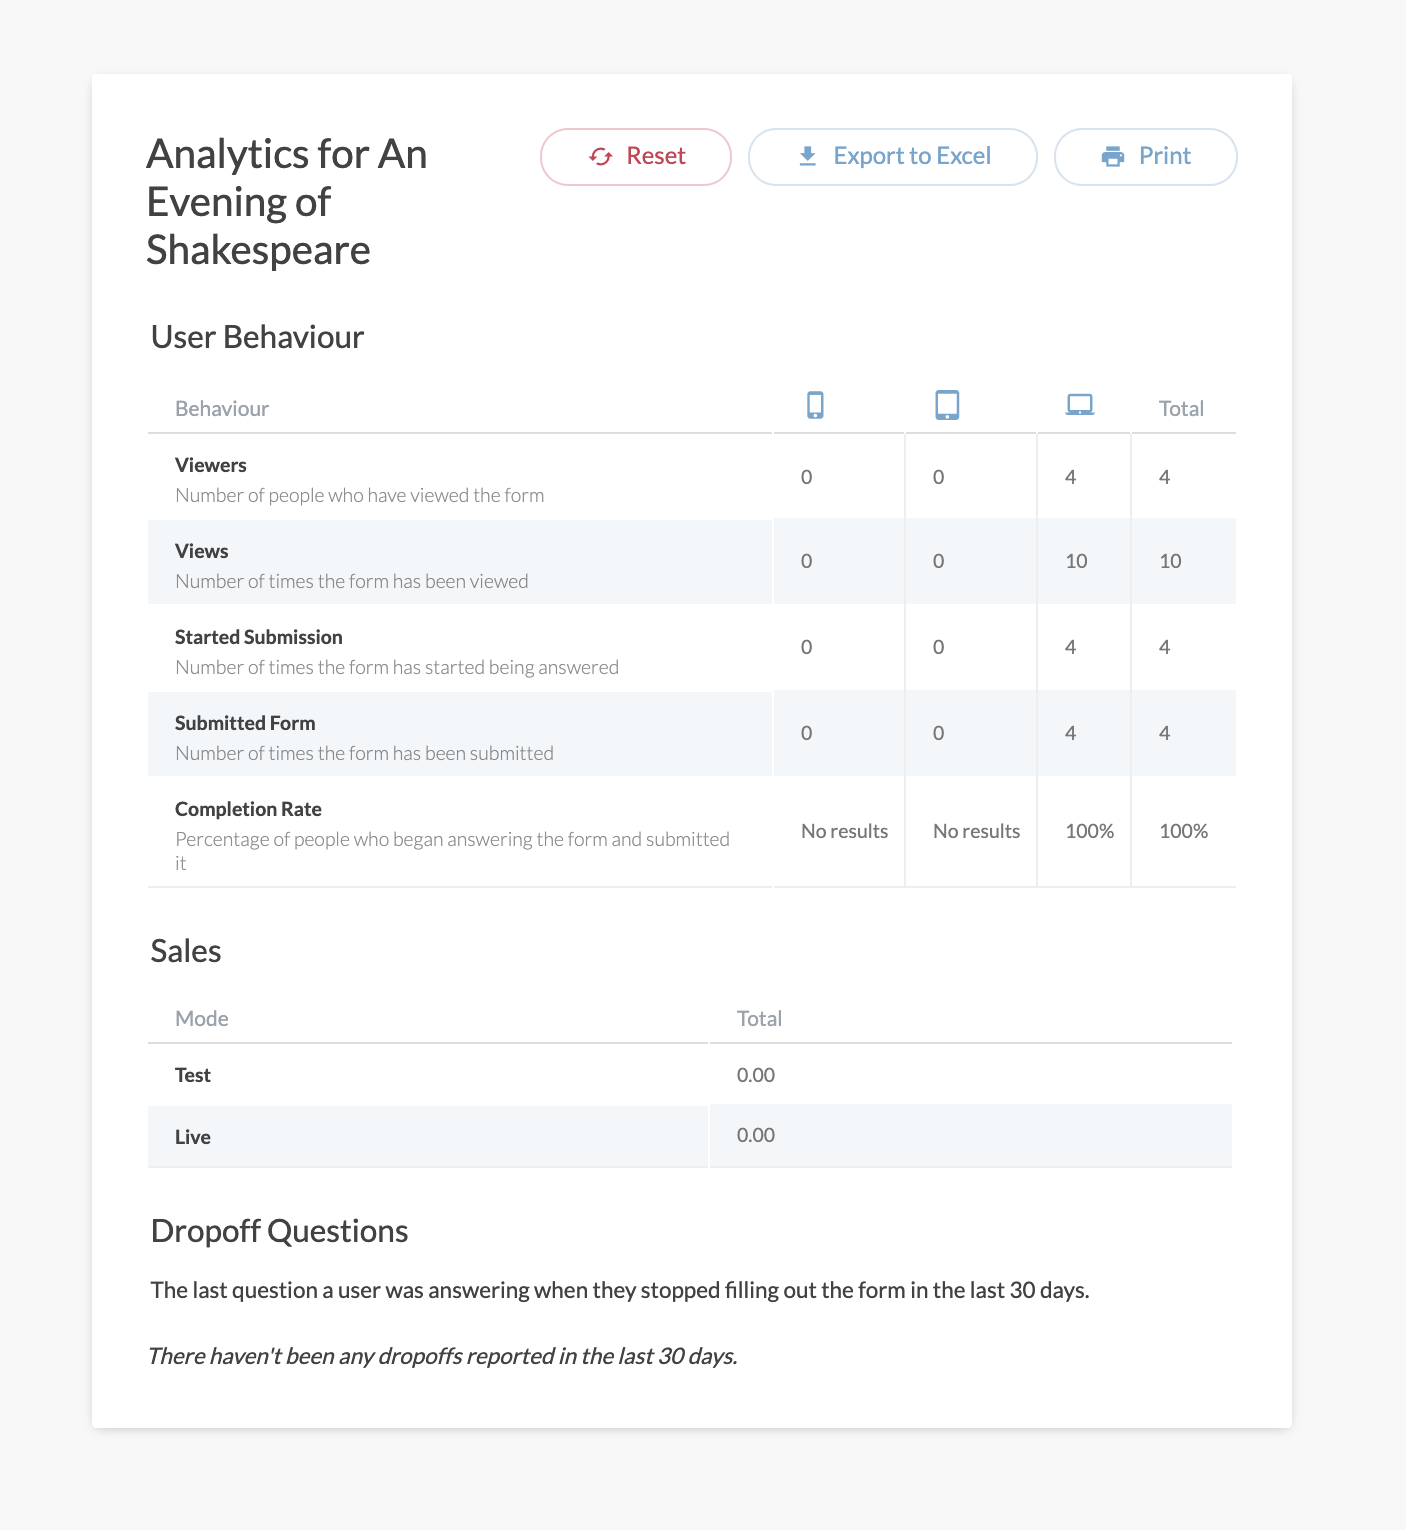
The reporting and analytics don’t offer any graphical representation of the data but overall, the metrics provided seem quite adequate.
Paperform Pricing

Paperform has the following price points for annual subscriptions:
- Essentials: $12.50 p/month
- Pro: $32.50 p/month
- Agency: $82.50 p/month
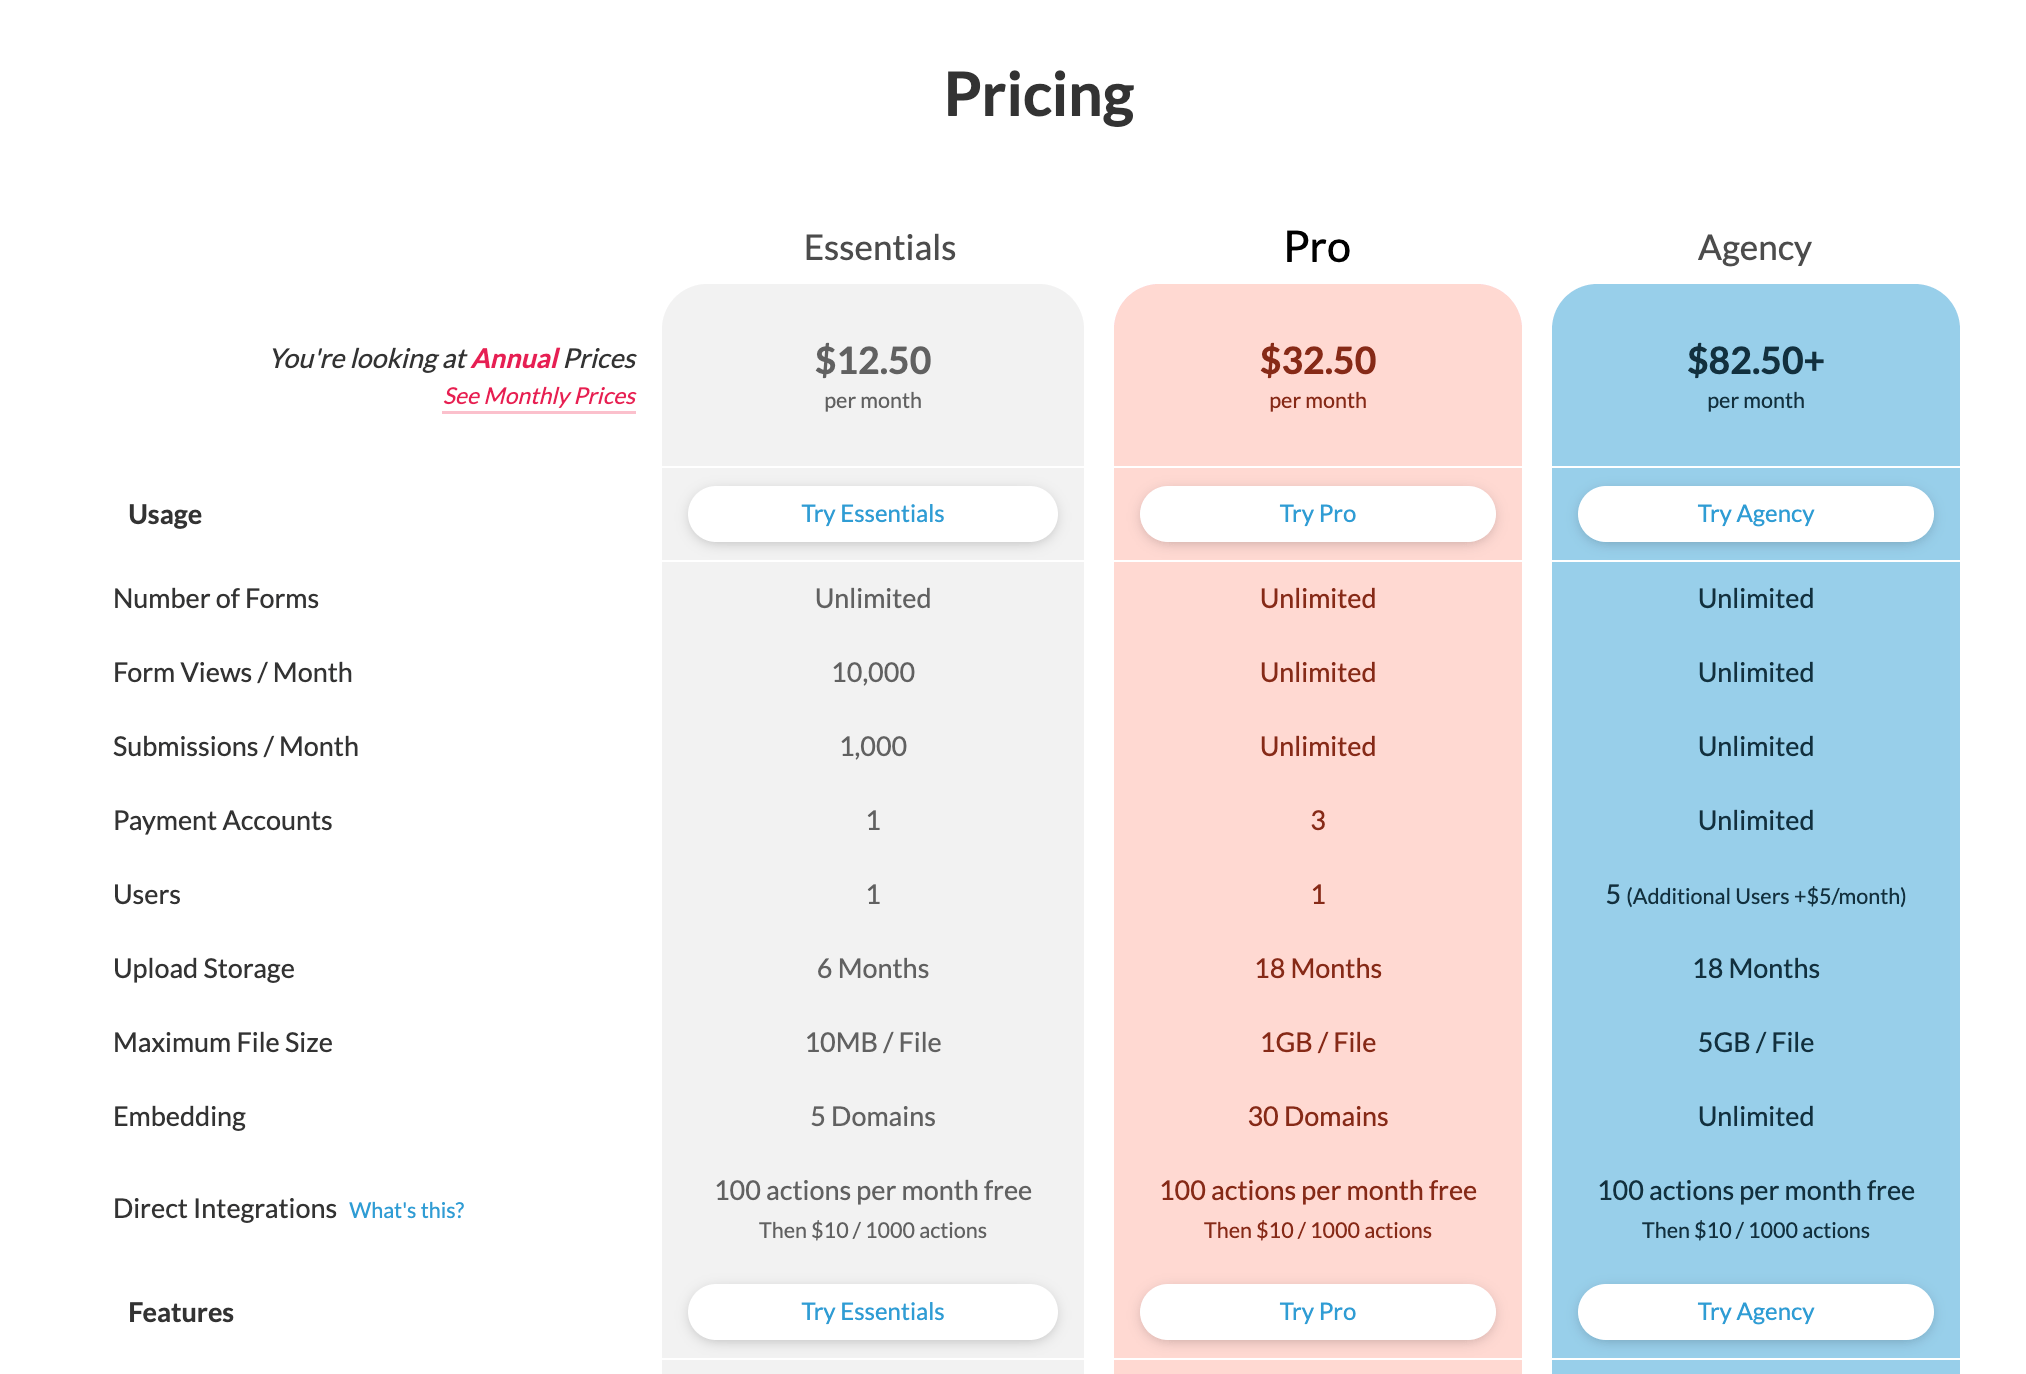
For monthly subscriptions, the price points are:
- Essentials: $15.00 p/month
- Pro: $39.00 p/month
- Agency: $99 p/month
One thing to be aware of if you‘re considering the Essentials plan is that you only get 100 ‘direct integration actions’ per month. After that, you pay an additional fee of $10 per month per 1000 actions.
A direct integration is where the submission of the form triggers an action in a third-party service such as ConvertKit, Trello, or Google Sheets.
An action is defined by Paperform as:
“a single task or effect. e.g. sending a message to Slack or adding a row to a spreadsheet. You are only charged for successful actions. Payments, emails, webhooks and Zapier are NOT direct integrations, and do not have any charge associated”.
Two things occur to me:
- 100 actions per month doesn’t seem very much (if you have a list of over 1000 subscribers, you could easily exceed that limit)
- On the other hand, an extra 1000 actions per month seems quite adequate (for an extra $10 p/month)
Support and help documentation
The help documentation is not easily discoverable from within the user interface. I found Paperform tutorials that answered my questions but only by searching in Google.
Paperform also provides help through an online chat app. I asked a question and got a response within about 15 minutes – so the support is good.
Conclusion
Paperform is a powerful online form builder that allows you to create forms to sell products, and create quizzes, questionnaires, surveys, quotes, and estimates.
Paperform has a large library of templates. You can use these templates to create forms where conditional logic is required. These include multiple-choice quiz tests and quote forms that use calculations based on area, weight, or volume.
Other types of forms in the template library include:
- Appointment forms
- Assessment forms
- Booking forms
- Client Onboarding forms
- Enrollment forms
- Event Registration forms
- Polls
- Questionnaires
- Referral forms
- Reservation forms
- Surveys
The user interface is based on floating icons that you can easily access from either left or the right side of the screen.
The dashboard needs some attention from someone with some design smarts. But don’t let the slightly clunky look deceive you: this is a powerful state-of-the-art form builder that will help you interact with your visitors in exciting new ways.
Rob specialises in helping new bloggers launch kick-ass websites and generate traffic from Google. He regularly posts high-quality, actionable strategies on SEO and traffic generation on his website, Rob Powell Biz Blog. Rob’s work has been featured in a laundry list of high-profile sites — Bustle, Ninja Outreach and Fit Small Business, to name a few.