Do you have a passion you want to share? A small business you want to get out to the world? or perhaps want to make an income while you travel the world?
(Note: assume each link in each post on my site is affiliated, meaning I will make money in some way if you purchase products through my blog or recommendation. I am attempting to make a living through this blog by sharing the companies I believe in 100% …Wish me luck!)
Blogs are not just for the “professional writer” they are for the dreamers, travellers, mothers and business owners.. People with a passion to do more of what they love.
The two versions of WordPress
As mentioned above, WordPress has two versions. The first version, WordPress.com allows you to host a website through the WordPress domain, this is called a “hosted” website.
The second version “WordPress.org” is the “self-hosted” version where you purchase your own domain and install the WordPress CMS on top of it.
You’ll want to stay away from “hosted” websites if you’re serious about building your online presence.
Let’s have a quick look at the main differences between “hosted” and “self-hosted” websites…
“Hosted” websites
Hosted websites are owned and operated by the parent site they are hosted on. Some examples of these platforms are Blogger, Tumblr and of course, WordPress.com. Typically you’ll notice a hosted blogging platform through the website address. These websites usually include the parent site in the domain name.
For example:
bengu.blogspot.com cookingfun.tumblr.com monstertruckwheels.wordpress.com
Starting a website on these platforms is super easy and straight-forward but unfortunately, the drawbacks practically make this option a non-starter for most people…
Lack of ownership – owning a hosted domain means you don’t really own your domain. Because they’re free, they’re all owned and managed by the parent website – at any point in time, they could take down your site and jeopardise all your hard work, without notice. Tight restrictions – if you’re thinking about monetizing your site through affiliate marketing, you can forget it! Most hosted blogging platforms do not allow affiliate links. Period. Unprofessional – for people looking to build a serious business, having a self-hosted blog is just not an option. It looks rather amateur having “.blogspot” at the end of your domain name. Anyone that checks out your site will know it’s a free website.
You also don’t have much choice when it comes to design. Most hosted platforms lock down their custom design features so you’ll be stuck with the basics.
Avoid avoid avoid!
“Self-hosted” websites
Self-hosting your website is taking full ownership and responsibility for your domain.
Owning a self-hosted website means you have full access to all your site files, including the servers where these files are stored.
With this type of setup, you have the freedom to decide exactly how your site is built from the ground up. And you won’t be burdened with the rules and limitations of a typical “hosted” website.
But with this freedom comes the responsibility to manage your site effectively. You’ll be in charge of things like backing up your website, keeping it up to date and troubleshooting any problems that come up.
However, many of these responsibilities can be managed fairly easily or handled by a managed hosting provider (more on that later).
So this post will be comparing Squarespace with a self-hosted WordPress website.
1. Getting A Paid Hosting Account (don’t worry this will be cheap)
The domain name of my blog is benguonline.com. That’s where people find me on the web and is the HUB of my business. Choosing a good domain can be tough. Your domain can either be your name or a branded domain like mine. Luckily, the hosting company I will recommend in step #2 provides you with a free domain for a full year and will usually only cost around $11.99 per year thereafter.
This is where your blog will “live.” This is a server in the cloud (i.e., a remote computer), where you will rent space to install the WordPress software and manage your blog. It’s far easier than it sounds… Stick with me.
There are hundreds of hosting services available. However, based on my experience and research, I recommend Bluehost. I believe it is the best option for most people for the following several reasons:
ACTION STEP: Click HERE to buy your domain and signup for hosting with Bluehost. I have provided a visual guide of the steps below.
– IMPORTANT UPDATE (March 2018) …If you don’t use the above link and just go through bluehost.com, the setup process will be much different. You will be up-sold on many different products such as e-commerce extensions after you register which are not necessary and it will not automatically install WordPress. I asked if they could make it different for my readers than they do for the general public to make it more simple and how I explain. They agreed.
When starting, use THIS LINK then follow the steps below.
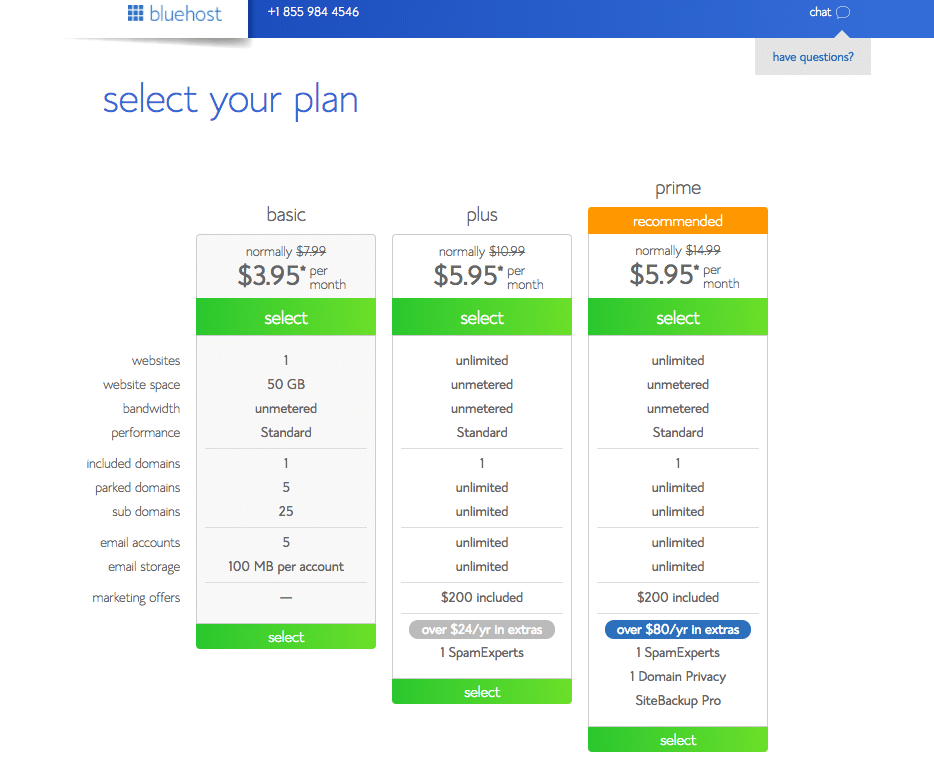
BLUEHOST STEP #2
Choose your plan. If you can afford it, I would highly suggest going with the ‘Plus’ or ‘Prime’ plan as you get unlimited storage and domain privacy (helps a lot).
If your budget is tight (I’ve certainly been there) go ahead and choose the ‘basic’ plan. You can upgrade later if needed.
BLUEHOST STEP #3
Choose your free domain name or bring over your current domain. Both are very easy processes.

BLUEHOST STEP #4
Enter your personal details.

BLUEHOST STEP #5
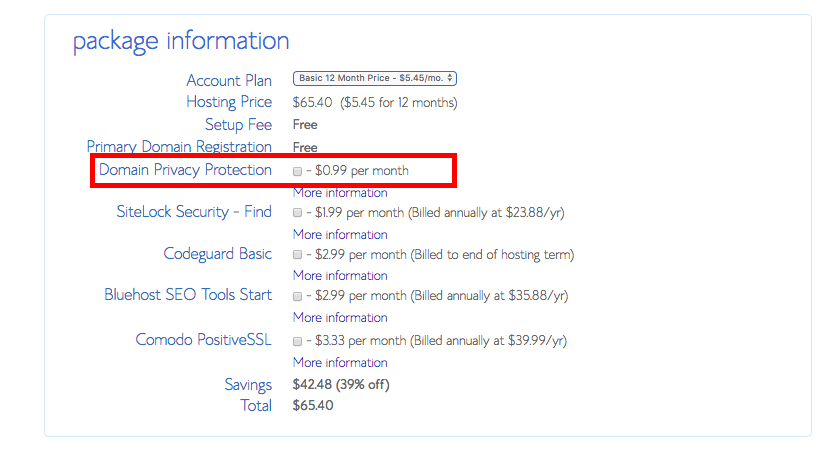
Choose your plan and any extras which are optional but not necessary. With Bluehost, you don’t pay monthly; you pay yearly, calculated by a monthly rate.
If you chose the ‘Basic’ plan, I would highly suggest getting domain privacy. This is so your personal information isn’t publicly available on the internet. It’s the only extra I recommend, the rest are pretty useless!
BLUEHOST STEP #6
Enter billing information to complete the registration.

BLUEHOST STEP #7
Now it’s time to create a password. Click the blue button which says ‘create your password’.

Type in your desired password then click the box to agree to the terms of service. Then click ‘next’.

BLUEHOST STEP #8
Click the ‘Login’ button to login to your new Bluehost account.
BLUEHOST STEP #9
Bluehost has made it super easy to install WordPress and start a blog. Pick a theme! – How you want your blog to look. This can be modified later also.

BLUEHOST STEP #10
All done! You are now ready to see your WordPress dashboard and begin building your blog. Click “Start Building”

BLUEHOST STEP #11
You should now be in your WordPress dashboard! – Let’s activate your blog. Click “Bluehost” on the top left menu.

BLUEHOST STEP #12
Click “Launch” – Don’t stress, you will not have millions of people viewing your site.

BLUEHOST STEP #13
Give your blog a title and tagline.

All Done!
You’re ready to roll. From here you can manage everything. Click “Login to WordPress” to start editing your site and making it look sexy 

In terms of themes, WordPress does provide free themes. But if none of them tickle ya fancy, you can look at some paid premium themes instead. I recommend Studiopress – They have some awesome themes!
At Studiopress, in the navigation go to “WordPress” in the upper left section of the page. Then choose your theme type and begin exploring thousands of themes. After purchasing your theme from Studiopress, you will return to your WordPress dashboard and click “Appearance” > Themes > Upload a New Theme. Here you will upload the .zip file of the theme you just purchased.
PLUGINS
One of the first things I suggest to do is to install some essential plugins to help with certain aspects of running your site smoothly. Here are some of the ones I use:
- Akismet: Protects your blog from spam. Trust me, you will need this!
- Contact Form 7: So readers can easily contact you via your site – The form is connected to your email account.
- Yoast SEO: Helps you optimise your content for SEO through on-page recommendations.
- Disqus comment system: Awesome comments plugin that makes your comment section look more polished and professional.
- Google XML Sitemaps: Helps search engines rank your blog better.
- Imagify: Compresses your blog images so they take up less space and speed up your site.
![]()
Congratulations! You have officially started your blog. This is only the beginning of an exciting journey for you. If you have any questions or issues please leave a comment below. I try to check my comments daily.

I’m a London-born lover of technology, obsessed with online business, passive income and the digital economy. I love learning, researching and curating the most valuable resources to save you time, money and help you discover the truth on what it actually takes to achieve your goals.
I need a free domain that is secured 100%. I’m Broke! Help! And I need help with everything. I feel so stupid!